Home Page
  Home  |  Contents  |  Forum
Print


Wind Speed and windmills explained  

By Don Brown

The following article was sent to Silicon Chip Magazine as a response to my first windmill article. Don sent me a copy and I thought it was so good I asked him if I could place it on my web site.


My congratulations to Glenn Littleford for Part 1 of his December 2004 article in Silicon Chip magazine on Windmill Generators. Like Glenn, they are a topic dear to my own heart, and I have been tinkering with them as a hobby over the last 15 years or so.


For the benefit of any of your readers inclined to experiment with windmills (wind turbines, actually), there are a few points that I have stumbled on that might be of interest.


Tip Speed Ratio
- this is the ratio between the wind speed and the turbine blade tip speed, and is the starting point for designing the turbine itself. The optimum TSR band changes with the "solidity" of the turbine disc (i.e. how many blades it has).
When operating at its design TSR, maximum power can be extracted from the wind. As the actual TSR shifts above or below its design point, the available power decreases substantially. A turbine with a single blade (and a counter weight on the other side) might be designed for a TSR of 10 to 15. As you add blades, the optimum TSR decreases, and a 3 blade turbine will work most effectively with a TSR in a band between 4 to 7. The typical multi-blade farm "windmill" pump operates at a TSR of less than one. For a 3 blade turbine with a 2 metre diameter and a TSR of 4.5 in a 5 metre per second wind, the optimum tip speed would therefore be 5 X 4.5, or 22.5 metres per second. This translates to a turbine shaft speed of 215 rpm. For a 20 metre diameter turbine, the rotational speed would be only 21.5 RPM to maintain the same TSR. These low speeds do not suit most alternators or generators and, in the case of the 20 meter turbine, would certainly require stepping up by a gearbox.
Note also that, if the wind speed doubles, then the turbine speed must double to permit maximum power to be extracted.

Power in the wind and power extraction - As a rough rule of thumb, you would require an 8 metre diameter turbine to extract 1 kilowatt of power from a 5 metre per second wind (18 kph). This assumes that the turbine is 30% efficient. According to a Mr. Betz, you can actually only extract 60% of the wind energy
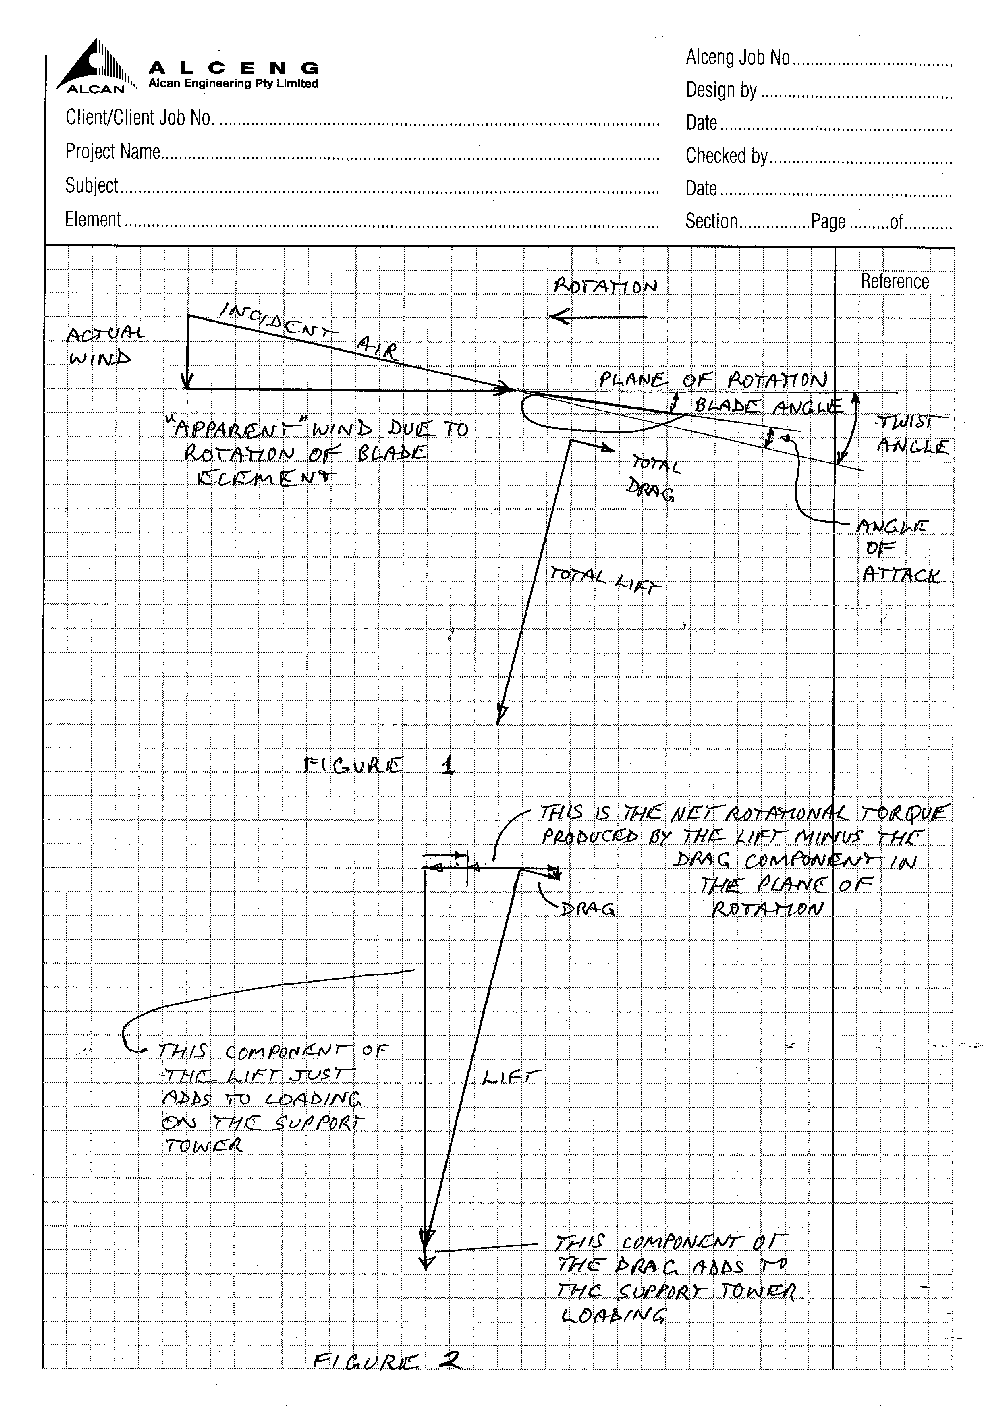
 anyway.
The power available in the wind varies as the cube of the wind speed (sorry Glenn, a point of disagreement here), and as the square of the turbine diameter. This means that, for even minor wind speed increases, there is an enormous increase in extractable energy. In most locations, though, wind speeds tend to be low, and the art with turbines focuses on extracting useful energy at the prevailing (usually low) wind speeds. Any small increase in wind speed can provide substantial power dividends so, within reason, the higher you can mount your wind turbine the better. Your local council and the neighbours may, however, not share your enthusiasm.

Blade Twist or Helix- There is a lot of science in efficient blade design, and I don't pretend great expertise. The principle of blade twist is, however, relatively simple. Air arriving at the leading edge of a turbine blade hits the blade with the speed of the wind in an axial direction, while the blade simultaneously hits the air at its circumferential speed. The circumferential speed depends on the radius of the point in question from the turbine axis, and is obviously fastest at the tip.
Considering the tip for the moment, if it is operating at its design TSR, then the air hitting the tip will do so at an angle to its rotational plane which is the angle who's cotangent is the TSR (see Figure 1). If the TSR is 4.5, then this angle is 12.5 degrees to the plane of rotation. At half the diameter, where the speed ratio is half, the angle is the cotangent of half the TSR (or, in this case, 23.9 degrees). The attached table gives the twist angles for various percentages of the radius of a three bladed turbine with a TSR of 4.5, but can be readily recalculated for other TSRs.
Note that the twist angle is not directly proportional to the radius, but follows the cotangent function. The rate of twist increases closer to the turbine axis.

Aerofoils - At high wind speeds there is so much wind power available that even bits of packing case timber set at an angle to the wind can generate power. The art is in efficiently extracting power at low wind speeds. Efficient turbines use aerofoil sections, like those used for the wings and propellors of aeroplanes.
All aerofoils can be distinguished by having a lifting side, where the air moves more quickly than on the other. The lifting side is ordinarily convex, while the other side may be identical, less convex, flat, or even concave. A turbine blade is no different to an aerofoil wing or propellor in its use of one (or several) aerofoil shapes. One essential difference though is that a turbine blade needs its lifting side away from the wind, while a propellor blade has it towards the direction of travel.
One of the things which distinguishes one aerofoil shape from another is its lift to drag (L/D) ratio. Lift is the force exerted at right angles to the incident air, while the drag force is in the same direction as the incident air. Really excellent aerofoils can produce a lift force of around 100 to 150 times the drag force, although values of around 20 are more readily achievable.

Attainment of high orders of L/D ratio are very much dependent on accurate reproduction of the aerofoil design, and a very high standard of finish. There are dozens (hundreds, probably) of aerofoil sections that have been developed by bodies such as NACA (now NASA), and their development is a science in itself.
A table enabling the venerable NACA Clark Y aerofoil to be set out is attached (Table 1). Being essentially flat on the lower face, the Clark Y is a relatively simple shape to reproduce, and has been used for many aeroplane propellors.
It is, however, by no means the ultimate wind turbine aerofoil. Its low L/D of about 20 needs a TSR at the lower end of the band (which is why 4.5 has been used as the example value) and lowers the turbine efficiency. The aerofoils of most interest to wind turbine blade experimenters chasing higher L/D ratios and hence efficiency tend to come from the lower speed end of the range, as developed for model aeroplanes. This is to do with having a similar Reynolds Number, to the turbine operating conditions (for those interested in following up the matter).
Erosion, or an accumulation of lumps from insects (particularly over the first third of the lifting surface), spoils the air-flow, and substantially lowers the L/D ratio. Glenn's comments on the need for initial and ongoing attention to this matter should be noted.

Angle of Attack. The angle between the incident air and the aerofoil chord (line between the leading and trailing edges) is called the Angle of Attack. As a rule of thumb, the highest lift is developed at an angle of attack of about 10 to 12 degrees to the incident air. The point of stall, where the air flow detatches from the lifting side and the lift collapses, occurs at an angle of about 16 degrees. The AA that provides the highest Lift to Drag ratio is the angle of most interest to aeroplane designers, and occurs somewhere between 0 to 4 degrees, depending upon the aerofoil selected.
Wind turbine designers are primarily interested only in the component of the lift that provides torque in the plane of rotation of the turbine, and may select a higher AA to get more lift. The component of lift acting in the same direction as the actual wind only serves to load up the support tower (see Figure 2), so turbine and aeroplane designers have different views on lift.

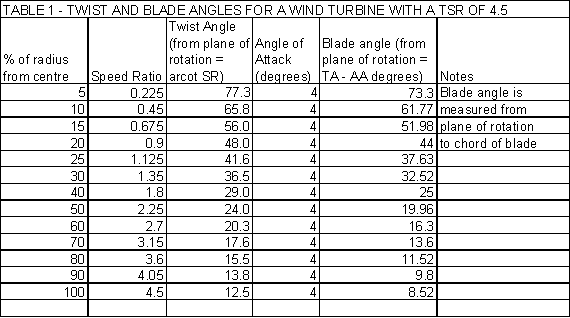
Turbine Blade Angle - For best efficiency, a turbine blade needs to be set at the twist angle minus the desired angle of attack (i.e. the blade angle - see Figure 1). Suggested blade angles for a percentage of blade radii for a typical three-blade turbine with a TSR of 4.5 are given in the Table 2. This is based on an arbitrarily selected AA of 4 degrees, but this can be the subject of some experimentation (in association with different aerofoils). The AA does not need to be constant for all of the blade length (nor does the aerofoil section), and this is a fertile area for the experimenter to research.
It is interesting to note that, if the blade was being designed as a propellor, the angle of attack would be added to the twist angle. This is because, for a propellor, the concave side of the aerofoil is on the opposite side to that for a turbine blade. Thus, while a propellor with something like the right tip blade angle might be pressed into service for a wind turbine, it is not really designed for this task, and will not extract wind power as efficiently (unless designed with an AA of zero).
It should be noted that some studies have shown that it is possible to achieve good wind turbine blade performance without twisting the inner part of the blade, due to a phenomenon described as "stall delay". What this means is that the inner portion of the blade has been found to be contributing useful torque, even though the angle of attack to the theoretical incident air exceeds 16 degrees. This is probably due to the more complex air flows associated turbine blades, which wing theory does not accommodate.
While an untwisted blade would be simpler to set out, it will certainly be less inclined to self-start (see below), and may not be worth the trade-off.

Blade taper and thickness - There are both aerodynamic and mechanical reasons for tapering the blade (ie reducing the width) towards the tip. Both relate to square law effects. As the width (chord) decreases, the thickness needs to reduce at least in proportion.
The lift generated by any element of a turbine blade is proportional to the chord, and the square of the incident air velocity. If the width, or chord, remained constant, then the blade tip would develop four times the lift of the centre of the blade, and might bend.
The force tending to cause parts of the blades to break off is also proportional to the square of the rotational speed. If the mass of the blade tip is lower, then the inner parts of the blades do not need to be as strong.
In addition to tapering the blade chord towards the tip, blade thickness (perpendicular to the chord) is generally increased towards the centre. This does not have much adverse aerodynamic effect, but certainly creates stronger blade sections towards the root.

Overspeed and blade forces - Because of the huge increase in wind power as the speed increases, wind turbines can spin to destruction even if loaded to the maximum extent capable from the alternator. As noted above, the force trying to rip the blades out of the hub increases with the square of the rotational speed. To put some dimension to this, a 2 metre diameter blade weighing 4kg and rotating at 1,200 RPM develops a centrifugal force of about 3 tonnes. Even if only part of a blade breaks off, the resulting out of balance rotation of what remains will quickly destroy the
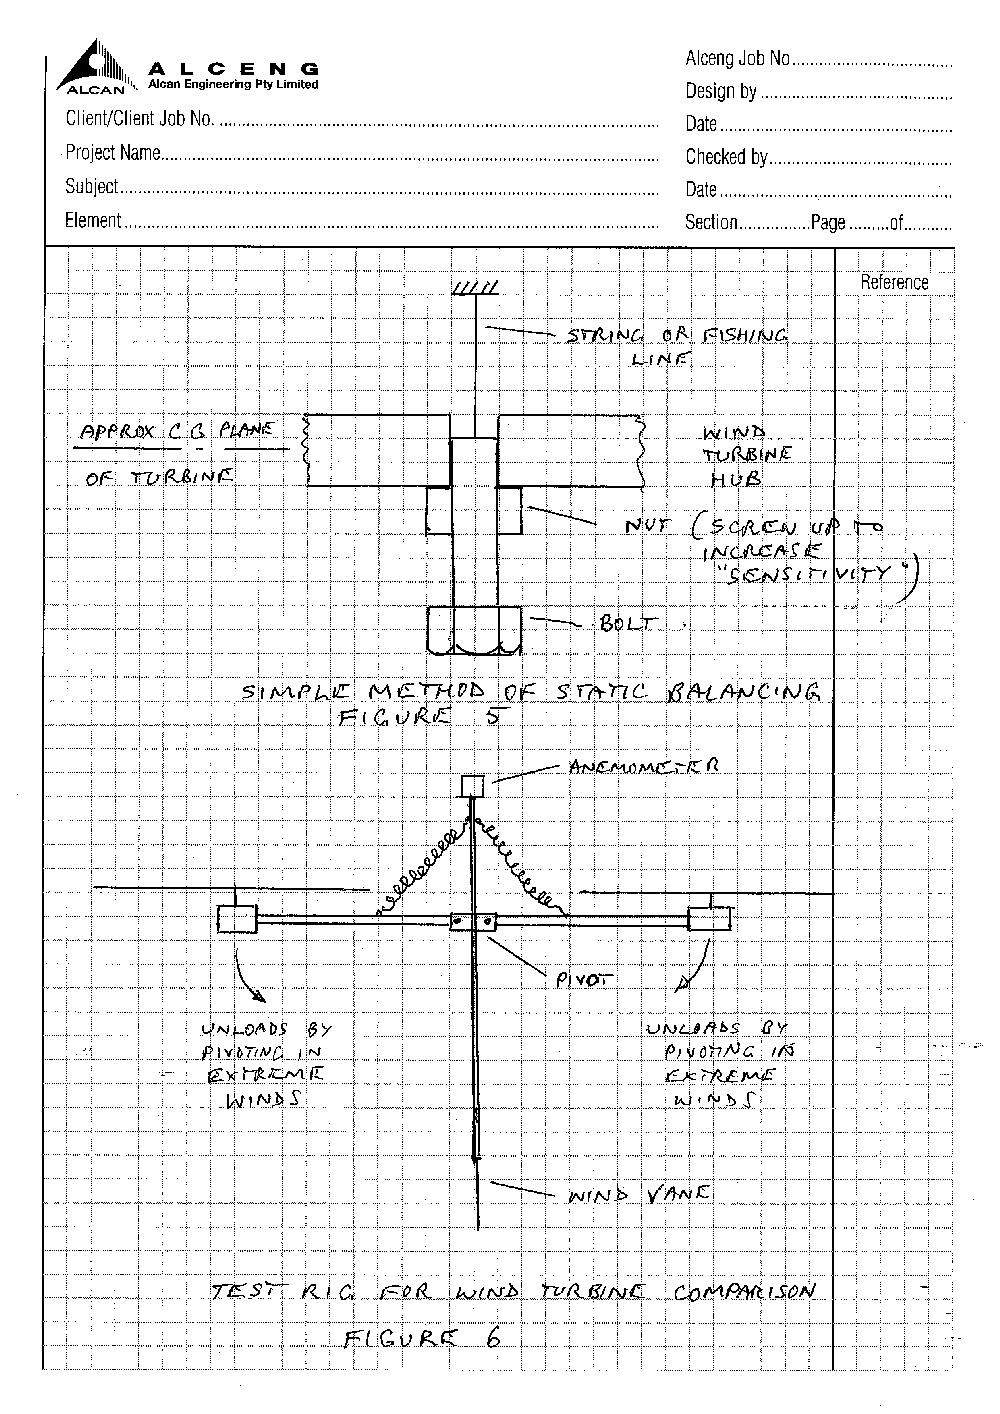
 generator and support structure,
This is an argument for keeping the blades as light as possible, yet strong. Wood (particularly the less dense but straight grained type) is still a very suitable choice for this. You probably can't get into too much trouble with a turbine of up to a metre or so in diameter, but don't go for broke regarding size till you get some experience with smaller ones, or you might do just that.
Some wind turbines use pitch changing or wind spill techniques to safeguard the blades, while others rely on brakes, or strength, or mutual air disturbance by the blades to limit the ultimate rotational speed. Even a piece of rope hanging from the wind vane can permit the turbine to be turned out of the wind if all else fails.
As someone who has been there, my strong advice is, don't expose your turbine to the wind until you have a way of stopping it when you need to.

Balance - Because of the substantial centrifugal forces that can develop, the turbine must be well balanced. The simplest way to do this is to take a nut and bolt of the same diameter as the turbine shaft, and to drill a small hole through the exact centre of the bolt. A piece of string or fishing line is then fed through the hole, and the turbine is suspended with the blade horizontal.
The nut is then used as the "sensitivity" setting (Figure 5)
The closer the top of the bolt comes to the centre of gravity of the turbine, the more sensitive the balance adjustment becomes. Pieces of paper can be used as test weights to verify that accurate balance has been achieved. Pick somewhere free of drafts to check the balance

Blade attachments - Don't forget that the most highly stressed part of a turbine blade will be the root and its attachment point to the hub. This presents some challenges for a 3 bladed prop. Be particularly careful to avoid abrupt section changes or other stress raisers such as holes in this area. Remember also that the centrifugal forces produced by one blade are balanced by the other two, and the hub design must provide adequate material section for the transfer of these forces.

Fatigue - Because of pressure changes due to wind masking by, say, the support tower, each rotation of the turbine produces stress changes which can lead to ultimate fatigue failure in some materials - notably aluminium. The wind turbine has been described as a very good fatigue generator, in addition to anything useful that it might do, so keep up the inspections.

Rotational Hazard - Just like aeroplane propellors, rotating wind turbines are dangerous, and must be treated with caution. This is especially so in an over-speed condition, where anything breaking off becomes a dangerous missile. The apparently slow rotating turbines in a wind farm kill birds, who apparently do not realise that the tips are travelling at 5 or 6 times wind speed.

Starting - When the turbine is stationary, the blades are in a deeply stalled condition, and require a significantly higher wind speed that the minimum generating wind speed to start rotating. This results in lost power generating opportunities, and some generator controllers include a "bump" facility to kick start rotation. Even a push helps.

Vibration and Noise - Turbines driving a single phase alternator are inherently noisy. The situation 
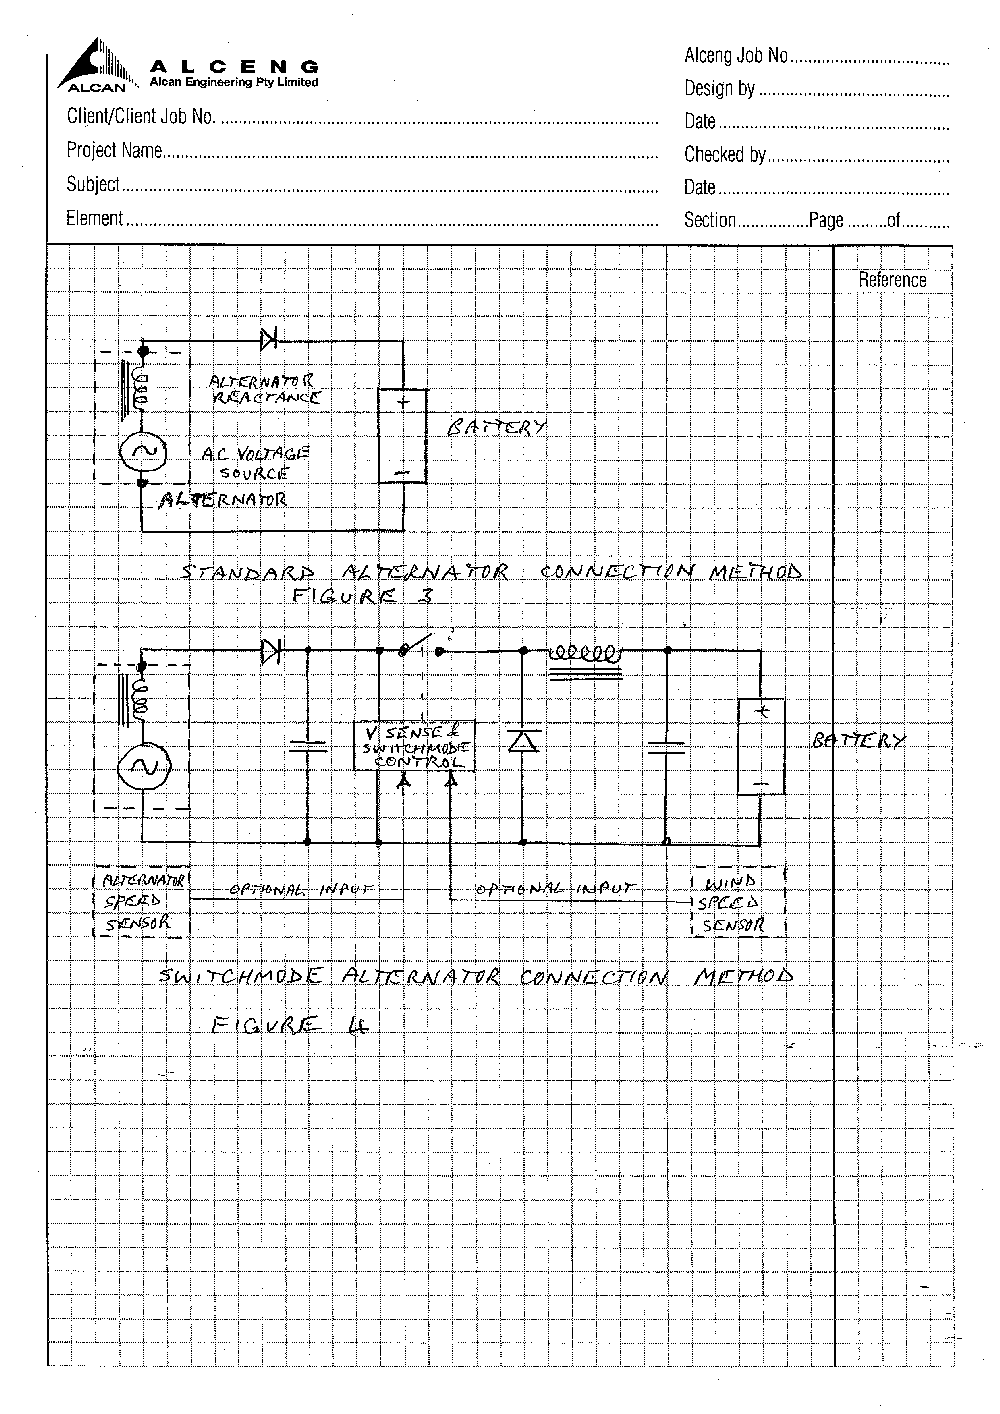
is much improved with a multi-phase alternator.
The blade tips can also generate noise, and some boat wind generators are notorious for this effect. The answer probably lies in an improved tip design, but I have no suggestions to offer.
Proper balance of the turbine is also necessary to minimise noise. Resonances in the support structure can occur, and can be remedied by stiffening.

Conventional charging circuitry - A typical wind turbine alternator connects to a (bridge) rectifier, which then connects to the battery under charge (Figure 3). Note that current can only flow from the alternator to the turbine once its terminal voltage exceeds that of the battery voltage, plus the diode bridge forward voltage drop. The current waveform is therefore unlikely to be a clean sinusoid, and some harmonics will be generated.
To minimise losses in the diodes, these should be of the Shottky type with the lowest available forward voltage drop (so long as they operate within their reverse voltage rating).

Conventional charging circuit shortcomings - As noted above, for the turbine to operate at maximum efficiency, it must run at or near its design TSR. This requires that its turbine speed must linearly follow the wind speed. For alternators with fixed excitation, the no-load voltage will be proportional to shaft speed.
The problem is that, with conventional circuitry, the alternator is more or less locked to the battery voltage, and the turbine will generally be operating below optimum speed as a consequence.

Switchmode charging circuit - In Figure 4, the alternator is connected via a switchmode charging circuit, which can let the alternator operate at voltages significantly above the battery voltage. The switchmode circuit works by connecting the alternator DC output voltage to the battery for a brief period. The current that flows is limited by the inductor, which also stores energy in the form of a magnetic field. When the switch opens, the polarity of the voltage of the inductance reverses, and current flow is maintained through the battery and the Shottky diode while the magnetic field dissipates.
The current burst flowing into the battery is thus longer than the current burst from the alternator side, while the voltage is lower. As very little energy is lost in this process, over a burst cycle, power in effectively equals power out, and the system works as a DC transformer.
This permits the alternator to operate at a higher voltage consistent with a higher turbine speed.

Open Loop Control - The switchmode controller can be programmed to continually make an incremental change to the alternator side voltage reference (ie shorten the burst time to increase the alternator voltage level), pause, and see if the current delivered to the battery increases. If it does, then it makes a further incremental change, pauses, and again checks the current. Should the battery current reduce, it will decrement the voltage reference.
Using this technique, the maximum power available from the alternator under any wind conditions can be tracked by letting its output voltage (and hence turbine speed) rise or fall to its optimum level. It should be pointed out that the wind is never constant, so that the alternator side voltage is always changing anyway.
I have built these controllers using analogue circuitry, and have an unfinished one using a micro-controller. One day .....

Closed Loop Control - If the alternator speed and the undisturbed wind speed are known, then the controller can be set to maintain a constant ratio between the two. If the wind should increase, the controller would shift to a higher reference voltage consistent with the expected higher turbine speed, thus unloading the turbine and assisting it to accelerate to its expected speed.
If the wind speed drops, the voltage reference would lower, loading up the turbine and recovering energy from it while it slows to its new, more appropriate speed.

Wind Speed Sensing - Although it has since sucumbed to the effects of UV and birds, I made a very serviceable cup type anemometer out of three Andronicus coffee measuring spoons. These drove an optical encoder built into the case of a small DC motor shell with the magnetics and brushes removed. I first tried a magnetic sensor, but found that even the small cogging from the magnet interferred with the operation.
Cup type anemometers are great because their wind speed characteristics are linear, and their rotational speed is close to the wind speed divided by the radius to the cup centre. This being said, a reasonable size two bladed turbine driving an unloaded DC motor used as a generator can serve satisfactorily and with linear voltage output as long as it starts before the power turbine. This will, of course, require a pivot and a wind vane.
Note that the air stream upstream and particularly downstream of the turbine is affected by the turbine itself. Air-speed sensing needs to be at least 1.5 diameters ahead or to the side of the turbine.

Alternator speed sensing - The simplest way to do this is to set up a pulse counter to monitor the alternator output frequency.

How much better? - As the wind is always changing, it is difficult to measure the extent of any improvements that you think that you have made unless you have access to a wind tunnel. The solution is to have two units identical in every respect except for the feature that you are testing. By mounting them on a common pivoting support and exposing them to an airflow that is as undisturbed as possible, they should see more or less the same air-flow.
By measuring the amp-hours output from each into a common load, the benefit of any enhancement can soon be checked. Using the amp-hours check with no enhancements fitted will also establish whether there is any difference before you start testing.
By mounting two alternators on a common T shaped pivoting bracket it is also possible to pivot and spring load them such that they will automatically unload themselves in strong winds (refer Figure 6).

Alternator suitability - This is the point where I am looking forward to Glenn's next article.
As noted above, a 2 metre diameter turbine has a design speed of about 230 to 300 RPM in a 5 metre/sec wind (depending on its TSR). With this diameter turbine, at this wind speed, it should be possible to recover 60W (or send 5 Amps into a 12 volt battery). While it is certainly possible to design an alternator that will do this, at this shaft speed, most of the off the shelf devices would require a step-up gearbox, or similar. Generally, a larger diameter alternator is needed to produce useful power at low shaft speeds.
If the turbine diameter was reduced to 1 metre, then the shaft could turn at 460 to 600RPM, which is just getting into the ball-park. Unfortunately, though, the power extraction capability drops to 15W (square law on the turbine diameter, remember)?
Like the turbine blade itself, producing a low speed alternator to output, say, 5A at 14V at 300RPM is more fertile ground for experimenters.

I hope that the above observations provide a little additional interest for your readers in conjunction with Glenn's articles, and may, perhaps, elicit some comments from others. Wind turbines (OK, I confess to calling them windmills too - even though they don't produce flour) are great things to experiment with - especially when you have an understanding of the basics. There is always a fascination with getting something for nothing from the wind or the sun.
I would also point out that there is a wealth of information out there on wind turbine design. Particularly recommended grounding is The Wind Power Book by J Park (Cheshire Books).

Incidentally, I have been reading and enjoying your magazine and its forebears since the days of "Radio and Hobbies" magazine, which probably gives my age away somewhat.

Keep up the good work.

Regards

Don Brown
Beachmere, Queensland

© TheBackShed 2011