
|
|
Forum Index : Microcontroller and PC projects : CMM2: Two CPU's, One case
| Author | Message | ||||
| PeteCotton Guru Joined: 13/08/2020 Location: CanadaPosts: 633 |
For a recent project I needed two CMM2's being programmed side by side. Switching between two keyboards and mice was getting mighty tiring. So I experimented with using a four pole - double throw switch to switch the USB ports of two CMM2s. It works great for the keyboard. The mouse works, but you have to restart the program or editor for it to pick up the mouse (not a big deal). Full disclosure - this build almost cost me my sanity. I do love the case, but cramming two CMM2s and all of the wiring to switch the mouse/keyboard, plus the wiring for the video/audio out and separate power switches, all make the insides of this machine absolute chaos. I will refine it, and build it again, but the next machine will only have a single CMM2 inside it and will be much cleaner. 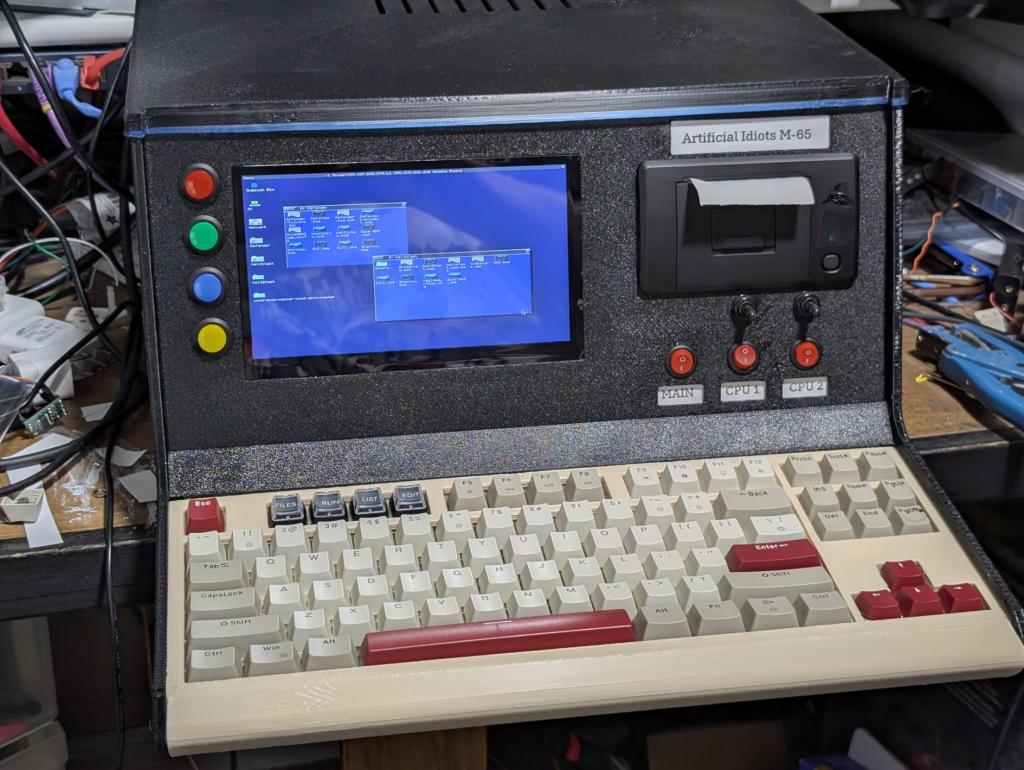 I wired three separate power switches (shown below). The main switch controls all power (printer, display, speakers, and both processors) and then each of the CPUs has it's own power, so I can easily reboot one or other. Just above the power switches are the two toggle switches that allow me to toggle the keyboard and/or mouse between CPU 1 and CPU 2. I did original use two position switches, but got concerned that for a split second during the switch I was connecting both +5 volt lines together. So, these are now three position switches, with the center position being all terminals disconnected. 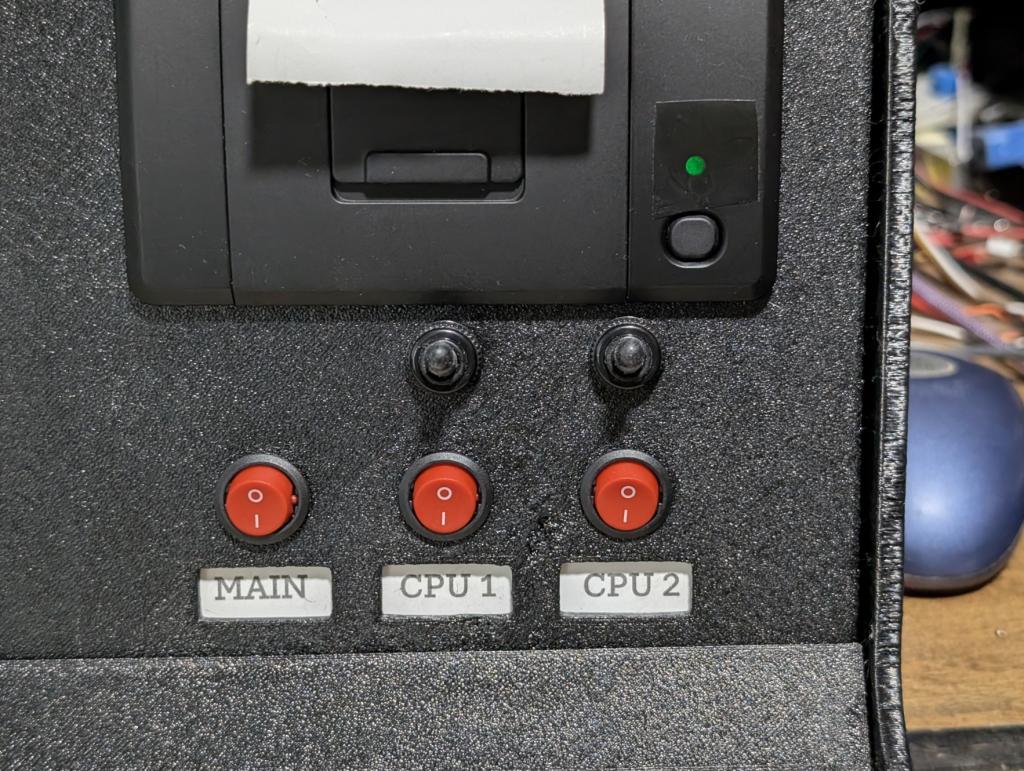 Incidentally, note the black tape over the printer power LED in the picture above. This LED glows with the power of a million suns and is very distracting. Even with the black tape on - it's still easily visible. Around the back of the unit (pictured below) we have DC power input, VGA out (from CPU 2), mouse USB port, 3.5mm audio out (from CPU 2) and an optional USB-C connector for connecting to my PC. Because the USB-C goes to a powered hub, when I plug my PC into this, both CMM2s appear as separate COM ports that I can blow programs down to. 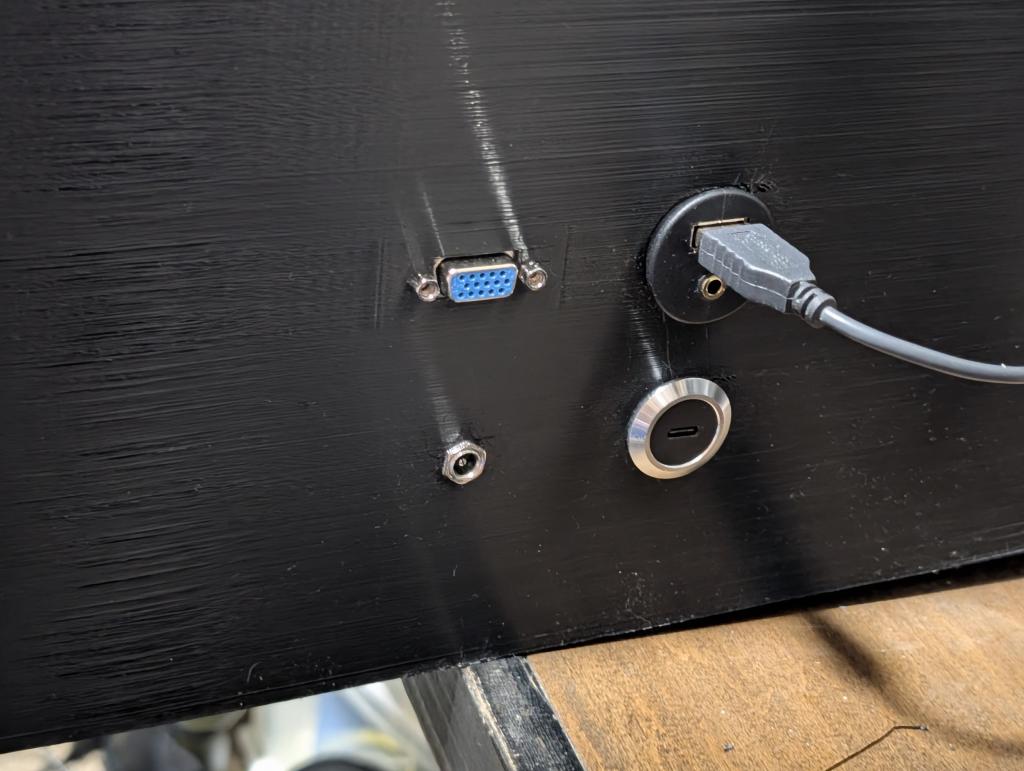 The second CMM2 connects to an external monitor (shown below). This is the setup I'm using for programming them both currently, and it's working great.  The printer is powered, but neither it nor the 4 coloured menu buttons on the left of the screen are connected to I/O yet. I have a 40 pin terminal block coming tomorrow that I will use for that. Here's a build picture before the mass of wires was installed. 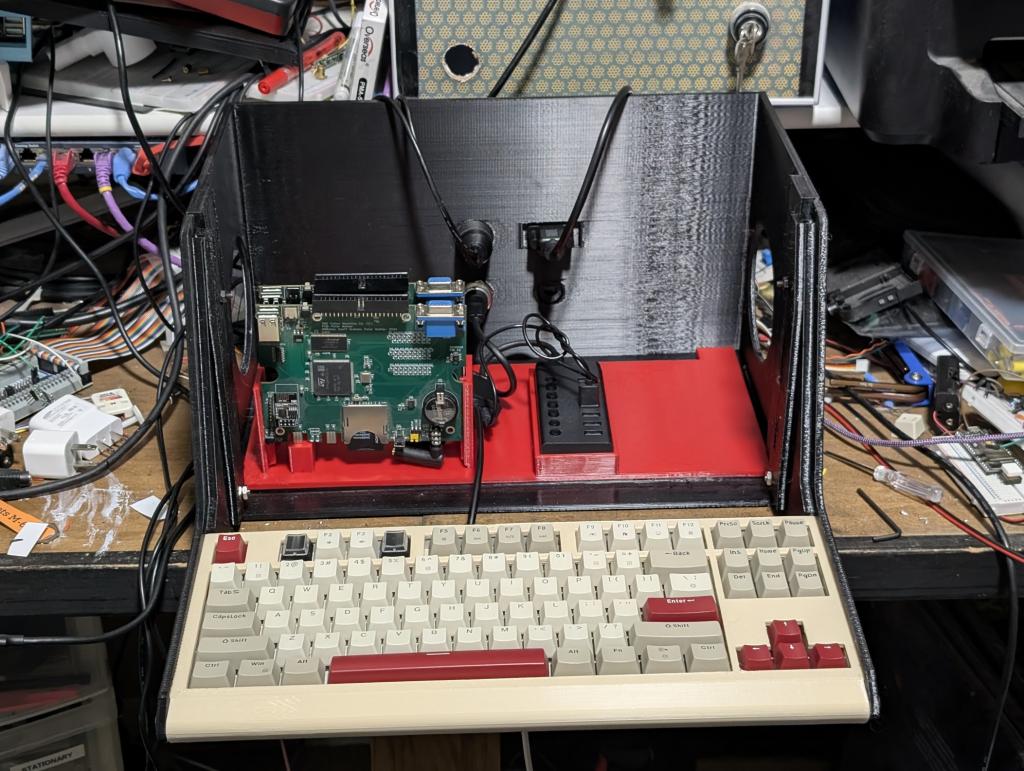 And here's the keyboard/mouse switcher (pictured below). 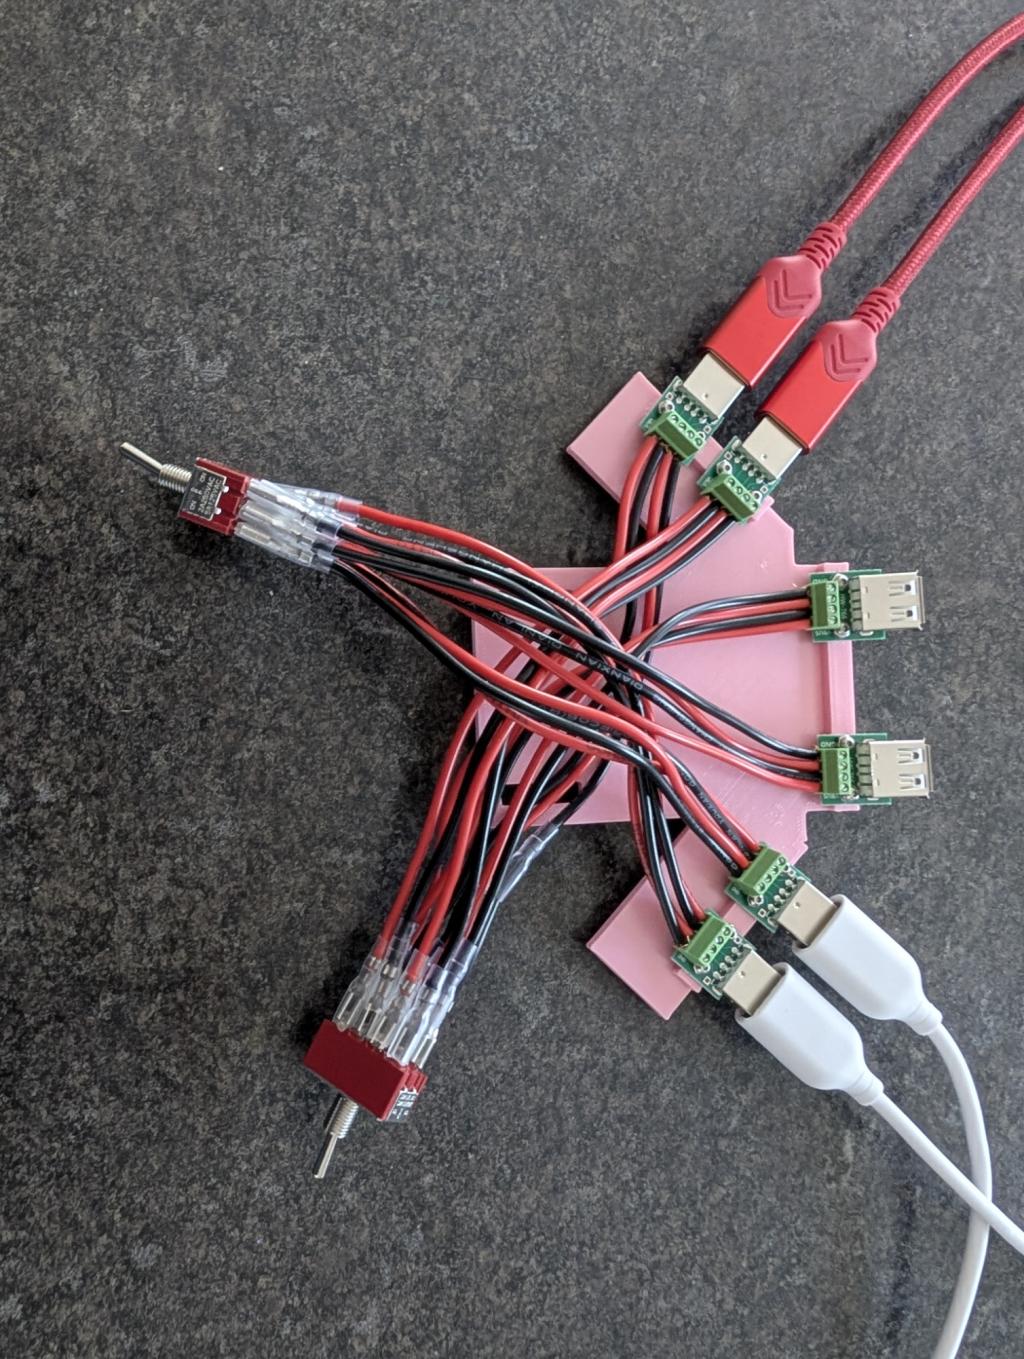 I absolutely love this case. It works brilliant and is rock solid. I took design inspirations from the old HP-85 computer, although the name is a pun on the Rockwell AIM-65 machine. It is by no means ready for people to just dive in and print, but the files are here if anyone wants to much around with them and try and work out how it all goes together. You'll need a 420mmx420mm print bed. CompCase2.zip  The weird shaped bit at the top left is the mount for my speakers. So you'll probably want to design your own. The keyboard I used was this: https://www.amazon.ca/dp/B0CP9C7QP6? This was the printer, but I haven't got it working yet: https://www.amazon.ca/dp/B0969ZLSF7 And finally, I used custom keycaps for the F1-F4 buttons. 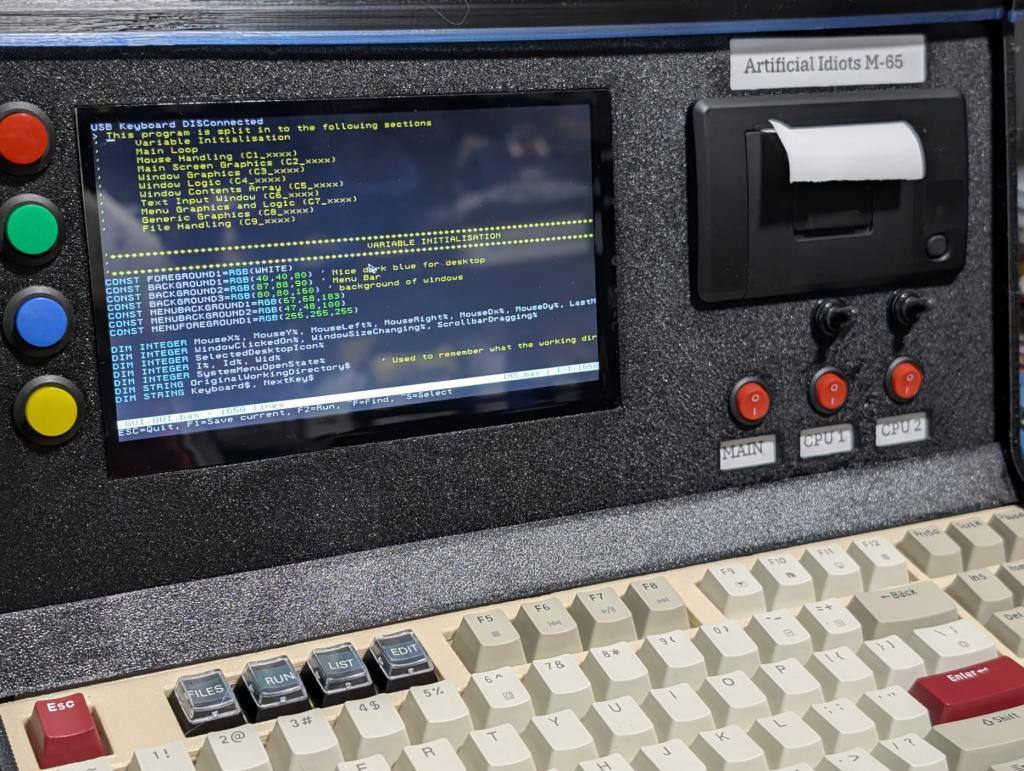 Edited 2026-06-23 13:51 by PeteCotton |
||||
| panky Guru Joined: 02/10/2012 Location: AustraliaPosts: 1128 |
An absolutely amazing project!! Just as an aside (and surely, you could jam some more inside  ) could a pico be used as a keyboard/mouse switcher? ) could a pico be used as a keyboard/mouse switcher?Again, fantastic job, Doug. ... almost all of the Maximites, the MicromMites, the MM Extremes, the ArmMites, the PicoMite and loving it! |
||||
| BarryH Regular Member Joined: 05/01/2025 Location: AustraliaPosts: 46 |
Great project Pete. Thanks for the detail BarryH |
||||
Grogster Admin Group Joined: 31/12/2012 Location: New ZealandPosts: 9977 |
Very sexy indeed.   Nice work there!    "Artificial Idiots" - I love that!    Edited 2026-06-23 15:48 by Grogster Smoke makes things work. When the smoke gets out, it stops! |
||||
| PeteCotton Guru Joined: 13/08/2020 Location: CanadaPosts: 633 |
Thank you all for the kind words. I would imagine so. I did think about using one of the Teensy 4.1 chips I have kicking about. But it was one of those "can I just switch all 4 USB wires?" sort of thoughts, that just made me start experimenting. If the story ended there it would have been fine. But I'm stupid - and got obsessed with the HP-85 design. So now there's a thermal printer in it, just like the HP-85. If I had been smart, I would just have designed a two processor case, with just the keyboard/mouse switcher and two external monitors. I definitely shouldn't have included the two speakers, or the menu buttons. Sometimes, my biggest problem is that I just don't know where to stop.  If I was to do it again, I would have a simple, two processor rack for my project, and a separate single processor HP-85 case with the menu buttons, printer and speakers. I will fix up the design so that it is suitable for a single processor case (but still include the option for a printer, menu buttons and speakers) - and I will probably make a couple of them to house my remaining CMM2s. |
||||
| Volhout Guru Joined: 05/03/2018 Location: NetherlandsPosts: 5937 |
Hi Pete, Great project. I have to admit I miss the point of having 2 CMM's in one case..but it is a nice project. And the choice for an HP-85 (an iconic machine) is also understandable. I used one to automate a test setup using HPIB (GPIB) equipment. And I think I missed more .... You have created a UNIX GUI for CMM2 ...? 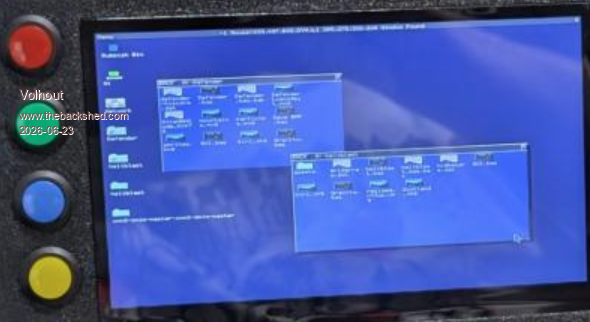 Volhout P.S. any access to the SD card needed ? Edited 2026-06-23 16:52 by Volhout PicomiteVGA PETSCII ROBOTS |
||||
| The Back Shed's forum code is written, and hosted, in Australia. | © JAQ Software 2026 |
