
|
|
Forum Index : Microcontroller and PC projects : CMM2: 3D Printed case for CMM2
| Page 1 of 2 |
|||||
| Author | Message | ||||
| PeteCotton Guru Joined: 13/08/2020 Location: CanadaPosts: 645 |
I know I'm a bit late on the band-wagon, but I finally got myself one of those new fangled 3-D printers, and decided what better way to learn Fusion 360 than to design myself a case for the CMM2. Mistakes were made. But I learned A LOT! I'm very happy with it for a first attempt. I did go back and tidy up the model to correct some of the issues - but I probably won't print it all out again. I will sand and paint it though. 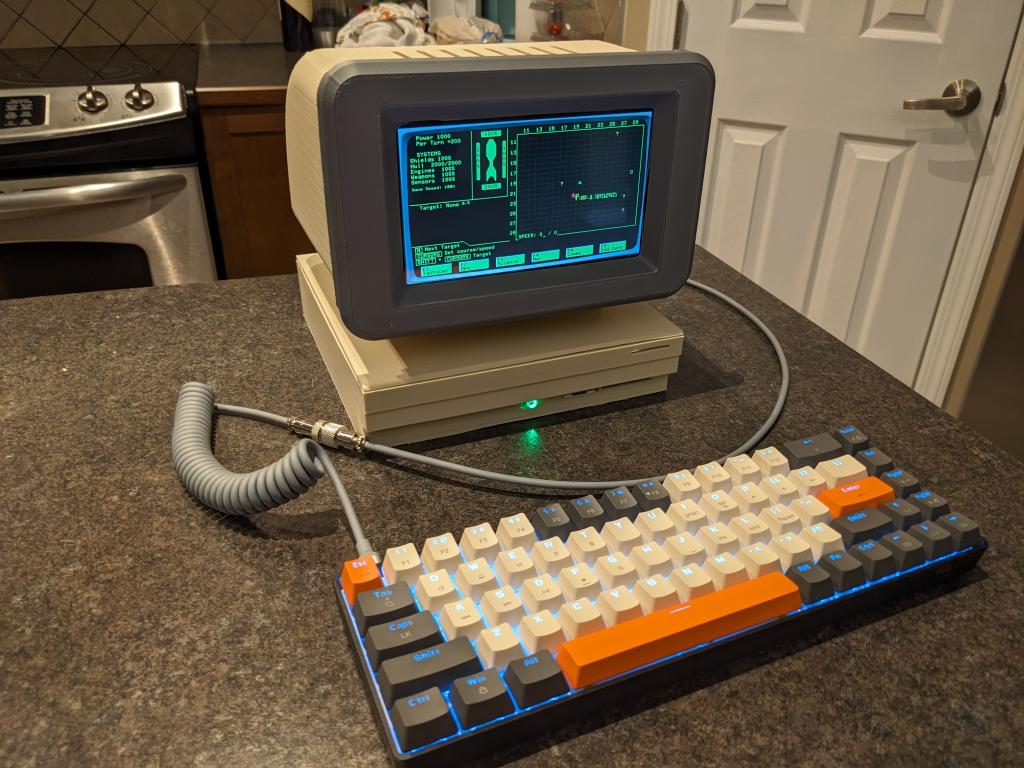 I took my inspiration from the HP-9845 workstation, which always wowed me with it's cable management, where the cables went up the two monitor legs. So I did the same thing here. The image below shows the two monitor legs, and nary a connecting cable in sight. 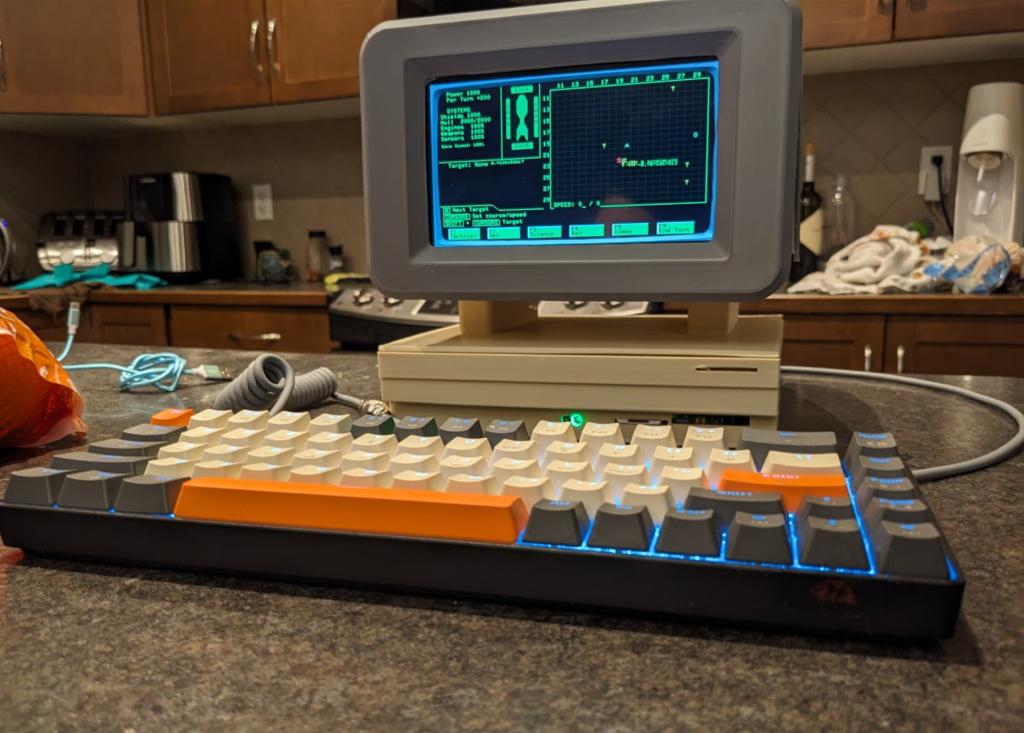 A view with the monitor cover off showing the internal cable routing. 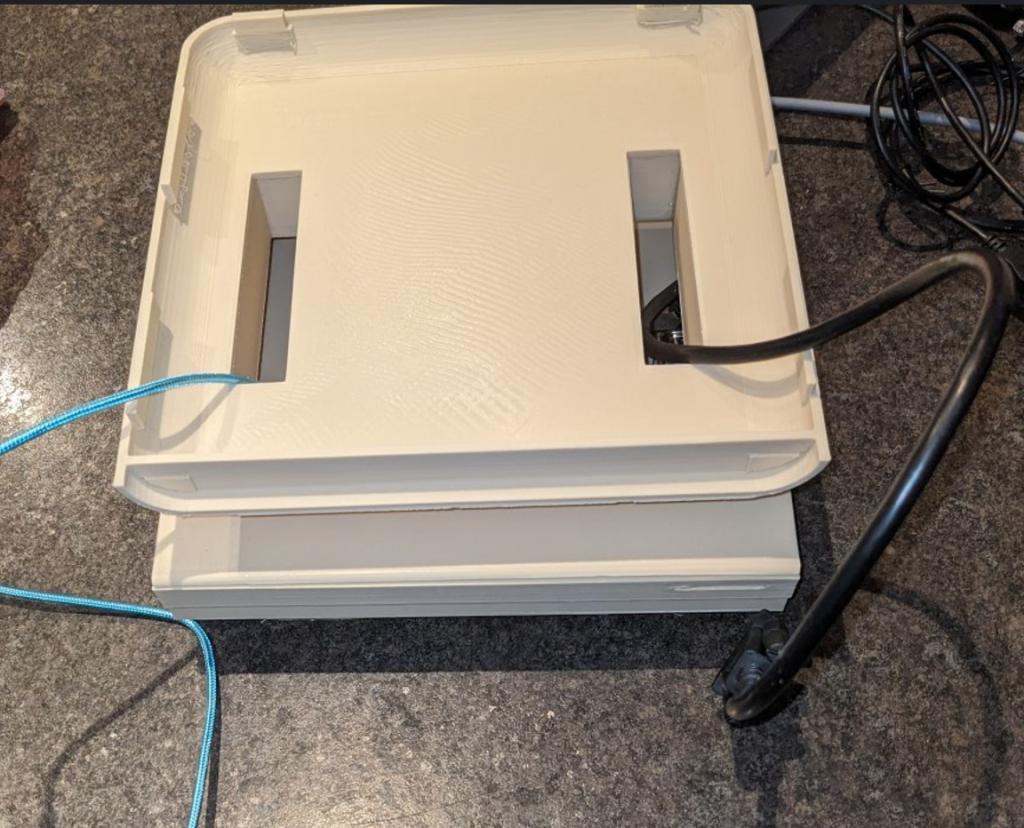 And here's a shot inside. I wanted enough space to put a breadboard in there for future projects. 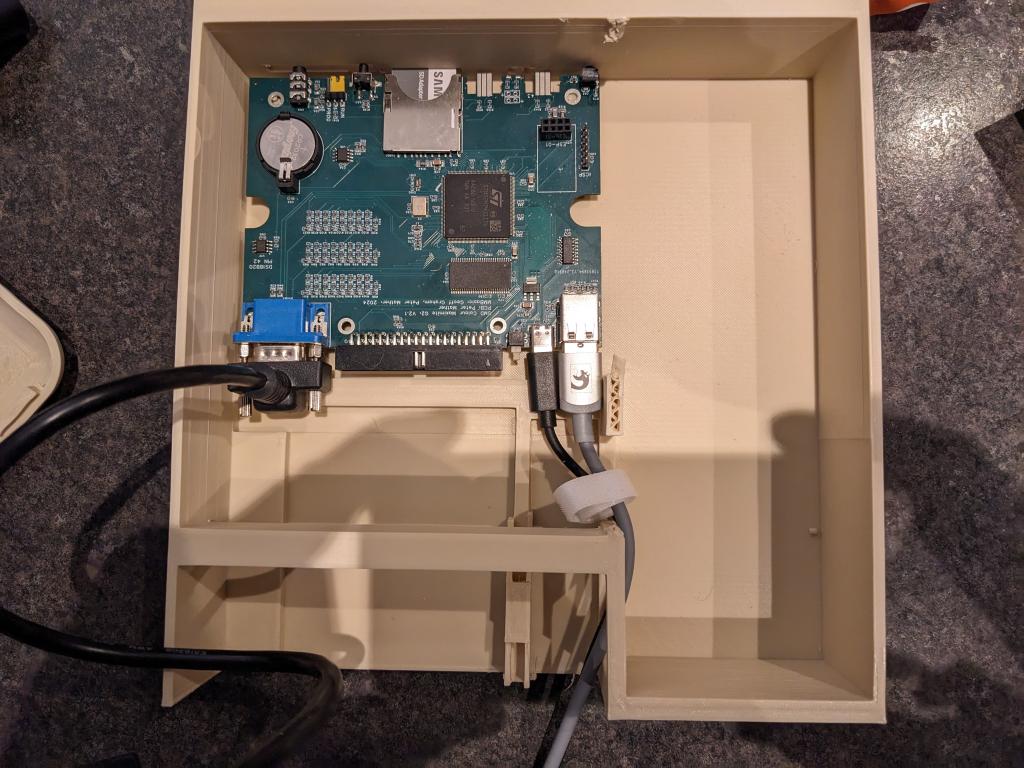 If anyone wants to try it out for themselves - or improve upon it. here are the Fusion 360 files and a .3mf file. CMM2 Case.zip 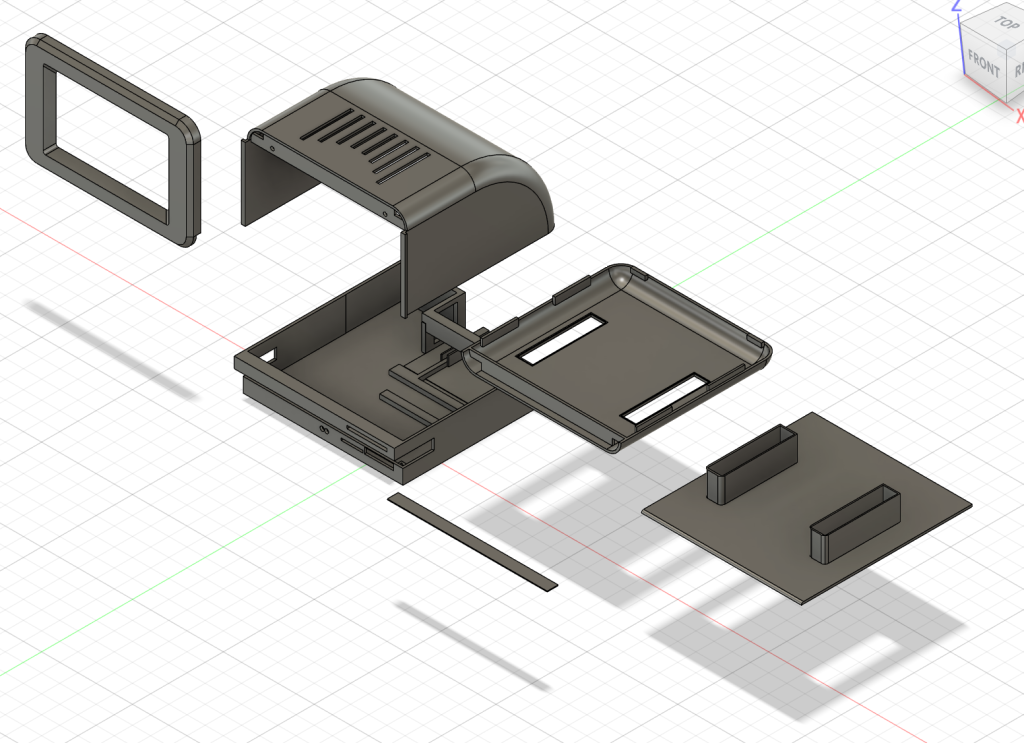 |
||||
| BarryH Regular Member Joined: 05/01/2025 Location: AustraliaPosts: 49 |
 WOW, that is so good WOW, that is so goodBarryH |
||||
| WhiteWizzard Guru Joined: 05/04/2013 Location: United KingdomPosts: 2991 |
Really brilliant work Is it simply held together with what look possibly like built in ‘clips’? And what size screen are you using there? Nice keyboard too by the way!! Edited 2025-04-03 15:04 by WhiteWizzard |
||||
| PeteCotton Guru Joined: 13/08/2020 Location: CanadaPosts: 645 |
Thank you very much! Thank you as well. It's mainly held together by clips. Two parts are glued together, the bottom of the monitor and the top of the case. I could have printed these as one, but it was quickest to print them separately without needing supports during the print. 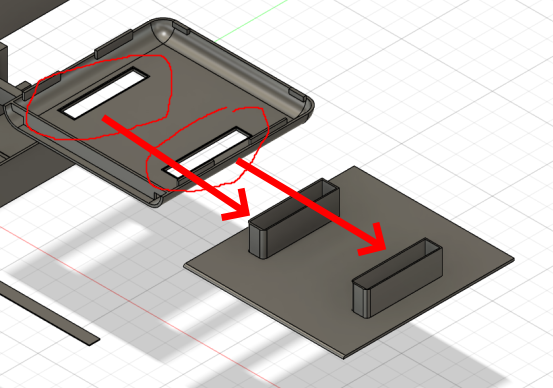 The monitor bezel is a friction fit (i.e. it slides one from the top and is held in by grooves). But I made all of them too tight (both the slot and the groove). So I updated the model to give a bit more tolerance. The LCD is a 7-inch 1024x600. It has an HDMI input, so I've got a VGA to HDMI connector hidden inside the monitor part. It's nice and bright - and (surprisingly) easily large enough to program and game on. As for the keyboard, it's very nice, but I made the fatal mistake of buying one that didn't have separate Function keys - which makes it a bit of a pain for using with the CMM2. But not to worry, this case has emboldened me and I have another classic HP computer case project in mind that might make use of this keyboard! Edited 2025-04-03 15:27 by PeteCotton |
||||
| Andrew_G Guru Joined: 18/10/2016 Location: AustraliaPosts: 883 |
Hi Pete, That is a seriously good effort. Well done! It looks remarkably smooth. Cheers, Andrew |
||||
| Frank N. Furter Guru Joined: 28/05/2012 Location: GermanyPosts: 1143 |
 ...which display did you use for this? Frank Edited 2025-04-03 16:41 by Frank N. Furter |
||||
PilotPirx Senior Member Joined: 03/11/2020 Location: GermanyPosts: 127 |
Wow, looks great. Good Job. I have to build one. Fortunately, I still have a circuit board left. Do you have the exact name of the display? Which modes does the display support? Edited 2025-04-03 20:06 by PilotPirx |
||||
| dddns Guru Joined: 20/09/2024 Location: GermanyPosts: 875 |
This is simply beautyful! The colors you've chosen are very harmonic and the keyboard seems to be made for it. One can see that your heart goes to it :) Does the display support 800x600 (and even higher PicoMite modes)? All the best! Got a chamber for your printer?? And what material did use use? Edited 2025-04-03 22:35 by dddns |
||||
| lizby Guru Joined: 17/05/2016 Location: United StatesPosts: 3816 |
Beautiful work. Very impressive. PicoMite, Armmite F4, SensorKits, MMBasic Hardware, Games, etc. on FOTS |
||||
| PeteCotton Guru Joined: 13/08/2020 Location: CanadaPosts: 645 |
Thank you all for the kind words. The display was a 7" LCD panel that I had lying around (1024x600 native - but seems happy with most other resolutions as well). This is the display - but this vendor doesn't have it for sale anymore: https://www.amazon.ca/dp/B092W5KN92?ref_=ppx_hzsearch_conn_dt_b_fed_asin_title_4 This looks like an available option (and interestingly has dual speakers). https://www.amazon.ca/Speakers-1024x600-Capacitive-Touchscreen-Raspberry/dp/B09L7XNBJB/ref=sr_1_3 Because of the HDMI and power connectors being on the side on the monitor, I did also buy 90 degree HDMI and USB power adapters - (and a very flexible short HDMI cable). Power, was provided by an unpowered (i.e. just USB cable power - no external transformer) USB hub inside the monitor (which powers both the display and the VGA to HDMI adapter). My original intention was to have the CMM2 also powered by this hub - but the power draw proved to be too much. A powered USB hub may work better - I was just using what I had to hand. It couldn't do Modes 12 and 16 (960x540 and 1920x1080). It struggled a bit with mode 14 (960x540) there is major overscan so you can't see the edges of the screens. All of the rest of the modes work great. Note: These are CMM2 modes - I don't know if they correlate with other Mites. 1 = 800 x 600 pixels 2 = 640 x 400 pixels 3 = 320 x 200 pixels 4 = 480 x 432 pixels 5 = 240 x 216 pixels 6 = 256 x 240 pixels 7 = 320 x 240 pixels 8 = 640 x 480 pixels 9 = 1024 x 768 pixels (12-bit mode not available) 10 = 848 x 480 pixels (widescreen format) 11 = 1280 x 720 pixels (widescreen format) 12 = 960 x 540 pixels (widescreen format, lines duplicated) 13 = 400 x 300 pixels 14 = 960 x 540 pixels (widescreen format, lines not duplicated – not supported by all monitors 15 = 1280x1024 16 = 1920x1080 (widescreen format, G2 only) 17 = 384 x 240 pixels No chamber - it currently just sits on my office floor (awaiting a permanent move into the basement). I used a Neptune 4 MAX with the standard Elegoo PLA. You will need at least a 320x320 bed, as some bits are quite large. It does need sanding on the larger curves and I suspect I will paint the light beige bits, but I was very happy with the dark grey bezel for the monitor. |
||||
| dddns Guru Joined: 20/09/2024 Location: GermanyPosts: 875 |
My experience is, that sanding PLA is no fun as it melts so early and it can easily look ugly :) Many thanks for reporting! |
||||
| Mixtel90 Guru Joined: 05/10/2019 Location: United KingdomPosts: 8965 |
Plenty of programming time while this is printing. :) Lovely job, Pete. I can't imagine even having the space to set a 3D printer up, never mind figuring out how to use one. lol My daughter got one ages ago (much smaller than that) but a stepper driver failed and she never got round to finding a replacement. She probably still has it somewhere. Mick Zilog Inside! nascom.info for Nascom & Gemini Preliminary MMBasic docs & my PCB designs |
||||
| PeteCotton Guru Joined: 13/08/2020 Location: CanadaPosts: 645 |
Thanks for the advice. I'm just starting out with 3D printing and learning the limitations/pitfalls. If I was designing it again, I'd use more subtle curves. It's the large curves on the monitor that really show up the layering. Having said that - I could probably tweak the settings on the printer to do a better job of smoothing them at the time of print. Oh yes!  One of the reasons I made this, was so that I could stick it on my work desk and have the Star Trek game running in the background during office hours. It makes me very happy and whets my appetite for that evenings tweaking and coding. One of the reasons I made this, was so that I could stick it on my work desk and have the Star Trek game running in the background during office hours. It makes me very happy and whets my appetite for that evenings tweaking and coding.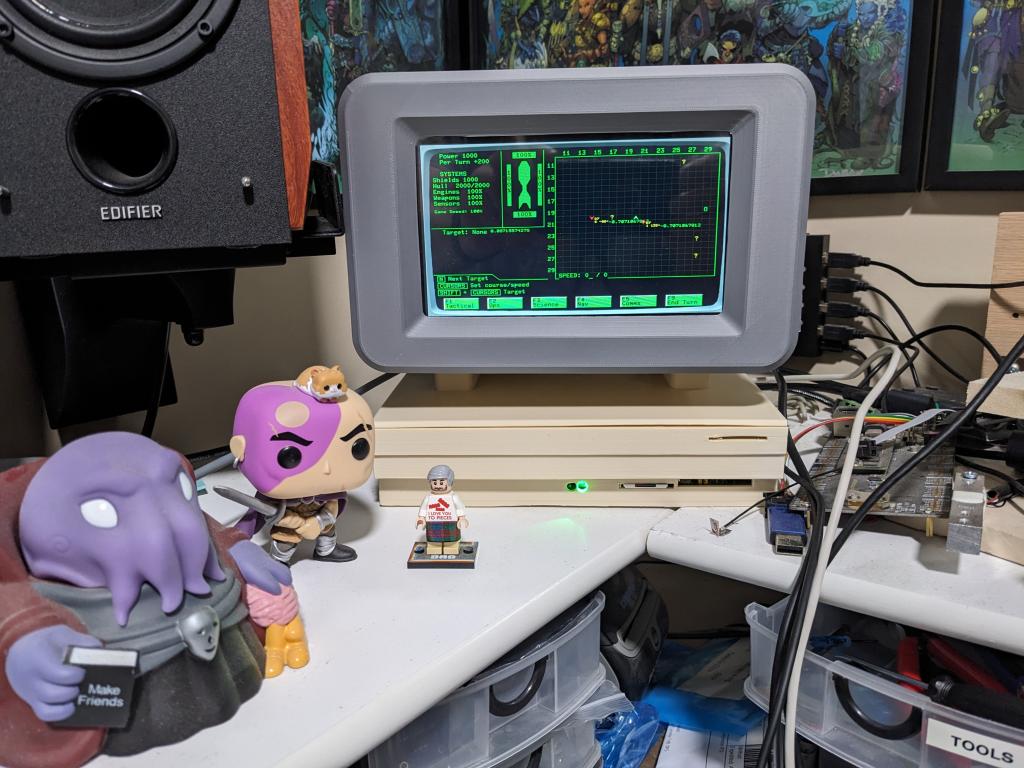 |
||||
| Plasmamac Guru Joined: 31/01/2019 Location: GermanyPosts: 620 |
like it ! what's the keyboard ? looks like a Temu one a updatet fusion version works fine. gtx Edited 2025-04-04 06:23 by Plasmamac Plasma |
||||
| PeteCotton Guru Joined: 13/08/2020 Location: CanadaPosts: 645 |
This one here. It's nice to use on a PC, but like I mentioned, I didn't notice that it doesn't have separate function keys (which are very useful on the CMM2) - so I wouldn't recommend it for this project again. https://www.amazon.ca/dp/B0BD6X9TQZ?ref=ppx_yo2ov_dt_b_fed_asin_title&th=1 Edit: To clarify, you can still use function keys - you just have to hold down the "Fnc" button with "1", "2" etc. - Which is a bit of a pain. Edited 2025-04-04 06:50 by PeteCotton |
||||
| Martin H. Guru Joined: 04/06/2022 Location: GermanyPosts: 1485 |
Hey Pete, great work on the model – it looks fantastic, really well done! Unfortunately, I’m having trouble opening the .f3d and .3fm files. Would it be possible for you to save and share the model as STL files instead? That would be super helpful – thanks a lot I just see this  Cheers Martin Edited 2025-04-07 02:41 by Martin H. 'no comment |
||||
| PeteCotton Guru Joined: 13/08/2020 Location: CanadaPosts: 645 |
Of course. Here you go: CMM2 Case STL.zip Cheers, Pete |
||||
| Martin H. Guru Joined: 04/06/2022 Location: GermanyPosts: 1485 |
 yeah, that looks very promising. Thank you very much 'no comment |
||||
| PeteCotton Guru Joined: 13/08/2020 Location: CanadaPosts: 645 |
You are very welcome. I'm very interested in how you get on with it and any suggestions you have for improvements. That long thin band at the bottom right was going to be printed in a different colour and stuck to the front to give it a two tone look, but I ended up scrapping mine as it didn't look great. Pete Edited 2025-04-07 04:20 by PeteCotton |
||||
| Plasmamac Guru Joined: 31/01/2019 Location: GermanyPosts: 620 |
Can someone please add a bay/support for a real 3,5 Floppy Disk ? Plasma |
||||
| Page 1 of 2 |
|||||
| The Back Shed's forum code is written, and hosted, in Australia. | © JAQ Software 2026 |
