
|
|
Forum Index : Microcontroller and PC projects : Photos Of My PICOMITE BUILD
| Author | Message | ||||
| rocco Newbie Joined: 29/09/2025 Location: United StatesPosts: 7 |
Sharing two photos of my PICOMITE (VGA, PS/2) Build. Using Christopher Barnatt's (Explaining Computers on You Tube Video) breadboard build as a starting point, then enclosing it in a custom made 3D Printed and Wood (Cherry And Mahogany) Hybrid case. I added audio using an adafruit's Max98357 I2S amp and 8 ohm speakers, Back of case allows power in with USB3, reset switch, PS/2 Keyboard connector, VGA connector and SD card. At the front there is the on/off switch and a pair of speakers. Looking forward to back to the past experience. 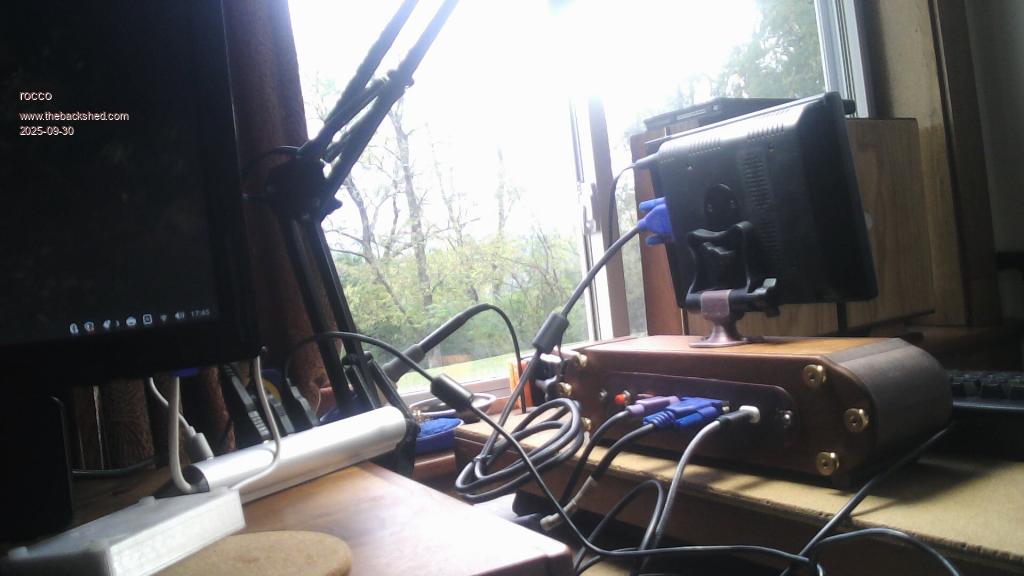 |
||||
| PeteCotton Guru Joined: 13/08/2020 Location: CanadaPosts: 645 |
Welcome Rocco! That looks very nice! I love the Mahogany look and the very unique shape. Do you have any other pictures of it? |
||||
| Gizmo Admin Group Joined: 05/06/2004 Location: AustraliaPosts: 5186 |
I've used wood boxes to house a few projects, but nothing close to the quality of this Rocco. Nice build. Glenn The best time to plant a tree was twenty years ago, the second best time is right now. JAQ |
||||
| rocco Newbie Joined: 29/09/2025 Location: United StatesPosts: 7 |
I'd be more than happy to send more photos. Do I post them here? |
||||
| lizby Guru Joined: 17/05/2016 Location: United StatesPosts: 3813 |
Yes, please, and nice work. Welcome to the forum. PicoMite, Armmite F4, SensorKits, MMBasic Hardware, Games, etc. on FOTS |
||||
| rocco Newbie Joined: 29/09/2025 Location: United StatesPosts: 7 |
Here are some other photos of the enclosure without the clutter of wires as requested  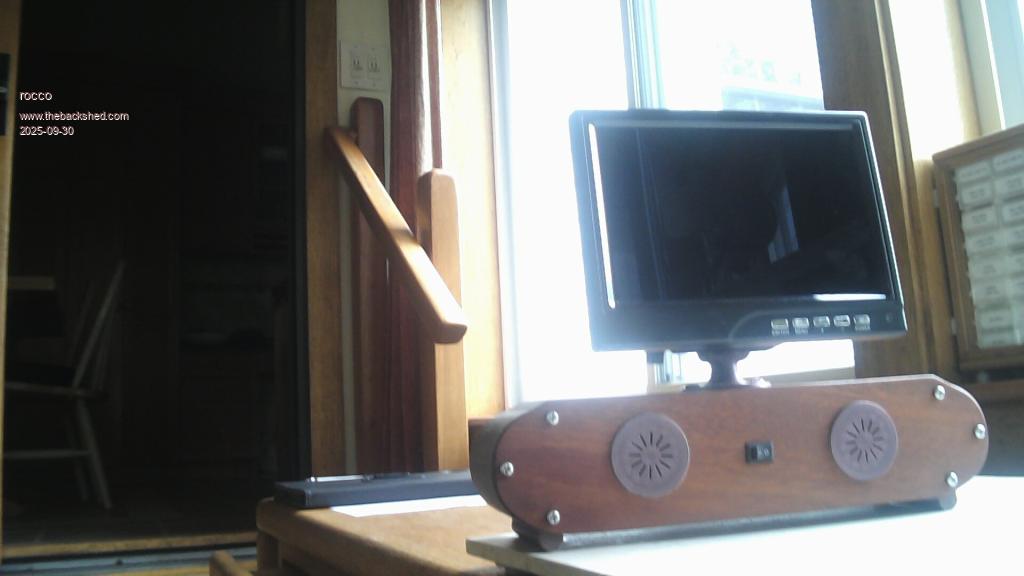 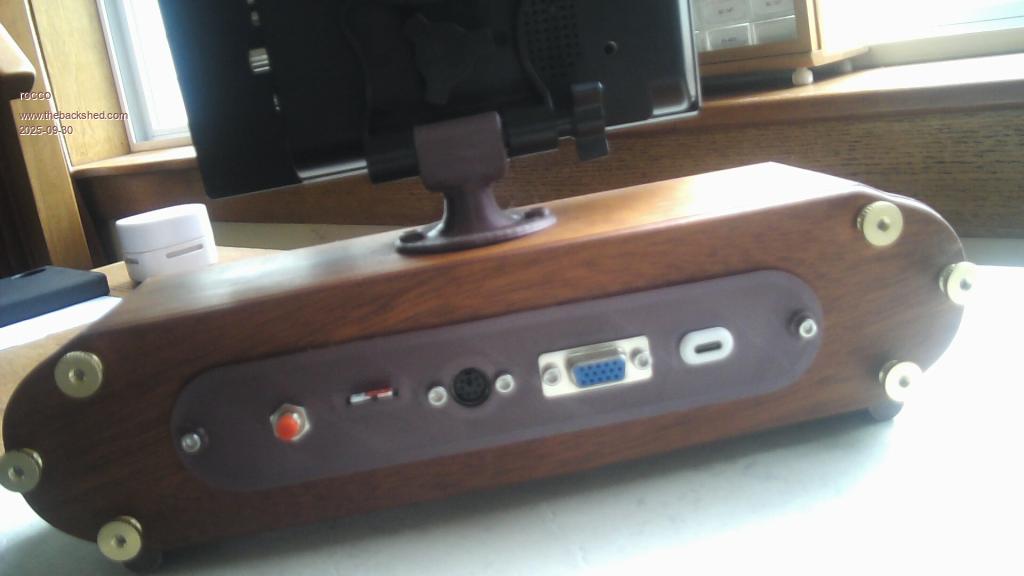 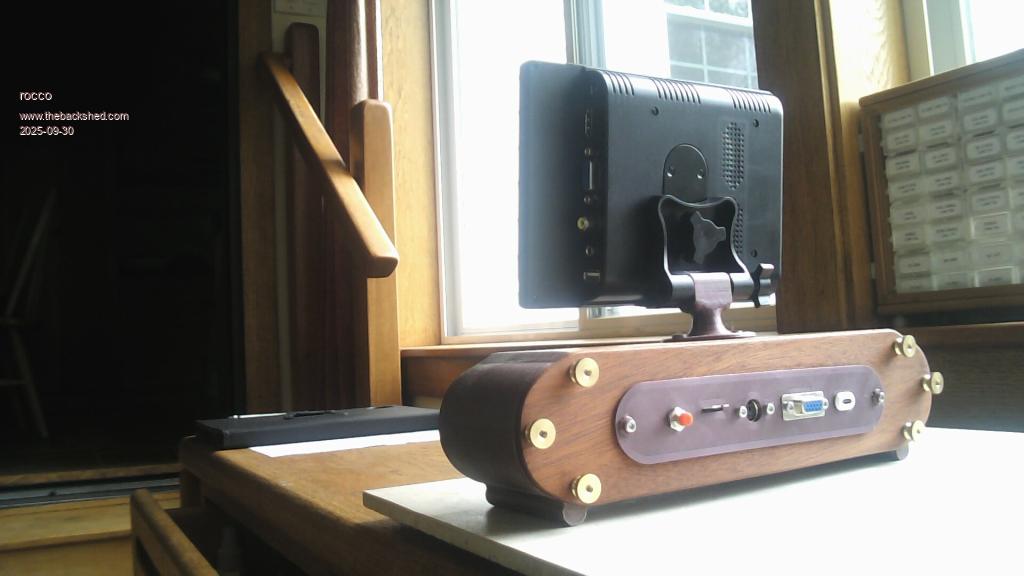 |
||||
| stanleyella Guru Joined: 25/06/2022 Location: United KingdomPosts: 2807 |
Nice unit. I got a monitor just like that! car reversing so no sound but with mini usb keyboard very small system.. my sound goes to mini ghetto blaster. |
||||
| Mixtel90 Guru Joined: 05/10/2019 Location: United KingdomPosts: 8965 |
Oh, I love it! The terminal nuts on the back are really cool :) Mick Zilog Inside! nascom.info for Nascom & Gemini Preliminary MMBasic docs & my PCB designs |
||||
| rocco Newbie Joined: 29/09/2025 Location: United StatesPosts: 7 |
I did not want shiny, but favored a slightly steam-pinkish look hence the knurled brass nuts at the back. I was tempted to add a few LEDs but decided that would be too garish. |
||||
| PeteCotton Guru Joined: 13/08/2020 Location: CanadaPosts: 645 |
Brilliant job! It looks great! Thanks for sharing. |
||||
| Martin H. Guru Joined: 04/06/2022 Location: GermanyPosts: 1485 |
Very nice design, congratulations. If I were to replicate it, I would only add two joystick ports at the front.  Great work! Cheers Martin 'no comment |
||||
| JohnS Guru Joined: 18/11/2011 Location: United KingdomPosts: 4352 |
Lovely! John |
||||
| DaveC5 Newbie Joined: 24/09/2025 Location: United KingdomPosts: 40 |
Very nice. Classy! And nice to find another fan of Chris Barnatt. Sunday wouldn't be the same without a fix of EC. Cheers Dave |
||||
| Mixtel90 Guru Joined: 05/10/2019 Location: United KingdomPosts: 8965 |
I had a thought at stupid o'clock this morning. I really should get a life... The screw heads on the front panel were niggling me a bit. Then I thought of this sort. If you could find some, even if too short, you could couple onto threaded rod using a FF standoff and a locknut inside, so the back would look the same. Just an idea. :) Mick Zilog Inside! nascom.info for Nascom & Gemini Preliminary MMBasic docs & my PCB designs |
||||
| rocco Newbie Joined: 29/09/2025 Location: United StatesPosts: 7 |
I do like his (Chris Barnatt's) humour. I wish him Mr. Scissors and stanley the knife all the best. |
||||
| rocco Newbie Joined: 29/09/2025 Location: United StatesPosts: 7 |
If anyone would like to tweak this let me know. I have his(Chris Barnatt's) full bill of materials, and my own .stl files for the 3D parts. I had thought to a) add a joystick port and b) A breakout of remaining unused pins to create additional peripherals (Camera perhaps). |
||||
| rocco Newbie Joined: 29/09/2025 Location: United StatesPosts: 7 |
I Thought about the screw heads my initial option was to use brass bolts and to fill in the head with solder, but the cost of them was excessive, I also thought of 3D printing some kind of cap in the same colour as the rest of the plastic parts. But compromises. |
||||
| The Back Shed's forum code is written, and hosted, in Australia. | © JAQ Software 2026 |
