
|
|
Forum Index : Windmills : Feedback carving blades chainsaw webpage
| Author | Message | ||||
imsmooth Senior Member Joined: 07/02/2008 Location: United StatesPosts: 214 |
I am developing a webpage for Oztules method for carving blades with a chainsaw. The webpage is here. I am almost done carving - one side is done. I plan to shoot video for side two. If anyone has positive, negative or constructive comments I welcome them. My goal is to make the task easy for others to duplicate. |
||||
| GWatPE Senior Member Joined: 01/09/2006 Location: AustraliaPosts: 2127 |
I would think that more people would have access to a band saw. Jiggging is the key to making blades with a chain saw, or band saw, or a draw saw for that matter. become more energy aware |
||||
oztules Guru Joined: 26/07/2007 Location: AustraliaPosts: 1686 |
Gordon, Anyone living off-grid or away from town will have a chainsaw.... not likely a band saw. All of us hill-billies cut fire wood. An electric chainsaw is also cheap and every bit as effective (and probably lighter too). A band saw is very difficult to jig for these purposes as well. (otherwise Danb would have been using jigs from year dot.) Imsmooth, i think the pics under the words "Here I am cutting through the board." are too close up to get the bigger picture. The first in the series of three (directly below words) is confusing, perhaps a different angle from further away may help.... Otherwise, it's light-years ahead of my "how too". Good job .........oztules Village idiot...or... just another hack out of his depth |
||||
Bryan1 Guru Joined: 22/02/2006 Location: AustraliaPosts: 2102 |
G'day Smooth, When I first brought up the page it looked like the google ads had pushed the text off the left side of the page. I had a quick look at the source and maybe if you put a couple of 'nbsp's�' in before each line that will correct the issue. By the way I use firefox as my browser. Looking good mate.  |
||||
| oztules Guru Joined: 26/07/2007 Location: AustraliaPosts: 1686 |
Firefox here too Bryan, and same effect. Margin (in page source)is set to zero, but he has started at page edge too. So he seems to have got what he wanted. My preference would be for more offset from margin, and wrap the text earlier perhaps. It does look unusual Cheers Mutley, ......oztules Village idiot...or... just another hack out of his depth |
||||
| GWatPE Senior Member Joined: 01/09/2006 Location: AustraliaPosts: 2127 |
Hi oztules, This was from the link above. This was in relation to a jigsaw, but imsmooth has a bandsaw apparently as well. My comments were really related to jigging, and not really about the cutting tool. I think the airfoil suggested is a bit rudimentary as well, but others may suggest a better alternative. Gordon. become more energy aware |
||||
| Tinker Guru Joined: 07/11/2007 Location: AustraliaPosts: 1904 |
I agree with Gordon that cutting the jig would be easier done on a bandsaw. BTW, its not too hard to make your own bandsaw - made mine about 20 years ago and its still running fine. 3 wheeler, opening is 600mm wide, 300mm high, blade (up to 12mm) runs on 350mm dia jarrah wheels and is over 3 metres long. Reason for making it was that the bandsaws I could afford then where toys and I wanted one big enough to build my boat. Power is just a 1/4Hp old washing machine motor, 2 electric speeds, 2 belt speeds. This thing will cut 12mm steel plate at low speed. Best thing I ever made  . .Klaus |
||||
| imsmooth Senior Member Joined: 07/02/2008 Location: United StatesPosts: 214 |
Thanks so far for the comments. On my computer the text looks fine, but I understand that on different browsers with different screen aspects the text can be different. Are you all suggesting increasing the margin on the left? If I use the � command, what happens if the screen is too small? How would I use this affectively to solve the problem you mention? I have a 9" bandsaw, but I don't have a large enough plate to rest the work, so it is difficult for me to cut long pieces of wood. That is why I used the jigsaw; I could clamp the work and move with the jigsaw. Anyway, I mentioned that a jigsaw or bandsaw can be used for making the jigs and cutting the shape of the blade. Oztules, I have more cuts, so I will take pictures from farther away, and I will make a video of me moving the chainsaw over the jigs without the wood plank so people can see how the chainsaw moves. EDIT: I changed the margin to 0.25" on the left and right. Does this help? |
||||
niall1 Senior Member Joined: 20/11/2008 Location: IrelandPosts: 331 |
nice work smooth ! how,d you find the pine to work on compared to the cedar ? niall |
||||
| imsmooth Senior Member Joined: 07/02/2008 Location: United StatesPosts: 214 |
So far the pine chipped more when cutting, but this should not be a problem. I'll let you know after the whole task is complete. |
||||
| oztules Guru Joined: 26/07/2007 Location: AustraliaPosts: 1686 |
I find it looks better with the adjustments you made Imsmooth. Looks more "normal" with the new margin. I just found that the pictures I referred to were ok for me to understand what was going on, but as you learn't early on when I presented my article, I thought it was enough info, and others did not. It would be probably more helpful if I shutup on this, and let those who haven't used this technique to ask for further definition, or questions on those things they don't see as clear... Because I have done it, and you too, what seems obvious to us may seem difficult to get the hang of for them. Gordon, sorry , I thought you were referring to the blade carving itself... my misunderstanding 
Yes a band saw, if you have tapered blades with curve or I used a table saw because I see no reason to not taper straight. A jig saw is a bit tedious, but will get there I guess..... If you have a straight taper, a rough cut with the chainsaw and a quick plane will suffice as well to cut the taper. I agree with Gordon that the profile is not what I would have preferred. It seems to me that Hugh's 1/3rd in and straight to the trailing edge is easier to plane than curving all the way to the front and trailing edges from the thickest point.... and I figure if Hugh does this it is probably better aerodynamically as well. ...........oztules Village idiot...or... just another hack out of his depth |
||||
| GWatPE Senior Member Joined: 01/09/2006 Location: AustraliaPosts: 2127 |
Here is a typical airfoil ClarkY that would be suitable. I will look into making some form templates from my Lakota blades, to compare with. Gordon. 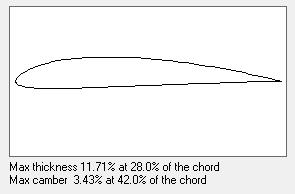
become more energy aware |
||||
| imsmooth Senior Member Joined: 07/02/2008 Location: United StatesPosts: 214 |
I believe the tutorial is done. The last page has some good video tutorials showing the cutting in action with commentary. |
||||
| oztules Guru Joined: 26/07/2007 Location: AustraliaPosts: 1686 |
Looks the goods to me 
..........oztules Village idiot...or... just another hack out of his depth |
||||
DaViD Senior Member Joined: 14/01/2009 Location: United StatesPosts: 120 |
I'm very impressed, that is very good information for even a beginner like myself. Keep up the good work!!! And with all that snow it's a good thing it didn't take you long to do it! If your not living on the edge your taking up to much space! |
||||
| DaViD Senior Member Joined: 14/01/2009 Location: United StatesPosts: 120 |
Hi imsmooth,I was just wondering if thw wood you used was already dried or if you dried it yourself and if so how long did you dry it? Thanks again for the great info. If your not living on the edge your taking up to much space! |
||||
| imsmooth Senior Member Joined: 07/02/2008 Location: United StatesPosts: 214 |
I bought Radiata pine from Home Depot, and it was pre-dried. The cost difference in minimal, and I am not about to start drying my own wood. The nice thing about the pieces I got are they are light, dry and planned smooth. I have learned you can use almost any wood, as long as it is strong and easy to carve. |
||||
| DaViD Senior Member Joined: 14/01/2009 Location: United StatesPosts: 120 |
I've got a Home Depot card thats screaming to get used, what better project than this  If your not living on the edge your taking up to much space! |
||||
| imsmooth Senior Member Joined: 07/02/2008 Location: United StatesPosts: 214 |
Just remember to cut thicker than you intend the final thickness. If you want the tip to be 0.5", cut it 5/8" or 3/4". The chainsaw will not cut smooth; it will be irregular and you will need to do some power sanding to get it smooth before you shape the blades. This smoothing process will consume close to 1/8" of wood. My first set resulted in having the tips too thin and I had to build it up with epoxy paint. This set came out perfect because I knew what I had to do. |
||||
| The Back Shed's forum code is written, and hosted, in Australia. | © JAQ Software 2026 |
