
|

|
Forum Index : Windmills : Feedback on my coupler please
| Author | Message | ||||
| imsmooth Senior Member Joined: 07/02/2008 Location: United StatesPosts: 214 |
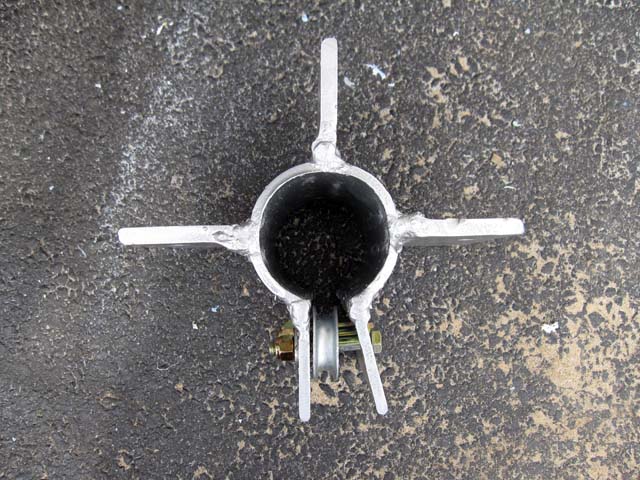
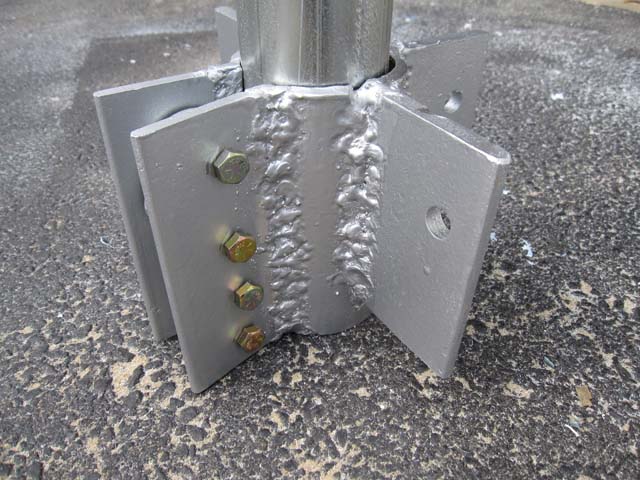
I have put together a coupling to connect two 20' 2.5" (ID) schedule 40 pipe. The ID of the coupler is 3"; the OD is 3.5" and is schedule 40 galvanized steel. The flanges are 3/8" thick, except for the two compression pieces which are each 1/4". These two pieces have grade 8 3/8" steel bolts. The coupling is 6" tall. I welded each flange on both sides, as well as the top and bottom with a 6011 stick using an arc welder. I coated the piece with metallic Rustoleum. I was hoping some of you with good welding experience can comment, and see if the welds appear good. I looked at them and they all had good penetration, and when I was welding I could see the stick melting the flanges and tubing as I advanced the puddle of molten metal. When I tighten the bolts, and compress the tube, everything holds nicely. 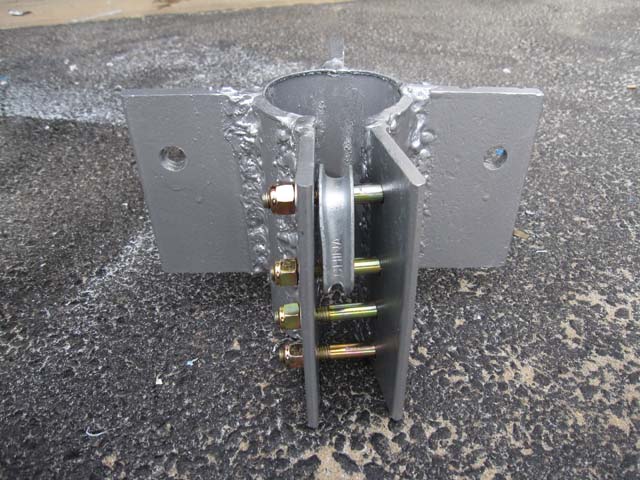
|
||||
DaViD Senior Member Joined: 14/01/2009 Location: United StatesPosts: 120 |
Hi imsmooth, I was an iron worker/welder for many years and I can tell you it's not what the weld looks like because I've seen some beautiful (looking) welds break right after stress was applied. And I've seen ugly welds hold for years. If you have good penetration,no pits and no sl*g that you can see in the weld it should hold really well. Just be careful welding galvanized the fumes are deadly. All in all it looks good to me,nice job!  If your not living on the edge your taking up to much space! |
||||
| KiwiJohn Guru Joined: 01/12/2005 Location: New ZealandPosts: 691 |
Hi, the weld looks at least as good as any of mine! And I have not had any break on me yet. The test I use on such as your piece is to get my biggest Crescent brand spanner and try to bend the flanges, if the flange starts to bend before the weld break it gets a pass mark!  |
||||
| imsmooth Senior Member Joined: 07/02/2008 Location: United StatesPosts: 214 |
Thanks for the comments. Yes, the flange bends close to parallel when I tighten and the welds are strong. The 6011 sticks seem to penetrate quite deeply. Thanks, too, for the warning, but I am aware of the zinc fumes, and I wear a respirator when I weld those pipes. A nice wind also helps. |
||||
fillm Guru Joined: 10/02/2007 Location: AustraliaPosts: 730 |
As the others have said it will probably hold , but it looks like you have tried to cover a lot of sl*g inclusions and it looks like what boilermakers call bird sh!# , dont take offence. You definatly need to adjust your amps and once the arc is struck and burning move the rod steadly aiming the arc at the join and watch behind the arc at the molten pool , rod angle also needs to be maintained as is feeding the rod in keeping the correct arc gap .. If I was putting that into the air and wanting to sleep at night in a storm , I would be grinding it of and starting again... PhillM ...Oz Wind Engineering..Wind Turbine Kits 500W - 5000W ~ F&P Dual Kits ~ GOE222Blades- Voltage Control Parts ------- Tower kits |
||||
eirbyte Newbie Joined: 19/11/2008 Location: IrelandPosts: 16 |
I used couplers like that and they work well. The wire rope that you use will be the weakest link and probably give up at the eyes before the coupler. If you are worried about a weld try triple welding it. Education isn't everything; for a start it isn't an elephant. Spike Milligan BuildYourOwnWindTurbine.com |
||||
Bryan1 Guru Joined: 22/02/2006 Location: AustraliaPosts: 1641 |
Hiys Imsmooth, Isn't the 6011 a GP type welding rod ? For any structural arc welding i always use low hydrogen rod's. They can be hard to start but breaking the bead off the end of the rod helps and those rods will take more amps. Basically if the weld isn't a uniform size I will grind it out and start afresh, the same with any sl*g inclusions. Also with welding gal it does pay to angle grind the gal off where your welding and for peice of mind if I was welding that fitting I'd pre-heat the weld area first. Just a quick note on using GP rod's when doing a stright fillet run the the top sl*g should tend to curl over releasing itself and the finish of the weld should be smooth with no sl*g inclusions. Cheers Bryan |
||||
| imsmooth Senior Member Joined: 07/02/2008 Location: United StatesPosts: 214 |
I preheated the pieces with a MAPP gas torch. I am not good with the terminology. Is the sl*g the excess metal from the rod? When I welded I could see both piece of metal being joined melt as the rod was fed. Sometimes I could get a nice straight run that was smooth; other times it was bumpy. When it was bumpy I ran over it again with the welder. What am I doing wrong that it is not smooth all the time? Am I moving the rod too fast? If that is the case, if I leave the rod in the same place too long it seems like I'm melting through metal too far. For a 5/32 rod I was using 145A. |
||||
| GWatPE Senior Member Joined: 01/09/2006 Location: AustraliaPosts: 2127 |
There is nothing that a bit more practice would not hurt. You seem to be a bit hesitant with the welding. The Cocky sh*t is a fair way from the joint. You may need to use one of those new fangled masks, that auto darken. Don't try and weld upside down yet. A rule of thumb is 1" of good weld should hold a ton. These are not good welds, but you make up a lot with the total of 12" per joint. BTW the sl*g is the flux. You also have a lot of splatter. Dirt/rust/Gal will cause splatter. Practice will only help, and don't forget the grinder. Gordon. become more energy aware |
||||
| imsmooth Senior Member Joined: 07/02/2008 Location: United StatesPosts: 214 |
I am using an AC stick welder. Can anyone show me a picture of welds they have done with this kind of welder. You can direct me to a web page or you can email me a picture or two at hofficer@erols.com I want to see how good these welds should appear. |
||||
CraziestOzzy Senior Member Joined: 11/07/2008 Location: AustraliaPosts: 152 |
have a look at this website ...check out other internal links for previous steps related to striking an arc and welding a bead cheers http://cr4.globalspec.com/member?u=25757 http://www.instructables.com/member/OzzyRoo/ |
||||
| Jarbar Senior Member Joined: 03/02/2008 Location: AustraliaPosts: 225 |
Hi all,I agree that the article covers most bases.Yes 145 Amps is too high. If it was me I would tack the two ends of plates to hold in correct position.I would then lay the piece so the valley is at the base of equally balanced sides.This then allows the molten metal to pool and the arc to be viewed as it fuses into the parent metal on either side.Less Amps 90/95 but a slower feed rate will give more control over the size of pooled molten metal without burning though. The Gal can be burnt through but a fan or extraction unit is an absoloute neccesity.Removal of Gal prior to welding is the best option. There also appears to be a large lip around the top edge from maybe a tube cutter or parting operation.This will have a detrimental effect on the clamping capacity and set up a stress line around the clamped pipe.I also note that at 6 inches long and joining 2x20 ft lengths of pipe is way too short for the task.12 to 18 inches would be more appropriate in my view.The sl*g is the molten coating from the outside of the stick rod.Used to keep Oxygen away from the Arc melting the metal rod.It should curl up as it cools or at least come off freely when tapped with a chipping hammer. But I do admire you detirmination at putting words into action.And your willingness to accept criticism.Take your mask down to the local boilermakers and watch a couple of runs take place.Best of luck it's all in the way you hold your tongue and the rod. Also the polarity of the leads connected to the welder.Just a thought. Anthony. "Creativity is detirmined by the way you hold your tounge".My Father "Your generation will have to correct the problems made by mine".My Grandfather. |
||||
| Tinker Guru Joined: 07/11/2007 Location: AustraliaPosts: 1904 |
I agree with the welding comments above, I'm not a welder by any means but think I could do a neater job  . Galvanised steel is NOT easy to weld in my experience unless the galvanising is filed or ground off all along the weld joints first. . Galvanised steel is NOT easy to weld in my experience unless the galvanising is filed or ground off all along the weld joints first.
What does worry me is the sheave, there is a good chance it will jam if the axle bolt is tightened up too much. In such a situation I always make a axle sleeve just slightly wider than the sheave. The sleeve will jam solid if the bolt is tightened up hard but the sheave can still rotate on it freely. Klaus |
||||
| woodchips Newbie Joined: 05/01/2009 Location: United KingdomPosts: 27 |
Hello, little surprised by some feedback, so thought I would dig a little deeper. First thing is my maths says a 5/32" rod is 4mm, and I would have said that 145A is about 100A too few. For 1/4" and both sides of 3/8" plate I would have thought a 3.2mm or 1/8" rod at 145A was plenty. If you wanted lower current then a 2.5mm rod would have to be used. To my mind the welds have all the appearances of not enough current, or too large a rod. The arc has to melt all of the rod, not just half of it. Pity it is painted. If you can't see the discolouration on the other side of the steel from the weld line then it hasn't penetrated. I am not convinced that at this size of assembly that it is possible to break it by hand irrespective of how bad the welds are. The suggestion of 1 tonne per 1" backs that up. You have to know it is a good weld, and if it is spluttering and arc going out, difficult to strike then you are not winning, up the current. I also agree that it is far too short to act as a clamp, and would it be pinned to the tubes to stop it sliding? Cleaning the weld line back to clean steel is really worth the effort, grind it, or a cup type wire brush is faster. The reference to the welding training web site is worrying. The rest of the world uses stick negative on a DC welder for more penetration. Why? Think about what is happening, the arc is electrons flowing form negative to positive, and the 50% extra heat at the positive comes form the violent slowing of the electrons when they hit the work. Similar to the old vacuum tube thermionic valves amplifiers, you could get the anodes red hot if you over ran them, same reason. |
||||
CraziestOzzy Senior Member Joined: 11/07/2008 Location: AustraliaPosts: 152 |
Nothing to worry about at all...avoid a few dozen beers before welding and all is good  http://cr4.globalspec.com/member?u=25757 http://www.instructables.com/member/OzzyRoo/ |
||||
| imsmooth Senior Member Joined: 07/02/2008 Location: United StatesPosts: 214 |
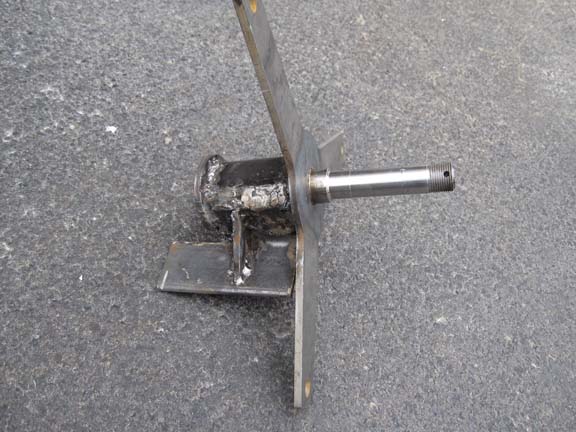
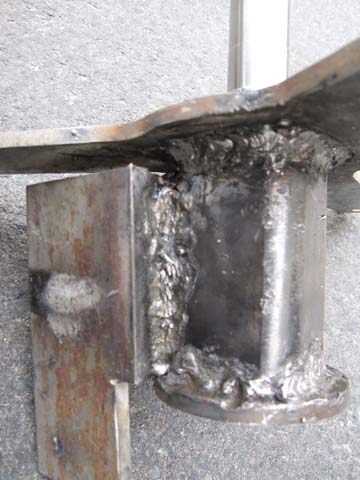
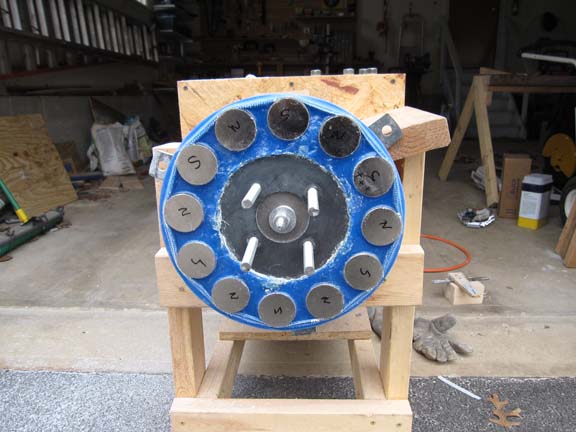
Lot's of comments. Ok. Anthony, I agree the coupler would be too small for jointing pipes, but that is not its purpose. I would have had it about 18". It is actually sitting at the top of my 42' tower at the 36' mark. The pipe at this section is sold. It's purpose is to provide a place to have my four 5/16" guy cables attach. With regards to discoloration: I don't know if this counts, but when I looked at the inside of the pipe I could see the burn marks following the outline of my flanges. The galvanized coating was a white, flaky powder with some darkening. I have some other pictures of my assembly without any painting. I think these welds cosmetically look better. I went over them twice. The beads look pretty solid. I also through in a picture of one of my magnetic rotors. It will be painted with epoxy to seal everything from the rain and coated with autocoat acrylic spray. 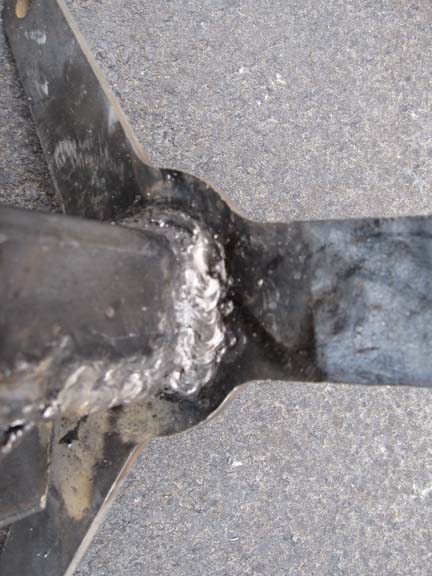
|
||||
fillm Guru Joined: 10/02/2007 Location: AustraliaPosts: 730 |
I think wood is your thing imsmooth , if you are going to keep welding then take a course at your local tec school or change your name to " imrough "  PhillM ...Oz Wind Engineering..Wind Turbine Kits 500W - 5000W ~ F&P Dual Kits ~ GOE222Blades- Voltage Control Parts ------- Tower kits |
||||
| Jarbar Senior Member Joined: 03/02/2008 Location: AustraliaPosts: 225 |
It' amazing the amount of information that is transfered here with usually the greatest of intentions.And how some things come easily to some of us and others don't.I was teaching for a while as a workplace trainer.Skills gained can often be taken for granted,by assuming everyone knows what you do.I wish I could come over there and help imsmooth.Just try running some welds on a flat stip a metal first.Waste a few rods just keeping the arc 2 to 3 mm above the surface of the job and watch the metal pooling behind the arc as you slowly move it from left to right.A steady hand can be helped by sitting on a stool to help steady your body.Keep your upper arm against your body to brace it even more.Once you get some good runs try to emulate it on the workpiece.Then always reposition the workpiece so it conforms to your seated stable position.I hope this helps. Anthony "Creativity is detirmined by the way you hold your tounge".My Father "Your generation will have to correct the problems made by mine".My Grandfather. |
||||
| The Back Shed's forum code is written, and hosted, in Australia. | © JAQ Software 2026 |