
|
|
Forum Index : Windmills : My F&P :)
| Author | Message | ||||
| vasi Guru Joined: 23/03/2007 Location: RomaniaPosts: 1697 |
I bought few things for my F&P 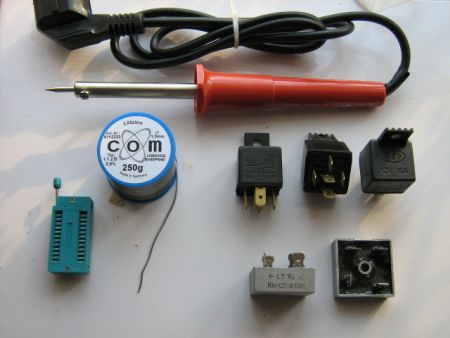
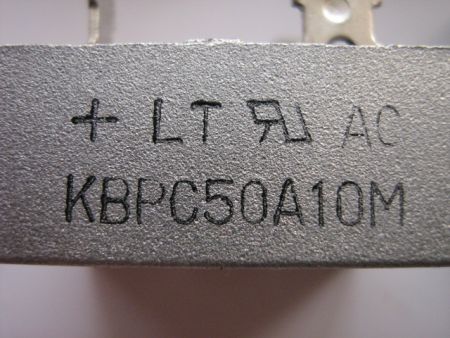
I hope 10M mean 100V not 10V 

Now I am ready for the conversion of F&P. Hobbit name: Togo Toadfoot of Frogmorton Elvish name: Mablung Miriel Beyound Arduino Lang |
||||
Prof Newbie Joined: 01/12/2005 Location: AustraliaPosts: 33 |
Hi Vasi, I looked at what you have bought. Seems that the bridge rectifier is 50A 1000V. Also, from an Aussie point of view, you do not seem to have bought anything to celebrate with!! The job would not be completely commisioned at the end. 
Cheers, Prof I know boats!! |
||||
| vasi Guru Joined: 23/03/2007 Location: RomaniaPosts: 1697 |
Hi Prof, In this topic I want to post every step made by me on my F&P windmill construction. Every step for me is a small victory (and a little more effort for my family). Thank you Lia (my wife) for your help. And I think is my duty posting every step I made - remember, my F&P is from Kiwijohn and The Back Shed Team (is not a F&P found on a junkyard). So, is a special topic :D . Is like a Report because I respect them. But guys, just let me know and I will stop this. Hobbit name: Togo Toadfoot of Frogmorton Elvish name: Mablung Miriel Beyound Arduino Lang |
||||
| KiwiJohn Guru Joined: 01/12/2005 Location: New ZealandPosts: 691 |
Hi Vasi I am sure all your friends on the The Shed Team will be following your 'adventures' with your F&P with great interest. So please continue with reports on your progress. John |
||||
Gill Senior Member Joined: 11/11/2006 Location: AustraliaPosts: 669 |
Here here! was working fine... til the smoke got out. Cheers Gill _Cairns, FNQ |
||||
Highlander Senior Member Joined: 03/10/2006 Location: AustraliaPosts: 266 |
Hi Vasi, keep the reports coming, looking forward to see it's progress. 
I think Prof meant you should have bought a beer to celebrate. Central Victorian highlands |
||||
| vasi Guru Joined: 23/03/2007 Location: RomaniaPosts: 1697 |
Yes (I figure it), but I think buing a beer to drink it on front of you is not nice (I suffer because I can't send a box full of beer ...). Anyway, I am sorry, Prof forgive me, I was too tired in that "day". Thank you for support. I started with 80 series F&P, cleaned up and found a transportation problem on a coil: 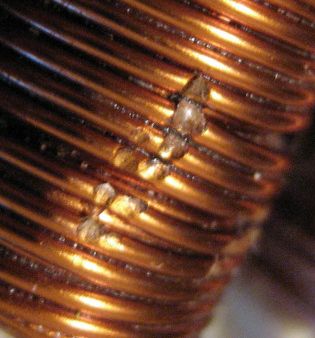
The wire is not cut, I can continue with that or rewire ? Is the first coil on a group of two poles (in reconfiguring sense). Hobbit name: Togo Toadfoot of Frogmorton Elvish name: Mablung Miriel Beyound Arduino Lang |
||||
| Robb Senior Member Joined: 01/08/2007 Location: AustraliaPosts: 221 |
The top 3 are looking 
1. If one wire is connected to the wire next to it (shorted turns) you need to fix that by insulating. 2. If the wire is partly cut through that will add resistance and get hoter there. It realy depends how much current is or should be flowing in that wire if it makes a noticable difference. |
||||
| vasi Guru Joined: 23/03/2007 Location: RomaniaPosts: 1697 |
Ok, thank you, I will put 80 type F&P on a shelf until get 0.8mm wire (good occasion to see how many turns on one coil) and continue with 100 type. One will be on a windmill and another on a pedal generator, as an insurance (protecting batt's when no wind). Hobbit name: Togo Toadfoot of Frogmorton Elvish name: Mablung Miriel Beyound Arduino Lang |
||||
| KiwiJohn Guru Joined: 01/12/2005 Location: New ZealandPosts: 691 |
Hi Vasi If it was me I would unwrap that top layer and fill those notches with solder then put new varnish around the repairs and wind it back on. I dont really think you would loose any significant current handling and besides you could always look at these notches as some sort of weak link fuse. 
P.S. I am sorry to see this damage as I thought I had packed it quite well. Maybe it was damaged while under my workbench here. 
|
||||
| vasi Guru Joined: 23/03/2007 Location: RomaniaPosts: 1697 |
Hi John, I am sure it was damaged during transport. I have broken plastic parts on 80 series. The foam was completely "broken" in many pieces. I already said: the box was opened before I get there, to "checkpoint". Stupid cops, they thought it was an atomic bomb from "Al qaeda". But don't worry. Is more important to me to have an F&P here, not on pictures only  . And is more pleasant to have my own "contribution" on this F&P. I mean, I like to work on it. I just wanted to know the best (and maybe the quick ) solution for repairing. . And is more pleasant to have my own "contribution" on this F&P. I mean, I like to work on it. I just wanted to know the best (and maybe the quick ) solution for repairing.
Your tip is very good. I will do it in this way. Thank you. Hobbit name: Togo Toadfoot of Frogmorton Elvish name: Mablung Miriel Beyound Arduino Lang |
||||
| KiwiJohn Guru Joined: 01/12/2005 Location: New ZealandPosts: 691 |
My friends here were laughing when I was doing the packing, they said the rotor looks like an anti-tank mine! |
||||
| vasi Guru Joined: 23/03/2007 Location: RomaniaPosts: 1697 |
 yes , it looks like ! yes , it looks like !Hobbit name: Togo Toadfoot of Frogmorton Elvish name: Mablung Miriel Beyound Arduino Lang |
||||
| vasi Guru Joined: 23/03/2007 Location: RomaniaPosts: 1697 |
Another important step, I found a good source for copper wire, and I can repair the 80 type F&P. The copper is 1.05 mm in diameter but is Ok. But most important, yesterday I received another package from Australia, a PICAXE 08M kit from a person from here. I don't have permission to tell his name. Thank you my friend! I hope Monday to send the post cards to all my friends. 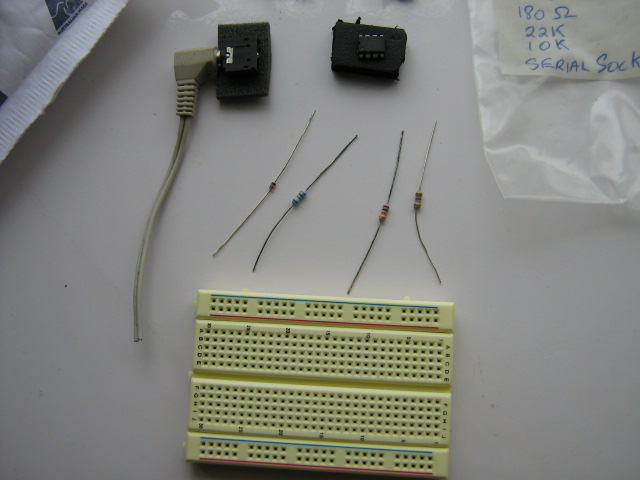 Hobbit name: Togo Toadfoot of Frogmorton Elvish name: Mablung Miriel Beyound Arduino Lang |
||||
| vasi Guru Joined: 23/03/2007 Location: RomaniaPosts: 1697 |
I finished my picaxe windmill controller with car battery setup. 
Entire story in english is here: http://funlw65.googlepages.com/e_picaxe08m_eng.html Hobbit name: Togo Toadfoot of Frogmorton Elvish name: Mablung Miriel Beyound Arduino Lang |
||||
| Gizmo Admin Group Joined: 05/06/2004 Location: AustraliaPosts: 5182 |
Excellent work Vasi, well done. And thanks for the plugs
Looks like you've got the hang of the PicAxe chips, good fun once you get started. I've tried using the toner transfer methode in the past too, works OK but like you say you need to touch it up with a marker pen in some places. Glenn The best time to plant a tree was twenty years ago, the second best time is right now. JAQ |
||||
Bryan1 Guru Joined: 22/02/2006 Location: AustraliaPosts: 2101 |
Eh Guy's, Now you've mentioned the toner transfer if I may add my 2.2 cents . I've been using press'n'peel for the last few years and always have to do it twice as I can't seem to get the iron method worked out. Now the guy's on the electro-tech forum are using laminators with either the P'N'P or what they call pulsar paper. I've done 1 trial method using epson 360 dpi glossy paper but once again the iron moved the transfer. I'm on the hunt for a secondhand laminator so I can butcher it so standard pcb's will pass thru and if you guys are interested I can photograph how I change the laminator so it's easy for anyone to do.
Cheers Bryan. P.S. Vasi if your ready to moveup to the pic chips pm me and we'll get something sorted |
||||
| vasi Guru Joined: 23/03/2007 Location: RomaniaPosts: 1697 |
I am not using glossy paper, just transparencies like in this tutorial: http://www.instructables.com/id/5pcb/ And with this tip: [quote] After probably hundreds of toner-based PCBs from home, I have found one simple and quick step to assure a good toner transfer regardless of the paper used: clean the board with acetone and/or alcohol then dip a paper towel in some of your etchant and rub the surface of the board. After the surface is a dark brown, clean the surface again, then proceed with the usual transfer method. The microscopic pits in the surface from this step will grab the toner better than any other surface treatment I have used. After using this method, I cannot recall a single failed board even with a variety of glossy papers. [/quote] And I not cooling with water, just let it until is cold. Bryan, you saw my ICSP programmer? Hobbit name: Togo Toadfoot of Frogmorton Elvish name: Mablung Miriel Beyound Arduino Lang |
||||
| Highlander Senior Member Joined: 03/10/2006 Location: AustraliaPosts: 266 |
Nice work Vasi
Bryan, if you want a laminator you can buy them from the post office, Aldi or officeworks for around $60. The one I have is a lot bigger and dearer, it has adjustable roller tension. I don't think the cheapies will have this but you may be able to work it out. Central Victorian highlands |
||||
| The Back Shed's forum code is written, and hosted, in Australia. | © JAQ Software 2026 |
