
|
|
Forum Index : Windmills : Blade Construction
| Author | Message | ||||
| Chris_Psmith Newbie Joined: 06/03/2008 Location: United StatesPosts: 5 |
Hi all, Just starting the second atempt at a VAWT and will be making to the design at the bottom of: http://club.cycom.co.uk/vertAxis.html Starting to get the bits together but mulling around ideas for the best way to make the blades. The blades need to be 2m long (3 off)with the profile shown below 23cm wide. Thoughts are: Wood - would take ages, be difficult to get exact and thin trailing edge would be fragile, would be heavy as well. Aluminium - As in Lenz2 design with shape cut from wood with stringers and 0.6mm ally bent round it - Would be quite fragile, stringers would be difficult again due to thin section. Polystyrene + Fiberglass - cut shape from polystyrene (thinking about feeding through hot wire of correct shape) and cover in fiberglass - hmm, probably harder than it sounds. Extrusion,- wouldn't that be perfect, but cost a fortune for 3 blades. Am I missing the obvious answer, thoughts please. 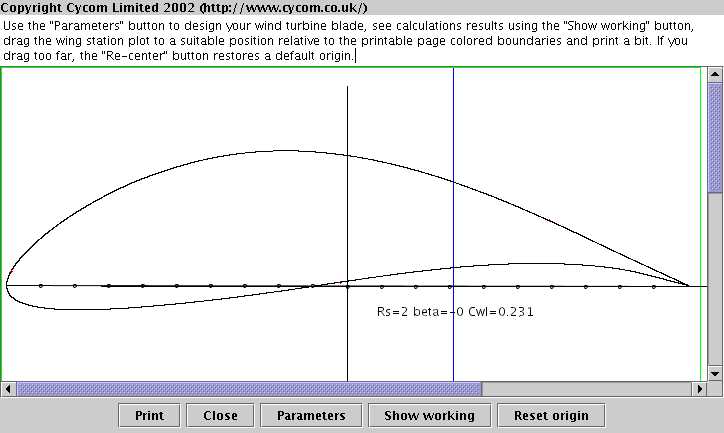
Regards Chris |
||||
| GWatPE Senior Member Joined: 01/09/2006 Location: AustraliaPosts: 2127 |
Hi Chris, I would make ply, or sheet metal airfoil templates. These could be glued to the end of the styrene block. Use hot wire to cut the foam between the templates. I have made many aircraft wings this way. Temp control of the wire is quite critical to get a neat cut. I have used stainless steel fishing trace for cutting wire, on a bow, with around 2A current. The templates ere easily reused. I would form an epoxy/glass skin to the airfoil section for strength. You should be able to add reinforcement, etc before glassing. The trailing edge may be better with some carbon fibre, but extra layers of glass would be OK. You will need to lay up the glass on the core, bag with waxed mylar sheet and then place back in the shells with weight added to ensure the wing stays straight during the curing process. I you need more specifics, ask Gizmo to contact me with your email. cheers, Gordon. become more energy aware |
||||
| Chris_Psmith Newbie Joined: 06/03/2008 Location: United StatesPosts: 5 |
Thanks Gordon, Did some more digging into hot wire cutters, do you think it is possible to cut a 2m length that way, or would wire drag be an issue? Would it be better to drag the foil shape length wise? Rgds Chris |
||||
vawtman Senior Member Joined: 14/09/2006 Location: United StatesPosts: 146 |
Hi Chris Nice to see another Darrius builder.I think your profile selection will work fine.If you use a straight profile the turbine will go back and forth for awhile before starting.It wants to go in circle not straight if you get what i mean. I built a 4ft foam cutter using a 24v transformer from a pool robot,pvc pipe,spring from a dishwasher and a streched ot element from a milkhouse heater.Worked great but the wire did drag a bit but didn't effect the overall cut. It may be easier to make the blade in sections and glue and bolt them later. The blades i have now are wood wraped in trimcoil(thin aluminum)done in 3 sections more for testing.I'll make them sexier with foam and epoxy resin(can't use fiberglass resin)it'll eat the foam.One could actually use epoxy paint with the cloth. Best of luck to ya. Mark |
||||
| GWatPE Senior Member Joined: 01/09/2006 Location: AustraliaPosts: 2127 |
Hi Chris, I do not think it would be possible to reliably use an airfoil shape wire. The wire drag should only be an inch or so at the centre of the bow. Wire temp is critical for bead foam, but not as critical as for blue or green foam. There should be minimal drag on the bow. Usually wire drag is the result of haste. I let gravity do the work to pull the bow. If you are not confident at 2m, then just reduce the cut length and join the sections. Minimal strength loss in the foam. The skins provide the tensile strength. A failure will usually occur due to surface compression, so design spars into the structure at appropriate places. If you use a mylar sheet to sort of bag the airfoil, then you can get a near mirror finish. Sanding and painting fibreglassed products I avoid. cheers, Gordon. become more energy aware |
||||
| Chris_Psmith Newbie Joined: 06/03/2008 Location: United StatesPosts: 5 |
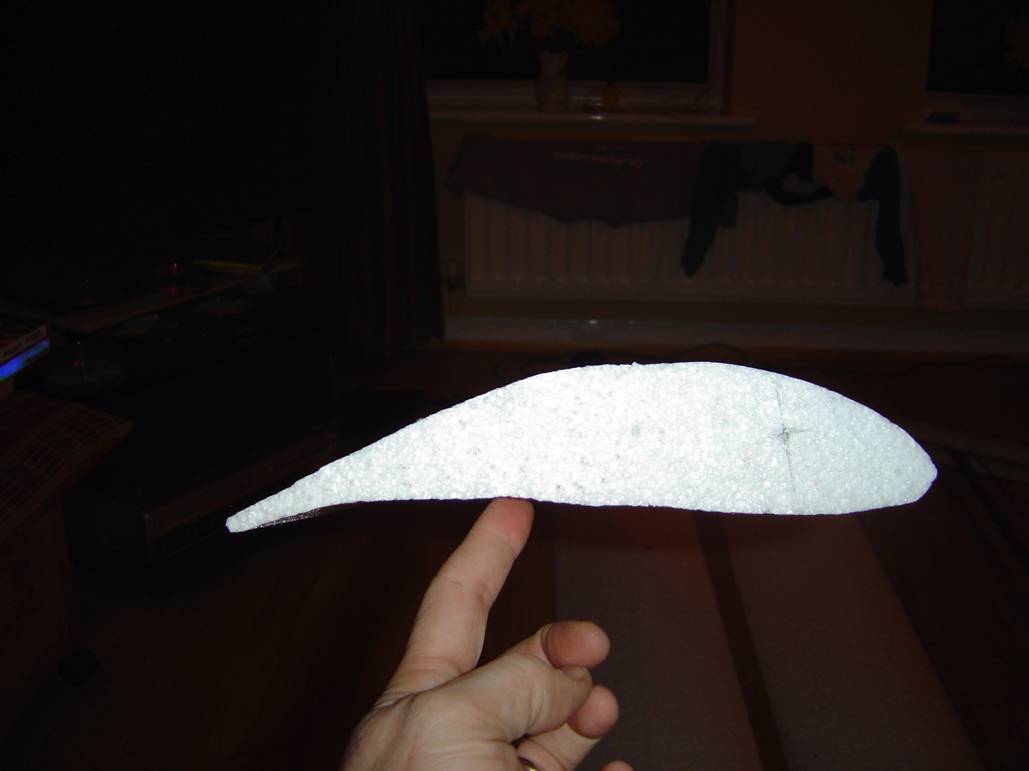
Well had some blade cutting fun, I guess all the web sites that talk about using a battery charger aren't trying to cut 2m long blades, stone cold. In desperation opted for 240v mains and a dimmer switch....ooooooh, don't reccomend that, the singing wire cut one brilliant cut, went orange and snapped, yee haaah. So with sensible head on, borrowed a comercial DC transformer from work, took some practice, and got better every go, but results below, look ok to me. Any suggestions from anyone on how easiest to coat them for strength, fiberglass mat would be messy, must be some sort of paint on stuff? Chris 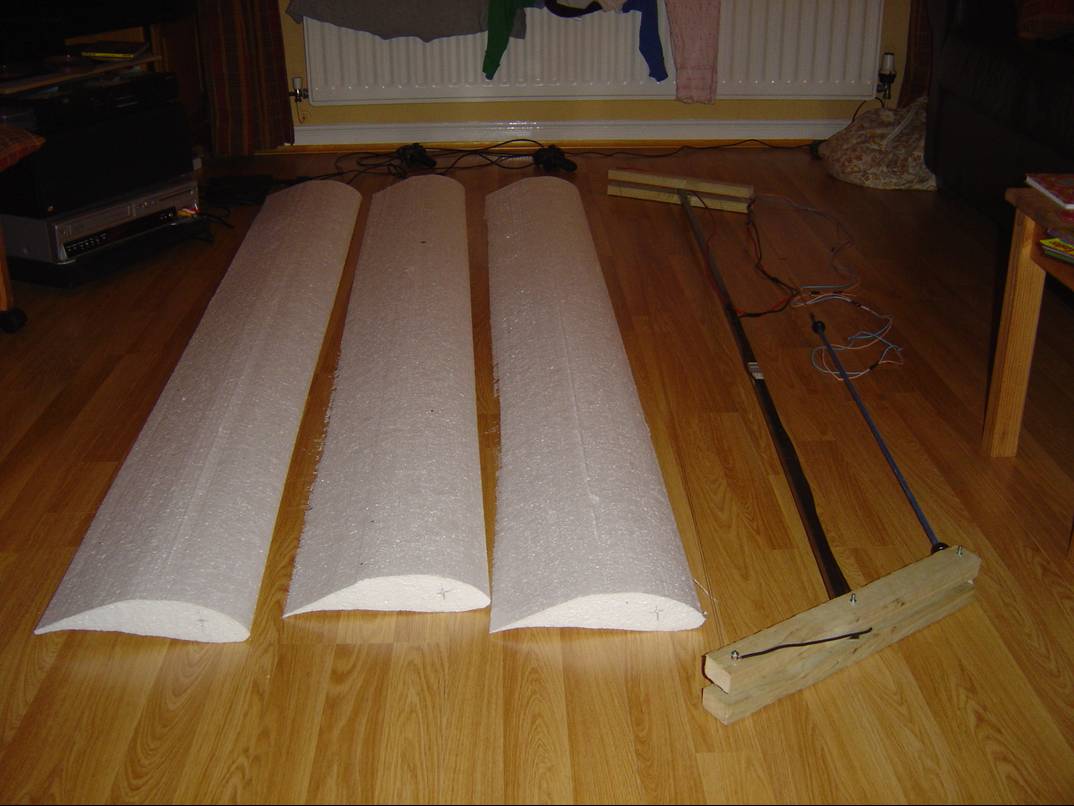
 |
||||
| vawtman Senior Member Joined: 14/09/2006 Location: United StatesPosts: 146 |
Nice work Chris  |
||||
| Tinker Guru Joined: 07/11/2007 Location: AustraliaPosts: 1904 |
Hi Chris, You can't use ordinary fibreglass resin on that foam, it just gets eaten away in no time. You *have* to use epoxy resin, but you can't use glass mat for that either as it wont wet out proprly due the binder in the mat. Get some woven glass cloth and epoxy resin and you're on your way to strenghten these blades. This task may be more involved than you bargained for if you want a halfway decent finish  . .
Make sure you have some non crushable inserts under the glass where the mounting screws go. Tinker Klaus |
||||
| Chris_Psmith Newbie Joined: 06/03/2008 Location: United StatesPosts: 5 |
Tinker, your suggestion feels like the one for me, just had a look for glass fibre cloth and came up with: 50mm wide / 50m long by 0.23mm thick, how does that sound to you, should be easily enough to cover it, just not sure about the thickness? Regards Chris |
||||
| Tinker Guru Joined: 07/11/2007 Location: AustraliaPosts: 1904 |
Chris, before you do any glass taping (BTW, you can get that tape wider as well, 50mm looks too narrow to me) you ought to fair the foam with bog first. Use microspheres for your epoxy fairing mix, it sands very easy. Run the tape longitudinally afterwards,many thin layers are better (stronger) than one thick layer. If you have never used epoxy before practice on a piece of scrap first. Do read the safety sheet, I always wear rubber gloves when handling that stuff. Tinker Klaus |
||||
| Jarbar Senior Member Joined: 03/02/2008 Location: AustraliaPosts: 225 |
Hello Chris,what is the diameter or swing of wings when mounted.And did you calculate this profile using the program from cycom.Or just use the example above.And well done on the cutting.How did the fibre glassing go. Anthony. "Creativity is detirmined by the way you hold your tounge".My Father "Your generation will have to correct the problems made by mine".My Grandfather. |
||||
| Chris_Psmith Newbie Joined: 06/03/2008 Location: United StatesPosts: 5 |
I just used the example they gave for the wing profile as the diameter was just what i was looking for, haven't started on the fiberglass yet, will post picks as soon as i get it done. regards chris |
||||
| GWatPE Senior Member Joined: 01/09/2006 Location: AustraliaPosts: 2127 |
Hi Chris, before you start to layup directly to the foam plugs, place the reinforcement where the mounts will need to be and the ends. These can be end grain balsa or other wood. These will be glued with epoxy/micofibre/microspheres. [filler and glue] After curing, these should be sanded back to the airfoil profile. I presume you have kept the foam shells that you cut the airfoils from. The mylar sheet is available from plastics suppliers by the yard. You start with a sheet approx 3 times the width of the airfoil section and cut it precisely in half down the length. The two halves are then joined back along the cut with cellotape. This then makes an open sided sleeve. Open out to the flat again. Use a mould release wax or similar and give 2-3 applications, buffing in between. Hand buffing with a soft cloth rather than a mechanical device. This prepares the mylar so a near mirror finnish can be obtained on the finished airfoils without any painting. The press can be made with a flat surface[eg a floor] on the bottom and another movable plank slightly longer and wider than the airfoil section. I used old car batteries, but bricks etc can be used for the weights. For bead foam I would Only use about 10 pounds per square foot airfoil section, of weights. "You do need to have the shells left over from the cutting process" You may have to cut another airfoil, if you discarded them. I would make one airfoil at a time. All you do is apply the fibreglass cloth to the sheet of mylar. The cloth straddles the join and is not quite wide enough to do both sides. Wet out the cloth till transparent with epoxy. I would use two layers. The second layer is cut to be half the width of the airfoil section and is placed about an inch from the join line, on both top and bottom halves. These are wet out as well. Now wet the leading edge of the airfoil section, about 1.5 inches, top and bottom. Apply a layer of 2inch tape around the leading edge and wet out with epoxy. A second layer can be applied with a 0.5 inch offset and wet out. The airfoil section can now be placed on the mylar sheet with the trailing edge along the cellotape join. The mylar is folded over to form a sleeve. Place the sleeve with airfoil onto the inside foam shell. Use a plastic scraper on the mylar to work the epoxy into the foam. Small air bubbles are not too much of a problem. Turn the sleeve over into the other shell and repeat. The sleeve can then be placed between the foam shells and weights applied. This effectively squeezes the fibreslass into the foam while the glue cures. Have some epoxy left over to confirm when it has hard cured. This will depend on ambient conditions. "Being too hasty will ruin the finish" After the glue is hard, remove the weights and the mylar should just peel away, leaving the shiny surface. The only trimming and sanding should be the ends and the leading edge. I have used this technique for making model aeroplane wings with excellent success. There should be minimal mess and you shouldn't need to use gloves. I use a plastic scraper and brush to wet out the glass on the mylar sheets. This technique was passed onto me by a fellow modeller, and is used extensively by model aeroplane hobbyists. I hope you understand this process as it can give a near perfect finish. .... Gordon. PS If you edit your post with the pics and resubmit, Gizmo's pic post fix should go to work on your pics. become more energy aware |
||||
Bryan1 Guru Joined: 22/02/2006 Location: AustraliaPosts: 2101 |
Hiya Guy's, I researched cnc foam cutting awhile ago and cameup finding some beaut wire cutter software here. It wouldn't be hard to makeup a cnc cutter by using small steppers and you can get draw slides pretty cheap for the axis travel. Oatleys have a hot wire electronic kit perfect for this so with a bit of thought it would be easy to make a cnc wire cutter up. Just my 2.2 cents Cheers Bryan |
||||
| The Back Shed's forum code is written, and hosted, in Australia. | © JAQ Software 2026 |
