
|
|
Forum Index : Windmills : Making blades with a ChainSaw
| Page 1 of 6 |
|||||
| Author | Message | ||||
oztules Guru Joined: 26/07/2007 Location: AustraliaPosts: 1686 |
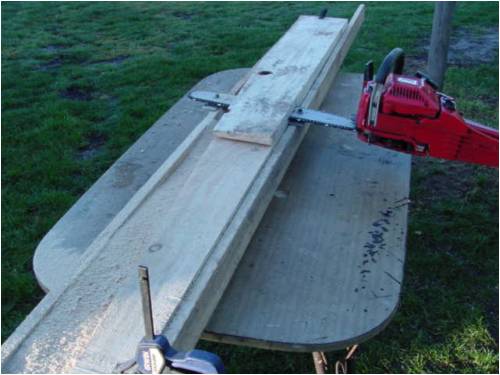
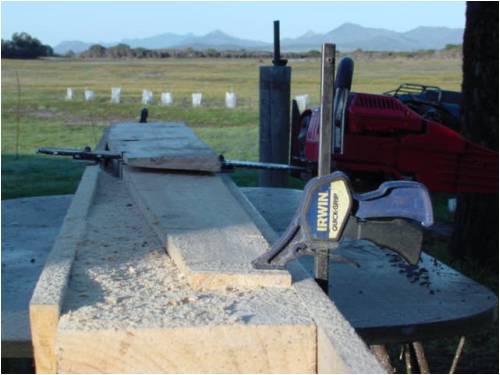
It has been about 9 months since we cut up a pine tree from the other side of the Island. Out of this I got some 8"x2" planks cut up by the bloke with the portable saw mill. They have sat on the floor of the shed for all this time and were now much much lighter than they were when they were green. I had been lucky that they were green, as it gave me a good excuse to do nothing....but alas, it was time to consider doing something. I am the first to admit that I'm a lazy slob, and the thought of getting a hand saw and doing all the cuts and then chiseling them out..... well after doing a small 8' set some years ago, I just couldn't get excited about it. If only there were a way to do it eeasy. I have no band saw, so there was no quick way of getting rid of a lot of timber before the carving began (as they show on Otherpower), so I contemplated life with 30kgs of shavings from what was to be my 4M blade set. I had been sawing up some firewood out in my forest one day, when the thought of slitting the timber with the chain saw came into focus... Ahh yes thats it!!. Flushed with my new enthusiasm, I decided to see how accurately I could saw in a straight line on a log..... it turns out that not very accurately at all summed it up quite nicely. I was thoroughly beaten again. I needed a plan B. It was while I was re-reading the way Danb did his rough and simple 10' set, that it hit me that doing it his way meant that it was all straight lines.... so it was decided. A JIG!! Here is the 20 minute jig I came up with. It uses the Dans 3 degree at the tip, 6 degree at the center and extrapolate to the sensible end of your timber size, and blade thickness= 1/8 blade width, and best line of fit from the tip to somewhere near the root. It consists of two pieces of 3x1 down either side of my 4th piece of 8x2 timber I had. It is 2M long. Here is a timber blank sitting in the jig ready for "processing" It needs to be held down while slitting obviously, and I used the clamps for this. Here is a full view of it..... yes lots of pictures just in case anyone else is silly enough to try it. 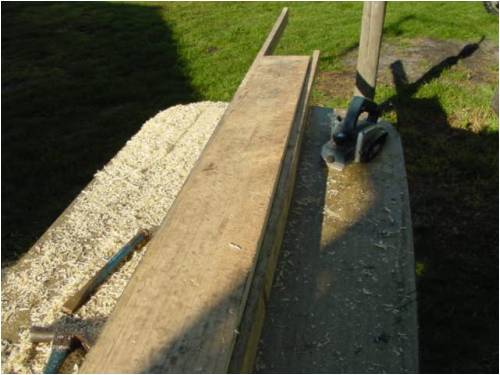
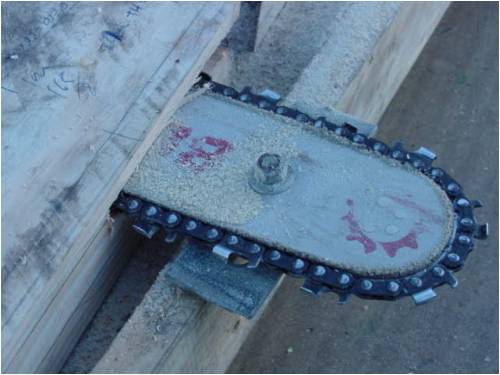
Well now I guess I must show how we get the chain saw to follow the jig we have set up. It was solved simply (like all things I do) by just welding a few bits of steel 6mm strapping together to give me 12mm thick bits, boring holes through 2 parts of the blade bar, and installing the guides with some 6mm bolts. It looks like this: 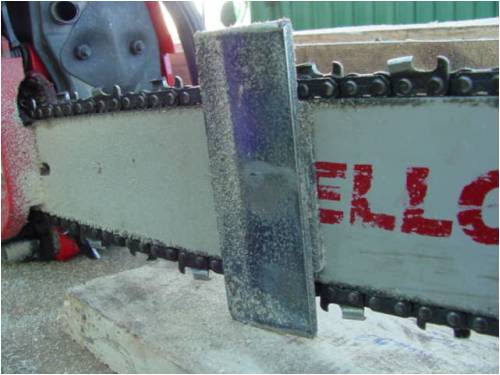
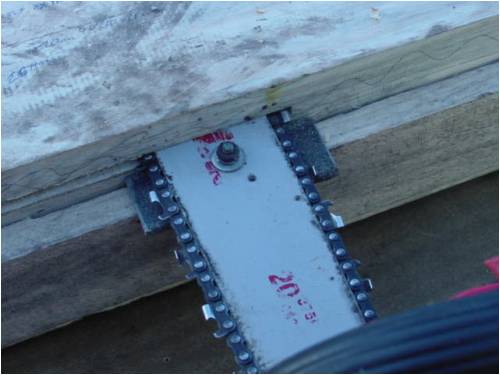
and one for the other extremity like this: 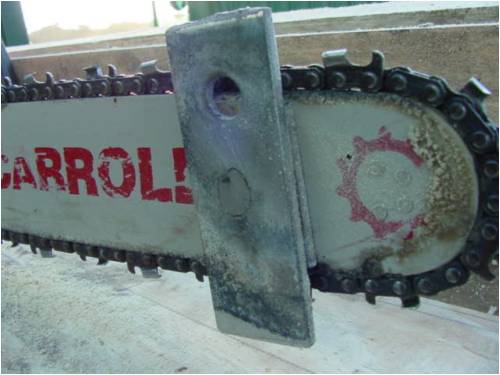
It turned out that they allowed exactly 10mm clearance from the jig to the cut wood. The side pieces of timber were offset 10mm too low on either side from our actual line. This meant that when I cut along the jig, sliding along on the skids, I will be cutting 10mm above the jig line Here are a few pics of how that looks: 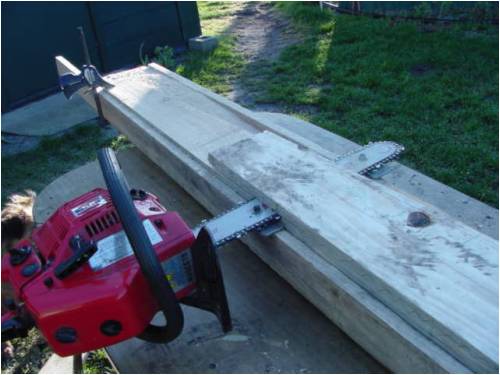
Here we are part way through 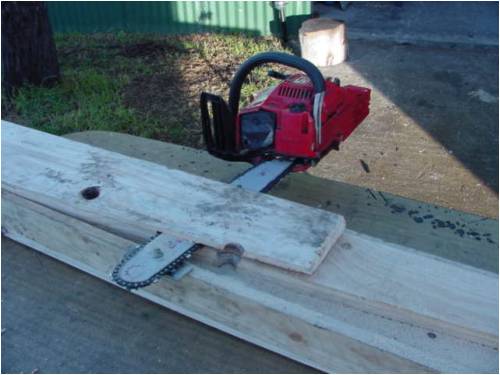
I suspect we all have the idea of that part now, so here is a finished raw cut. The finish is the same as a fence paling, or a weatherboard. So very happy with the finish, 2 minutes with the planer and the leading face was virtually complete. From start cutting to finished cut and plane, was only about 10 minutes. This beats the hell out of half a day or more doing it with the saw and chisel. 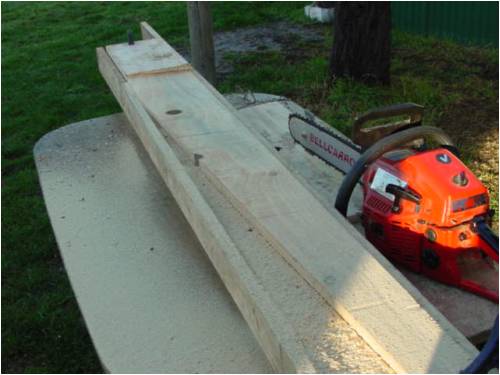
Here is the remains from a few cuts. Thats a lot of timber I don't have to remove by hand. 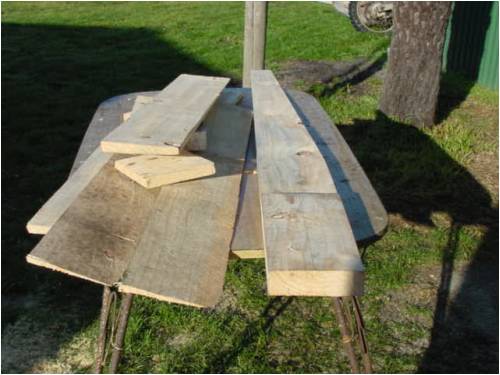
The three blades and all the angle cutting is finished. It took an hour or so do make the jigs and guides, an hour to cut all the blade blanks. This is the fastest way I know of cutting blades of this size. If I had built the jig a bit less flimsy, you could pump out blades all day long. Things to know. 1. Do sharpen the blades before you use them. 2. Do tighten the chain more than is usual, we don't want too much slop, else you will have to leave more error wood to compensate. 3. I elected to saw on the back of the blade (see photo's). This allowed me to have good vision of the cutting process as the chips get thrown away from you. 4. If you do 3, then be careful of backlash. A second jig does the rear of the blade (airfoil side) and is every bit as quick. 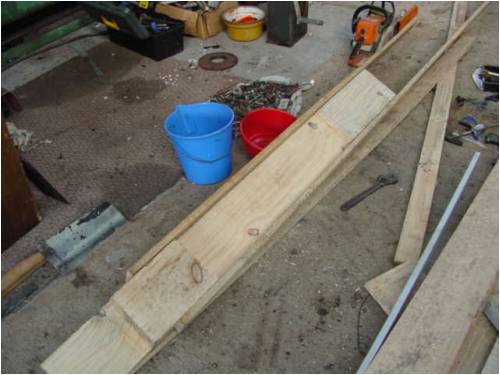
And now just have to plane the camber for the airfoil side. May make a jig for that too, but the planer will probably be fast as well as there is not lots to get rid of. The hard part is done. Update: 14/12/08 here is a link to a fellow board member with a video of this process. Imsmooth's video Village idiot...or... just another hack out of his depth |
||||
| Robb Senior Member Joined: 01/08/2007 Location: AustraliaPosts: 221 |
What type of pine tree? I gave blade carving a go once and decided it would be once but this looks like an idea....... |
||||
| oztules Guru Joined: 26/07/2007 Location: AustraliaPosts: 1686 |
Hi Robb, It was a radiata. I wanted to do a test with them (cheap and nasty and full of knots) before I use some Macracarpa for the final set. It is falling off a log easy. I could not believe it came out so well so fast. I no longer fear the process at all. Like you, I carved a set out years ago, and decided this was for better people than me, thats why I wasn't in a hurry to start on these. If I weren't so isolated transport wise, I would have tried to buy some.... glad I didn't. ........oztules Village idiot...or... just another hack out of his depth |
||||
vawtman Senior Member Joined: 14/09/2006 Location: United StatesPosts: 146 |
Hi Oz You've been a busy beaver lately.Nice work 
Sometimes we appear to be lazy when the extremities don't move much even though the the brain is really sparkin. Continue havin fun down there. |
||||
| Dinges Senior Member Joined: 04/01/2008 Location: AlbaniaPosts: 510 |
You mean all those 9 months procrastinating were for nothing ? 
But you see ? That's what I kept telling you... work smarter, not harder. Good to see you took my advice to heart. 
Seriously. Looking very good so far. I hope the knots won't cause any problems. Time will tell. Besides, if they fail, you could have a new set made in a few hours...
|
||||
philb Regular Member Joined: 05/07/2008 Location: United StatesPosts: 96 |
Hello Oztules, I tried "Plan A" a few years ago. It made good firewood of various geometric sizes, but not good blades. 
20 minute setup and 10 minutes roughout? For me that would have taken all day. I have considered duplicating tables, CNC, and anything else that might accurately get to job done. All took more work than carving several sets of blades. I settled on a hand held 5" grinder with 30 grit sand paper. That seemed the easiest until now. Here's an idea to go with your setup that may speed up the finishing process.  If you have a router on hand, you might make a device that will allow it to glide on top of the 3X1 boards after the roughout. "C" channel iron bolted to the router base comes to mind. A round over bit could make the curved surface on the leading edge and a flat bit for the rest. After all, it is already set up with the correct angles. It would be very nice to be able to remove a blade from the jig that only required light sanding and paint to complete the blade. If you have a router on hand, you might make a device that will allow it to glide on top of the 3X1 boards after the roughout. "C" channel iron bolted to the router base comes to mind. A round over bit could make the curved surface on the leading edge and a flat bit for the rest. After all, it is already set up with the correct angles. It would be very nice to be able to remove a blade from the jig that only required light sanding and paint to complete the blade.
I've got to try this! BTW, nice saw. philb |
||||
| pntrbl Newbie Joined: 12/07/2008 Location: United StatesPosts: 32 |
Very impressive spot o' ingenuity on those chain guides Oz. Nice job. SP |
||||
| martinjsto Senior Member Joined: 09/10/2007 Location: AustraliaPosts: 149 |
nice job oztules, are they for the 50000kw geny? free power for all McAlinden WA |
||||
| oztules Guru Joined: 26/07/2007 Location: AustraliaPosts: 1686 |
Philb, It only took about 15-20mins to plane the aerofoil and sand each blade, and although a jig could be done for the trailing edge, it is easy to do with the plane. If I had lots to do then I would consider it. The Blades are all done now, and turned out to be within 100 grams of each other at the first weigh in. For 2m long planks of pine hacked up with a chainsaw, they came in at 3.87kg each in the finish. Soon a 4 meter mill will arise. Pretty damn close for a chainsaw massacre I reckon. Pntrbl, sometimes slackarsedness is a virtue. I just so didn't want to carve them.... (so I listened to master Dinges and took his advice )
martinjsto.... I think I would need another 50m on each blade just to start it. Dinges, thanks for your guidance, I will get some pics tomorrow. The knots are big and horrible, but that does not detract from the blades, as I will fill them with sawdust and glue and it should be as strong as with no knots. ........oztules Village idiot...or... just another hack out of his depth |
||||
wdyasq Newbie Joined: 29/07/2008 Location: United StatesPosts: 21 |
Nice work Tules, It is amazing what a couple of well thought out jigs can do for a seemingly complicated project. It might be worthwhile for one to build such a jig for the bandsaw (yes, the one YOU don't have). The sawdust and glue past to disguise the knots will work fine (as long as I am at least a couple of kilometers away when it is running). I have been told Peter is back on his medication and shall be fine. Ron Adventure is just bad planning." -- Roald Amundsen |
||||
| oztules Guru Joined: 26/07/2007 Location: AustraliaPosts: 1686 |
Thanks Ron, With Dinges back on his tablets, the world can rest easy again. When starting out on this I knew what rubbish the wood was, so designed the root area to be much stronger than is normal. I basically ignored the first 1/3rd of the blade from the root for aerodynamics, but rather strength. This will create a little drag in the inner of the blade, but for this size blade I don't expect much faster wind than >100kph in the inner 600mm. The furling will be of Southern Cross origin, which will mitigate the high wind problems of the normal furling system, whilst incorporating the piggott system as well. This will mean total control of output with real time power limiting, and shutdown ability with or without the stator, or a braking system that may have frozen up from lack of maintenance. A discussion about this system was had here: southerncross furling and here:the manual overide furling system However, failing that I figure your 12000 mile separation from it may just make the difference. .........oztules Village idiot...or... just another hack out of his depth |
||||
crabtronic Newbie Joined: 31/07/2008 Location: AustraliaPosts: 9 |
Great idea. But could you have use a nice cured piece of hardwood instead of the pine? I don't really know a lot about props but i can give you some info on properties of timber and there are some incredibly strong and stable species of eucalypt. One in particular found around my area that's ideal is Tallowwood (eucalytus microcorys). This has tight interlocked grain and is used extensively in furniture making as well as tool handles. No good for firewood though. It burns great but you just can't split it. Try it! It's crabtastic |
||||
| Robb Senior Member Joined: 01/08/2007 Location: AustraliaPosts: 221 |
I think this is basicly his test run on making them. I was cuting up some firewood yesterday and thinking....... what will chain oil do when it comes to painting etc. For our euro friends we arnt useing vegetable oil on our chains over here. |
||||
| oztules Guru Joined: 26/07/2007 Location: AustraliaPosts: 1686 |
Hmm Rob, . "what will chain oil do when it comes to painting etc. " On the airfoil side... nothing .... as it is planed down to form the airfoil from an otherwise flat back of the blade. The front needs a quick plane and sand and this seems to do the trick. Interestingly, I noticed that when cutting, large globs of dust and oil built up on the table under the chainsaw. At no stage did I detect any oil residue on the timber... odd now I think about it. I use sae30 oil for the bar lube.... I'm no angel. This is probably less sticky than proper bar lube, but I replace the bar and chain each year, need it or not, but it never seems to wear anyway. Mineral paints would probably dissolve the oils if they were there, but they don't appear to be there anyway. And yes, the reason I needed a simple quick system, is I want to try several different blade combinations for the alternator. These ones are probably going to be a bit quick for the final design, but I want to see how three or four different tsr's go to see how and why.... These are probably tsr7+. I don't expect them to be steller performers. TSR of 5 will probably be the best as the Alt is pretty electrically stiff (dual axial), and may need torque more than speed. Now I can at least try different TSR as they are so easy to make. I will continue to use radiata until the best blade is found to match the load, it's cheap and abundant.... then the macrocarpa for the long term.... still cheap (free) but not abundant. .........oztules Village idiot...or... just another hack out of his depth |
||||
Dodgeman Newbie Joined: 19/07/2008 Location: United StatesPosts: 33 |
Awsome Idea Windmaster OZ,  and great narration as well, and great narration as well,
that -blade carving stuff- is what put me off of the idea also,much too labor intensive for my available free time, but, I am pretty handy with a chainsaw, even made a few small animal carvings over the years with em. Once I get the hang of what I am doing with the PVC mills, I would like to give your idea a go. |
||||
| oztules Guru Joined: 26/07/2007 Location: AustraliaPosts: 1686 |
Well today was the day the chainsawn blades took to the air. It was on a small 3.5m tower just for testing and trimming the turbine. They worked unbelievably well. As is customary when you raise these things in the air, there was barely a breath of wind anywhere... in the roaring forties in winter.. no wind. 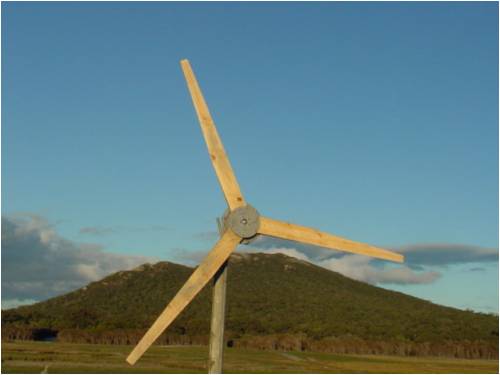
The breeze was so low that I could barely feel it on my face, so I estimate about... 3mph. With the blades not balanced, they would not even rotate. After balancing (with some magnets and spanners magnetically glued to the front plate), it slowly started to spin up. I could barely detect any air movement. Quite suddenly they gripped whatever air was there and you could hear them cut the breeze, even though I could barely feel it. Here is the test site, the trees are about half a kilometer away from the mill. 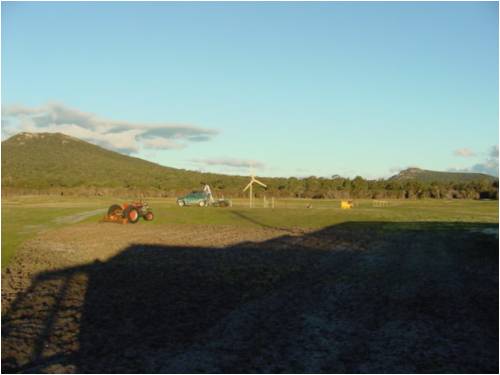
I was dumbfounded, with almost no detectable air movement, the damn things were trying to cut my head off. They were putting out 27v in virtually no wind.... no power mind you, but I would not have suspected that they would even spin under their own power. I didn't have any batteries on hand, but I did bring a 415v 3kw induction motor .. just to put a load on the alternator .... on the off chance a gust came along and it became unruly.... and it did A gentle 5-10 mph gust came through, lasting about 40 seconds at best, and it took off and drove the big 3 ph motor at a very respectable pace. So I was right, these are high TSR blades, too fast I think for this alternator, as it is very electrically stiff for battery charging. They make a slight swish noise from front and rear, but eerie silence out either side.. very odd... no detectable sound at all out the sides. I have not been face to face with blades of this diameter on a basically frictionless alternator before, but is all a little bit scary when you are both at ground level. Here it is a bit closer. 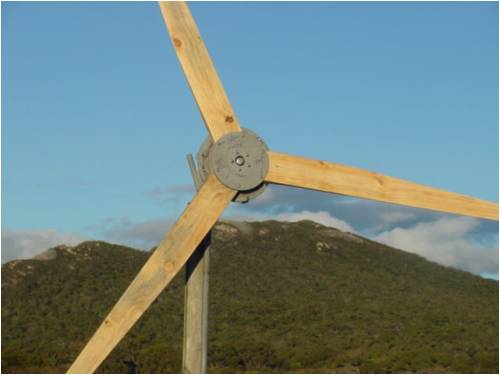
Anyway, the chainsaw blades are very impressive performers on their first windless day out.... and no I haven't built the tail yet. ........oztules Village idiot...or... just another hack out of his depth |
||||
| oztules Guru Joined: 26/07/2007 Location: AustraliaPosts: 1686 |
Ok, Test results Here is a graph of rpm/watts. I have placed a line of best fit for the prop curve. TSR 6 was just far too much, TSR7 and the figures were impossible. TSR 6.5 closely fits the results, and the wind conditions on the day/s. According to the weather man, no gusts were recorded greater than 30kmh so TSR6 was not possible by a long way. It was a clam day by our standards. I think 20 mph would have been as good as it got. (32kph). 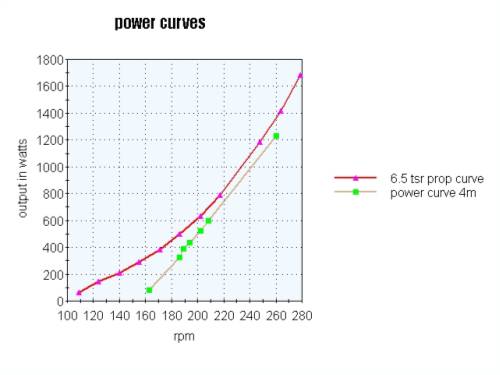
I was not good enough to read three meters at once, so had to use a camera to do it for me, and this had it's own problems. The other problem was the sheer amount of power going into the batteries when I started this. They were truck batteries(which I grabbed out of the grader and dozer just to have a 48v load. They are 700cca batteries, so I thought they weren't sissies, and that they could stand a bit of a belting ....not so After setting things up in a small trailer, and getting organised, the batteries went from 13v/batt to 17v/battery in no time with 20 or so amps pushing in.... So the first shot looks like this 68.3v@18A= 1230 watts, and the batts didn't like it much. 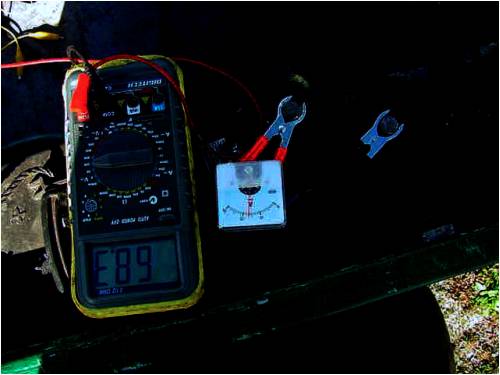
So I waited for the wind to die down a bit (didn't feel very strong at all anyway). Later in the afternoon,it was peaceful, and the readings looked more like this...still high voltage, but amps had calmed down a lot (batteries won't love me after this. Meter on left is rpm/10 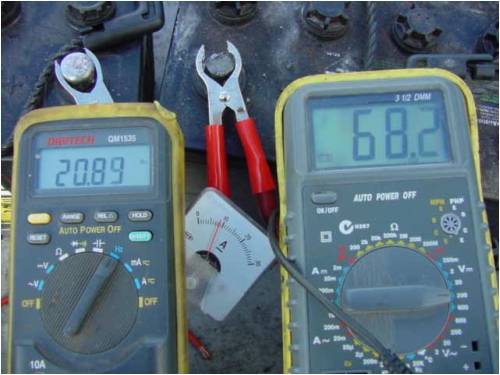
Note the voltage is about the same, but the batteries are not taking much charge now and probably only registering electrolysis if the truth be known. Had to stop this pretty soon, but took a number of readings... hence the graph. The blades have now got a few coats of epoxy paint on them now, and look like this: 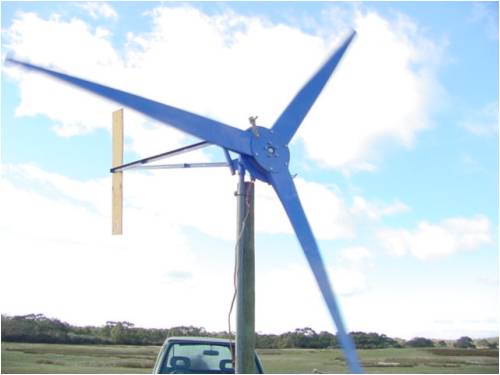
The tail is temporary to get the right weight and size for furling. All in all, these chainsawn blades work far better than I had expected for such a quick effort. Here is a pic of the test setup including the three phase 3kw motor I used as an initial load, it went over 1440 I think, and created a lot of air flow with that fan. At one stage the mill was driving it full speed and putting 19A@70v into the batteries at the same time (1.3kw for batts plus another 3-400w for the induction motor.... ) 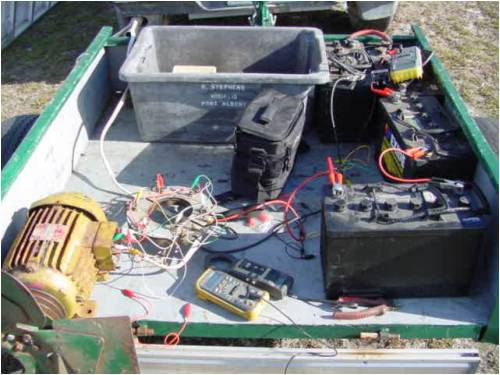
For those wondering what the performance is at ground level with a mill, here is an example of a few minutes power recording every 20 seconds. 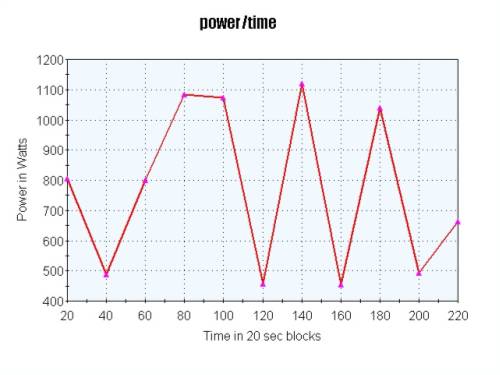
That should read time in seconds. The interval used was in 20 sec blocks... 
Having way too much fun down here ........oztules Village idiot...or... just another hack out of his depth |
||||
| crabtronic Newbie Joined: 31/07/2008 Location: AustraliaPosts: 9 |
O'tules They're pretty major output fugures for a few bits of pine. Would that be a potentially deadly current if you got zapped? And is that a F & P smart drive? Try it! It's crabtastic |
||||
| oztules Guru Joined: 26/07/2007 Location: AustraliaPosts: 1686 |
Hi Crabtronic, Yes that would do you no good, particularly if you had it unloaded, When it was doing it's max revs, I suspect unloaded it would be well over 100v@ high amps. At this size, it ceases to be a toy I think. No it is not a F&P, there is a story over here on it: story of brief construction type ..........oztules Village idiot...or... just another hack out of his depth |
||||
| dwyer Guru Joined: 19/09/2005 Location: AustraliaPosts: 575 |
HI OZTULES On your trailer you hook wires up on a ring thing between yellow motor and black bag so can you tell me what is use for ? and also stator coils are 100 turn 1.8 wire so how many ohms on each coils ? thank ian
dwyer the bushman |
||||
| Page 1 of 6 |
|||||
| The Back Shed's forum code is written, and hosted, in Australia. | © JAQ Software 2026 |
