Notice. New forum software under development. It's going to miss a few functions and look a bit ugly for a while, but I'm working on it full time now as the old forum was too unstable. Couple days, all good. If you notice any issues, please contact me.
grolly Regular Member Joined: 19/05/2007 Location: AustraliaPosts: 62
Posted: 07:56am 15 Sep 2008
Copy link to clipboard
Print this post
Here are the new storm proof blades...
They don't put out much power tho... I have bought the farm...now I AM powering it...
oztules Guru Joined: 26/07/2007 Location: AustraliaPosts: 1686
Posted: 10:18am 15 Sep 2008
Copy link to clipboard
Print this post
Interesting airfoil you have there....not sure your going to start a trend though...
The tip angle doesn't look quite right, and perhaps try and get some more angle at the root.... for better startup.
Im thinking your dump load is idle at the moment
Sad to see this though.
Time to get the chainsaw unleashed I think.
........oztules Village idiot...or... just another hack out of his depth
frank133 Newbie Joined: 11/09/2008 Location: Great BritainPosts: 32
Posted: 08:47pm 15 Sep 2008
Copy link to clipboard
Print this post
I bet they still turn better than the ones I have been making to date I just made a new set today,I have painted them before I try them,
I think that is were I was going wrong,
oztules Guru Joined: 26/07/2007 Location: AustraliaPosts: 1686
Posted: 09:07pm 15 Sep 2008
Copy link to clipboard
Print this post
Frank,
Don't forget the GT racing stripes.... makes em go faster
.........oztulesVillage idiot...or... just another hack out of his depth
frank133 Newbie Joined: 11/09/2008 Location: Great BritainPosts: 32
Posted: 09:23pm 15 Sep 2008
Copy link to clipboard
Print this post
Hi mate I will try anything ,
But I think these last ones I have just made will work?
If not, its out with the chainsaw While waiting for the paint to dry,I did a test on my dynamo,but when I hooked it up to a battery it turns the mill,I know I need something to stop the power from turning the dynamo into a motor,will sort that out later.
I just chopped a electric drill apart to see how the stator,and rotor were connected, big deal a busted drill and none the wiser, Why is windpower so complicated.I would go down the solar panel route, but there is no fun in that.I am still frustated but having fun.
oztules Guru Joined: 26/07/2007 Location: AustraliaPosts: 1686
Posted: 09:39pm 15 Sep 2008
Copy link to clipboard
Print this post
You use a diode in line with the positive or negative lead going to your battery. This diode will allow power to go from the dynamo to the battery, but not the other way. (stops the battery from motoring the dynamo.)
If you don't have a diode handy, and you wish to take out your frustrations on an inanimate object, you can steal a diode from one of your alternators.... each has six... but it is usually not so easy to extract them out singly, but rather pull out the whole diode block.
Where the three wires from the stator basket connects to them,... (cut the leads off from the stator basket to the diode block.... you now have three sets of diodes to choose from..... pick one set of two diodes at random.
This is where you can put the connection to one of the the dynamo wires.
One of the 2 beds that the diodes are embedded into, can go to the battery. Connected to one bed the dynamo will motor, connected to the other will isolate the dynamo from being motored, but will allow power from the mill/dynamo to pass to the battery.
The other wire from the dynamo goes straight to the battery. It is important to connect the dynamo around the right way.... neg output to neg battery terminal, and the diode in series with the positive line between the battery and the dynamo.
The easier way is to buy a bridge rectifier (very cheap now days) of 35A, and use that. The + and - terminals to the battery, and the dynamo to the other two posts in any order.
.........oztules
Edited by oztules 2008-09-17Village idiot...or... just another hack out of his depth
GWatPE Senior Member Joined: 01/09/2006 Location: AustraliaPosts: 2127
Posted: 11:25pm 15 Sep 2008
Copy link to clipboard
Print this post
Hi grolly,
is probably a good thing your storm proof blades were on yesterday. I am on the south coast and we were hammered yesterday. I have a couple of sets of wooden blades that you would be able to look at for inspiration. You have a chinese mill I think?
Storm proofing is all about furling. I took 300mm off the tail boom length when I reduced the rotor size by 600mm on my F&P mill. The chinese mills have a very heavy and long tail boom, with a relatively small heavy steel fin. I would look at some mods in this area. My F&P mill is controlled now, with furling starting at 10knots and almost fully furled at 20knots. No extra power generated, even in tested 40knot winds.
The high pressure system will dominate the weather for a while, so it is a good time to work on your mill.
Gordon.
become more energy aware
Bryan1 Guru Joined: 22/02/2006 Location: AustraliaPosts: 2102
Posted: 08:07am 16 Sep 2008
Copy link to clipboard
Print this post
Hi Grolly,
I had plenty of blades disappear on me in the past then I sat down and carved that set that goes anticlockwise for a bit of fun. I used the formula on gizmo's main site to get the tail to furl at 20m/sec. I did put roughly a 6 degree tilt on the genny mount and i have close to 20" clear of the tips to the tower. Now that suspect blade where I should of bit the bullet and made a new one but didnt is now showing signs of spitting. I'm based at kanmantoo in the adelaide hills so if you would like to venture down to my place we could have a dual blade carving session in my workshop where the only power used is from RE. I'm not game to try try Oz's chainsaw technique just yet but with 2 people working on 2 sets the time will be so much quicker. Well the offer is there mate all we need to is make a trip to the muarry bridge salvage yard and find some cheap lumber to use and we're on the way.
Cheers Bryan
frank133 Newbie Joined: 11/09/2008 Location: Great BritainPosts: 32
Posted: 10:38am 16 Sep 2008
Copy link to clipboard
Print this post
Hi,oztules,
That is the info I needed,thanks
UP to now my entire life has been engine related,
cars, trucks, motorbikes, I was toying with the idea of making a hydrogen powered engine,
But on my research I came across wind power, I have to say it is a lot more interesting than I thought,and more complicated,
I have read most of the old posts, still trying to get my head around some of them.
who said you cant teach a old dog new tricks,[that is a old uk saying]
Any thing mechanical I find fascinating, the furling systems are great, cant wait to have a go at making one
grolly Regular Member Joined: 19/05/2007 Location: AustraliaPosts: 62
Posted: 09:42am 17 Sep 2008
Copy link to clipboard
Print this post
Hi Bryan, thanks for the offer, I think I better take you up on the offer, how about Saturday, I have to mix about 5 cu mt of cement tomorrow for the shed foundation, and it will take till Sunday before I can remove the form work... and get a new back...only two more sides to go after this one.
E-mail me at pigpond1957@bigpond.com with the address etc, and what I have to bring, do I need to bring the mill or just the boss and the tail?
before I forget it... the shaft is 100mm offset from the pole center, to the right as you look at the blades.
I have started to make a set of blades, don't know how successful they will be, I have modelled them on the old ones for shape, but I am using plastic, they might bend not beak.
Grolly I have bought the farm...now I AM powering it...
Bryan1 Guru Joined: 22/02/2006 Location: AustraliaPosts: 2102
Posted: 10:02am 17 Sep 2008
Copy link to clipboard
Print this post
Hi Grolly,
I just send you an email mate feel free to ring me and we can have a good chat and get everything sorted before we start.
Cheers Bryan
Bryan1 Guru Joined: 22/02/2006 Location: AustraliaPosts: 2102
Posted: 10:03am 20 Sep 2008
Copy link to clipboard
Print this post
Well Guy's an upadte on todays work, yesterday I stopped at the timber yard and picked up 3 lengths of victorian ash for the blades. All the planks are straight square cut grain and when I told the guy what I was doing he took me out to the backshed and got me the best timber he had. Well $112.50 cash aint a bad price for the planks.
Firstly it's amazing just what you can do with a chainsaw powered by VB.
Just joking for Oztules.
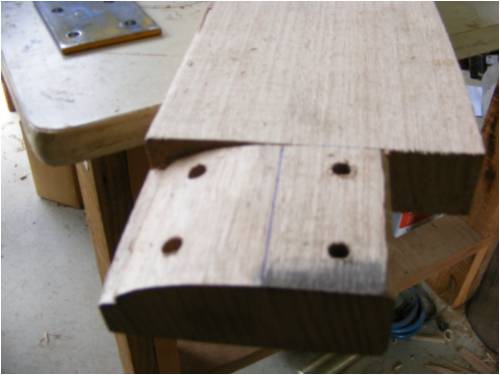
Now for the nitty gritty. The pic below shows how we chielded the wood to fit the chinese blade mount.
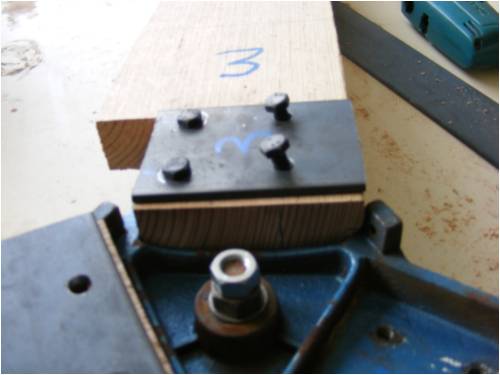
This pic shows the top of the chinese mount and tomorrow I'll make some tapered washers to suit the angled bolts
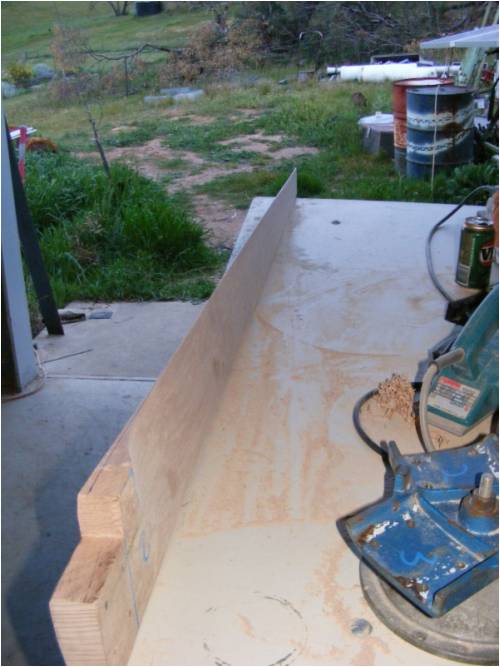
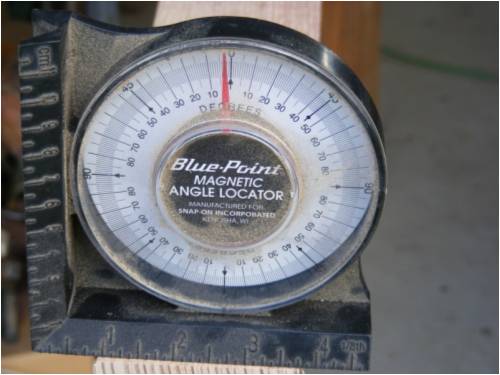
Here is a pic of the blades before any cutting showing the 3 degrees angle on the tips. We did this to see as the chinese blade mount had an angle already on it so to be sure to be sure we had to check.
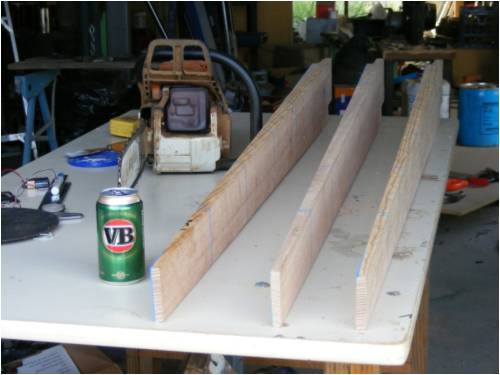
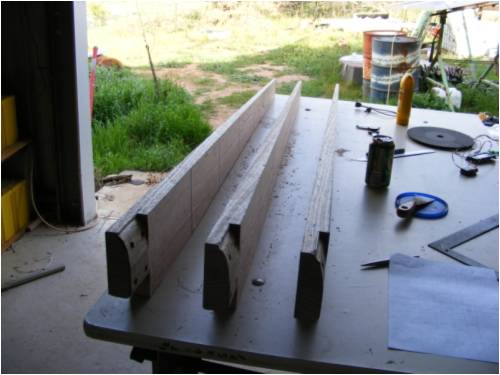
Well after day one here is the progress on the blades.
Tomorrow we'll hopefully get the blades finished, balanced and painted with the same 2 pak acrylic paint I used on my blades. The next job is going to dis-assemble the chinese genny and reverse engineer it so we have yet another kettle of fish to fry.
Cheers Bryan
oztules Guru Joined: 26/07/2007 Location: AustraliaPosts: 1686
Posted: 10:22am 20 Sep 2008
Copy link to clipboard
Print this post
Impressive blade mount workmanship....difficult curved surface there.
Dunno how you did that with a VB powered chainsaw .
Did you have to twist the blades, or is that a straight taper, with the twist from the angled mount?
It looks like you have used a bandsaw or similar to get the taper you have.... you realise I would not have to ask all these questions if you had a few more pics!! (I'm just picture greedy)
Looking good, am waiting on the edge of my seat for part two. I am also well relieved that you have managed to get Grollo weaned off plastic/glass blades. (By mistake I managed 5kw from the chainsaw blades today... they didn't break Grolly )
Well done Bryan, you're getting to be a real pro at this blade business.
.........oztules
ps I want a chainsaw to run on VB.... after you've drunk it Edited by oztules 2008-09-21Village idiot...or... just another hack out of his depth
philb Regular Member Joined: 05/07/2008 Location: United StatesPosts: 96
Posted: 03:38pm 20 Sep 2008
Copy link to clipboard
Print this post
Nice blades Bryan!
That's beautiful wood! The only wood I have found that looks that nice is aircraft grade spruce. I would have to sell the farm to pay for them. Instead, I use fiberglass over wooden blades.
You and Oztules seem to have taken blade fabrication to perfection!
Thanks for an excellent post! I am looking forward to hearing about reverse engineering the chinese generator.
philb
Bryan1 Guru Joined: 22/02/2006 Location: AustraliaPosts: 2102
Posted: 09:43am 21 Sep 2008
Copy link to clipboard
Print this post
Well day 2 guys,
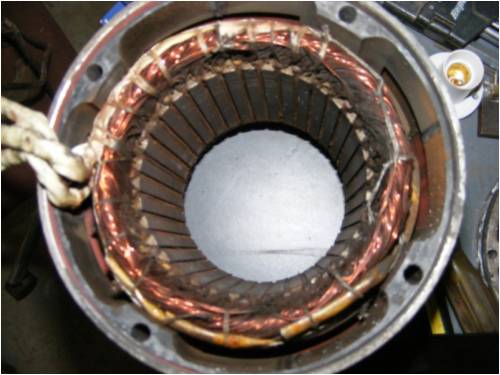
More hard work and we got all the front faces on the blades done and 1 blade nearly finished. We pulled the genny head apart and well the thing just looks like a cheap motor rewind so no reverse engineering here. It will be far easier just to do a motor conversion and get a better output anyday.
With the finished blade on the mount the tips are sitting on 3 degrees and although the wood was only 38mm thick we managed to get some twist in the blades. Hopefully i'll get a chance thru the week and get the blades all finished, both bearing holders rebushed and the genny backup in the air at Grolly's place producing power.
Cheers Bryan
oztules Guru Joined: 26/07/2007 Location: AustraliaPosts: 1686
Posted: 10:07am 21 Sep 2008
Copy link to clipboard
Print this post
Nice looking work Bryan
..... of course you know if you had fed the VB to the chainsaw, they would be finished yesterday ... two sets.
..........
Village idiot...or... just another hack out of his depth
Dinges Senior Member Joined: 04/01/2008 Location: AlbaniaPosts: 510
Posted: 10:19am 21 Sep 2008
Copy link to clipboard
Print this post
Bryan,
Hard to see in the pictures and maybe I haven't read carefully enough, but what's preventing the generator from cogging?
Looks as if the permanent magnets on the rotor are straight bars, and it doesn't appear the stator is skewed either?
Good looking blades, btw. Couldn't find a knot in there... More royalties going in Oztules' direction, I s'pose. He should be filthy rich by now.
oztules Guru Joined: 26/07/2007 Location: AustraliaPosts: 1686
Posted: 10:54am 21 Sep 2008
Copy link to clipboard
Print this post
Dinges,
Just Filthy I'm afraid. He did these blades the hard way, so I missed out..... and I think he's going to fine me 2 cents for being a smarty.... so I'm back to zip
I wondered about the cogging too, hopefully we'll find out if it cogs or not.
I am a little concerned about the length of the blade holder (or lack of it). Seems creepy small to me.
Knots smots, 5kw with lots of knots..... thrill seeker oztules. Village idiot...or... just another hack out of his depth
Bryan1 Guru Joined: 22/02/2006 Location: AustraliaPosts: 2102
Posted: 11:12am 21 Sep 2008
Copy link to clipboard
Print this post
Oz the blade holder is abit on the small side but i did make the base of the blade fit in suggly. I also made a 75x110mmx6mm plate to go ontop of the blade and 2 out of the 4 bolt go in at a 45 degree angle. Also as it will be hard to keep the moisture out of the blade base we'll be putting fiberglass resin in along with some glass matting not only to seal it up but also for additional strength.
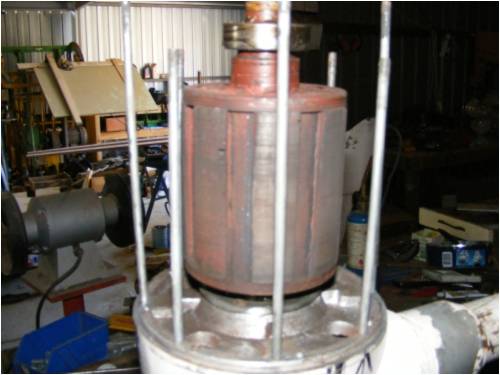
The rear bearing had gone on the rotor so once i get the bores re-bushed and the thing back togather we'll see if there is any cogging but Grolly did say there was very little if any cogging. I'll measure the distance between each magnet and see if any are offset too..
Cheers Bryan
Bryan1 Guru Joined: 22/02/2006 Location: AustraliaPosts: 2102
Posted: 09:32am 03 Oct 2008
Copy link to clipboard
Print this post
G'day Guy's,
Well as this thread was getting down the list I thought I'd better get it back on the front page.
Anyway last weekend Grolly and I got the blades finished and the genny re-bushed and put back together. silly me forgot to take pic's as we were that busy. It turned out when we tried to balance the blades my shed roof wasn't high enough so we packed the lot in Grolly's ute and headed up to sedan to balance them there. The wind was blowing that strong on all sides so we had no chance at all to balance them.
Now as said above it's been a week so time for Grolly to get back in here and finalise the genny repair with plenty of pic's of hopefully the genny working at full speed with the amp guage totally maxed out.
So come on Grolly we are all waiting mate especially me
Cheers Bryan
Page 1 of 2
Print this page
The Back Shed's forum code is written, and hosted, in Australia.


 )
)