Notice. New forum software under development. It's going to miss a few functions and look a bit ugly for a while, but I'm working on it full time now as the old forum was too unstable. Couple days, all good. If you notice any issues, please contact me.
vawtman Senior Member Joined: 14/09/2006 Location: United StatesPosts: 146
Posted: 03:54pm 07 Feb 2009
Copy link to clipboard
Print this post
After a couple months of pacing around the rotor and snowblowing everyday we finally got a break in the weather.
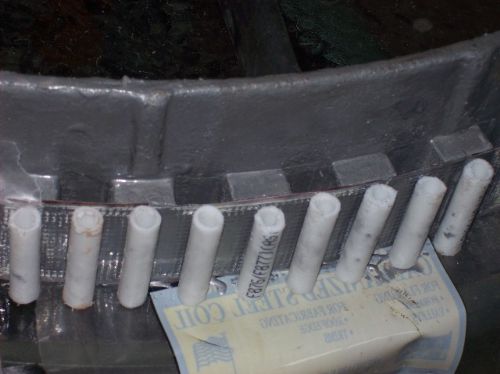
Here's the recipe i cooked up so far
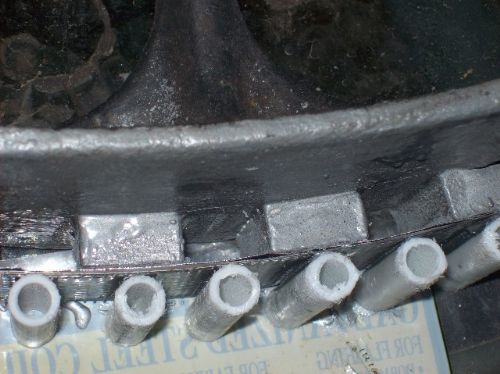
2 layers of sheet metal over mags(gap)
1 layer of waxpaper(stolen from wife 2 layers of fiberglass screen
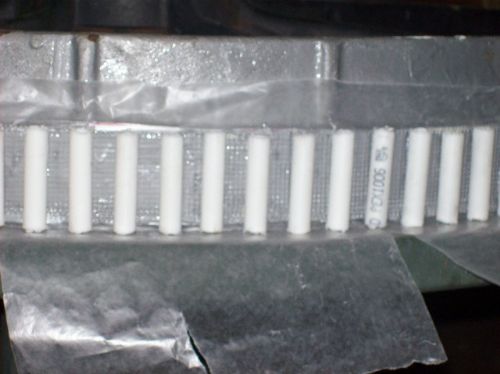
108~pieces of pvc tubing
1 carton of kevlar reinforced Power Poxy nice stuff ant the same has used for the mags.
Here's some pics of my progress so far.
Havin fun
oztules Guru Joined: 26/07/2007 Location: AustraliaPosts: 1686
Posted: 07:16pm 07 Feb 2009
Copy link to clipboard
Print this post
No doubt about it Vawtman... to say that is an ambitious project is an understatement.
I very much hope that the wheel is truly round, as the airgap is going to be unforgivingly skimpy. Hopefully the missus's wax paper allows the stator to release from the metal ring easily (it should... good idea)..... which just leaves you to release the metal band from 50 odd grabby magnets..... you have all the fun
Exactly what part do the plastic conduits play?... or put another way, where exactly does the wire go..inside the tubes (threaded through the hole?)...
Damn interesting stuff you got there Mark.
..........oztulesVillage idiot...or... just another hack out of his depth
vawtman Senior Member Joined: 14/09/2006 Location: United StatesPosts: 146
Posted: 08:25pm 07 Feb 2009
Copy link to clipboard
Print this post
Hi Oz
I spun it up pretty fast early on and it should be real close for the rpms called upon.The thought is i could glue a piece of emery cloth to a few the mags to plow the way if needed.
The conduits are just that slots for the winding.A 2ph overlap and the nice thing is i can work on the outer perimeter.When everything is stabilized, a bit fragile at this point.I'll used my grout grinder to open up thin slots and then reseal them when the winding is sealed.
Can you believe it took almost a pound of poxy to adhere the 108 slots.No mention of labor the fun part Thanks to the waxpaper it will lift of easily but needs more surgery yet.It was fun attaching the steel it just rolled right on.No support needed
vawtman Senior Member Joined: 14/09/2006 Location: United StatesPosts: 146
Posted: 10:00pm 08 Feb 2009
Copy link to clipboard
Print this post
I'm gonna use this has a diary of my stator if thats o.k.All 108 slots are installed and i can spin the stator on the waxpaper.Good Thing
Had a thought today of using the same banding i used for the inner gap on the outside for the poxy filler.Sometimes easy solutions take time.It's amazing how strong the pull is outthere.
The outer section is now wrapped with screen and waxpaper and working on the single band around the perimeter that will act has a magnetic form
I'm always open to other thoughts
Thanks for your time
v.....
vawtman Senior Member Joined: 14/09/2006 Location: United StatesPosts: 146
Posted: 07:20pm 14 Feb 2009
Copy link to clipboard
Print this post
Well today i finished the outer layer and after it cures the required 24hrs i'm gonna lift the stator assembly off the rotor to seal the base for the final pour for the gaps between slots and also add anchors for the supports.It seems like the skeleton will be pretty strong has is.
This will be the first test to see if the thin gap is enough.Hope so and havin fun.
Good or bad will post updates and pics.
oztules Guru Joined: 26/07/2007 Location: AustraliaPosts: 1686
Posted: 08:54pm 14 Feb 2009
Copy link to clipboard
Print this post
Vawtman,
Don't forget to have a camera handy for the big lift-off
.........oztulesVillage idiot...or... just another hack out of his depth
vawtman Senior Member Joined: 14/09/2006 Location: United StatesPosts: 146
Posted: 07:57pm 15 Feb 2009
Copy link to clipboard
Print this post
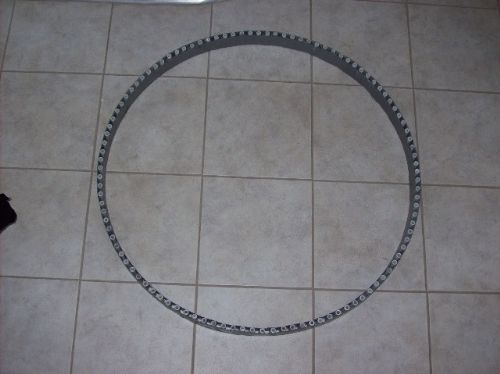
Well she popped right off and when the sheet metal was removed she spun freely all the way around so the wheel is true.
I think maybe i might open the gap up to a popcicle stick by cutting the epoxy band before the final pour though.
P.s how do you like my new floor i put in.
Jarbar Senior Member Joined: 03/02/2008 Location: AustraliaPosts: 225
Posted: 08:38pm 15 Feb 2009
Copy link to clipboard
Print this post
Now thats pretty inspiring,well done.
Anthony"Creativity is detirmined by the way you hold your tounge".My Father
"Your generation will have to correct the problems made by mine".My Grandfather.
oztules Guru Joined: 26/07/2007 Location: AustraliaPosts: 1686
Posted: 09:07pm 15 Feb 2009
Copy link to clipboard
Print this post
Now that is truly cool, and the tiling is good as well.
You have my complete sympathy with the wind. I am currently doing a 90 coil rewind. It has 360 pieces of transformer paper that had to be cut out, 90 coils to wind in 15 coil/half phase strings.... so 15 trapezoidal formers had to be built.... and the list goes on. 108 of anything is a lot of time....
..........oztules Village idiot...or... just another hack out of his depth
vawtman Senior Member Joined: 14/09/2006 Location: United StatesPosts: 146
Posted: 09:45pm 15 Feb 2009
Copy link to clipboard
Print this post
Thanks Jar and Oz and good luck with your projects.