| |
Page 1 of 2   |
| Author |
Message |
brucedownunder2
Guru

Joined: 14/09/2005
Location: AustraliaPosts: 1548 |
| Posted: 07:32am 29 Apr 2007 |
 Copy link to clipboard Copy link to clipboard |
 Print this post |
|
Hi,, I'm into cutting and profiling some "ABS-Duraflo " plastic pipe into a set of blades .
Question is , I need to use carbide tipped cutters and very rough sanding disc's ,,then a sharp spokeshave to get any reasonable finish.
Do any of you have experience with a fine finish to this material ???.
I'm thinking ,Fillers,Epoxy or Polyester, what binding undercoat first,?
The semi-final finish from sanding applications gives a "coarse,furry type of finish"-haven't tried wet and dry paper yet---
Any clues would be appreciated, Thanks.
Bruce
Bushboy |
| |
KiwiJohn
Guru
Joined: 01/12/2005
Location: New ZealandPosts: 691 |
| Posted: 06:58pm 29 Apr 2007 |
Copy link to clipboard |
Print this post |
|
Bruce, I did a "Google" and found this:
[quote]Apr 26, 2002
Dear Mr. Oddie,
Painting or plating of A/CRYLENE B/UTADIENE S/TYRENE need adhesion. Best way to get this adhesion is etching ABS. Best way to etching ABSis using[400g/l H2SO4 +400 g/lCHROIC acid]. Best kind of paint to the same is epoxy based paint.
Thanks and best regards,
Raafat Albendary
- Cairo, Egypt
[/quote]
However, considering that ABS is thermo plactic I wonder if the trusty hair dryer could be used to melt the furry bits and give a smoother surface? Just a random thought really.Edited by KiwiJohn 2007-05-01 |
| |
KiwiJohn
Guru
Joined: 01/12/2005
Location: New ZealandPosts: 691 |
| Posted: 07:01pm 29 Apr 2007 |
Copy link to clipboard |
Print this post |
|
Just another random thought Bruce, are you sure you want those blades to be smooth? A furry roof on your expensive European convertible is quieter than smooth vinyl fabric, maybe slightly or even matt surface blades are quieter than smooth and shiny? |
| |
brucedownunder2
Guru
Joined: 14/09/2005
Location: AustraliaPosts: 1548 |
| Posted: 09:20pm 29 Apr 2007 |
Copy link to clipboard |
Print this post |
|
Kiwijohn,,, Thanks for the reply --your heatgun is a thought I never thought about. I'll try it.
I'll try the wet & dry with water sanding paper also --don't want a glossy finish , just a "better" finish.
The acid prep sounds scary --- the hotel I stayed at in Cario could do with a few tanker loads of it ,,lol.
Bruce
Bushboy |
| |
Bushman

Regular Member

Joined: 24/04/2007
Location: AustraliaPosts: 41 |
| Posted: 11:30pm 29 Apr 2007 |
Copy link to clipboard |
Print this post |
|
G'Day
I rough-cut my first set of blades yesterday - using a small angle grinder with a diamond tipped blade - it worked, but what a bloody mess everywhere! I was thinking of doing the shaping and finishing with a jigsaw and router, but your post makes me think that chemical or heat-softening might work better than solely mechanical cutting/shaping
How about using jointing fluid? this stuff literally melts the surfaces and once soft, the cut maybe could be done with a knife and the shaping with a spokeshave The same would apply to the surfaces to key them before using an etch primer.
Cheers
Alan |
| |
brucedownunder2
Guru
Joined: 14/09/2005
Location: AustraliaPosts: 1548 |
| Posted: 08:24am 30 Apr 2007 |
Copy link to clipboard |
Print this post |
|
Hi Alan..
I've got there,,, if you have the tungsten-carbide tipped 4 inch cutting and profiling blade ,it's a beauty.
But....... be very careful, these new angle grinder profiling blades are very dangerous----- wear goggles,long sleeve shirt, long trousers,LEATHER gloves and don't have anybody around you to distract you...
now ,done with the sprooking,,
I cut my 3/4 inch plastic with the jigsaw and crc lubricant-works great. then marked out the leading and trailing edges and profiled the shape with that cutting wheel--take it very easy,,if you "dig" in ,then thats where the danger is.just "brush the surface and take small amounts of material off a bit at a time.."
cleaning up I used a very coarse wood sanding disc and later a orbital sander with cloth sanding paper and soap as a lubricant --finish looks fairly good so far ..
Bruce
Bushboy |
| |
Bushman
Regular Member
Joined: 24/04/2007
Location: AustraliaPosts: 41 |
| Posted: 10:28am 30 Apr 2007 |
Copy link to clipboard |
Print this post |
|
Hi Bruce
Your advice about the jigsaw sounds about right - had not thought of using the lubricant.
For shaping and fairing, I have a profiling blade - I use it to shape burls. I think we both know how dangerous angle grinders are but with the profile cutter, the danger level rises exponentially. A router is another potential killer, but on balance, I think it may be as effective and probably safer, especially using a fence to guide the cut. Do you think a 25mm quarter round bit might produce about the right curvature on the leading edge of 150 mm pipe? The trailing edge is more of a problem - that is where the angle grinder comes in, but the suggestion of a spokeshave is not silly, then clean up with a sander? I recall reading on one of the forum posts that it is the inside face that need shaping - not the outer (convex) face. Is this right?
Regards
Alan |
| |
brucedownunder2
Guru
Joined: 14/09/2005
Location: AustraliaPosts: 1548 |
| Posted: 09:10pm 30 Apr 2007 |
Copy link to clipboard |
Print this post |
|
Hello Alan and crew,,
Alan, both the inside and outside require profiling,the inside would be the traing edge which is fairly straight and an even sort of chamfer finishing off with a 1mm fine edge.
The leading edge is "bowed" of course to get the taper and twist,. this is where I shaped the outside edge to create the aerofoil section. I reckon your router cutter would be good at the finishing stage ,but initally ,you have to profile this leading edge with the cutter ,followed by coarse sanding .
Now, on the leading edge,depending on the diameter of the pipe,you may think it's an idea to just take a bit off the inside also--I eyeballed this and thought it would create a more even airflow. After all this ,i just round off this leading edge from nearly nothing at the tip to ,say, a pencil diameter at the most 'rounded" angle.
as for finishing , I'm going to try an Epoxy or Polyester bog ,very light application, then wet and dry it. Then paint with a epoxy "Killrust: self primer paint.
Bruce
Bushboy |
| |
Bushman
Regular Member
Joined: 24/04/2007
Location: AustraliaPosts: 41 |
| Posted: 10:23pm 30 Apr 2007 |
Copy link to clipboard |
Print this post |
|
Thanks for the advice Bruce.
Re finishing, I have a lot of experience with epoxy from building and repairing boats - see www.handymariner.com.au/ the catamaran featured throughout the site is mine. I rather doubt you will get a good bond onto ABS (or most other plastics). Polyester would probably be even worse so before you spend the money, check with Brett at Norglass or with ATL Composites (links are on the HM site). You may do better to roughen the surface and just use an epoxy primer.
Another option is chlorinated rubber (tougher than it sounds). This is the primer for Sigmaplane antifouling (marketed by Wattyl). It is even possible that HARD (not soft) antifouling paint might be good as the surface finish because it is tough and abrasion resistant - as used on planing hulls and propellors.
An added bonus is that you can strap your windmill onto the bathtub and go boating! |
| |
wind friend

Newbie

Joined: 01/05/2007
Location: AustraliaPosts: 39 |
| Posted: 08:06am 01 May 2007 |
Copy link to clipboard |
Print this post |
|
hi alan
just went through all the pain of shaping 3x1600mm blades cut from 150mm dia. pvc pipe. the first set of blades now going to a smaller project (one day) great results from angle grinder profiling disc for the trailing edge. mark the edges of the blade with a parallel line and work to it! say 5mm for the leading edge and 15mm for the trailing edge. got good results from drawing a router bit down the leading edge by hand. final finish was done with a foam sanding block with coarse and medium grit.
hansEdited by wind friend 2007-05-02 |
| |
domwild
Guru
Joined: 16/12/2005
Location: AustraliaPosts: 873 |
| Posted: 09:14am 01 May 2007 |
Copy link to clipboard |
Print this post |
|
Bruce,
I need to paint my PVC blades once i manage to have them balanced. Went to Bunnings and there is a primer, which sticks to tiles and PVC and even your shirt! As it even sticks to tiles, then it will also stick to ABS and make it less furry.
Taxation as a means of achieving prosperity is like a man standing inside a bucket trying to lift himself up.
Winston Churchill |
| |
brucedownunder2
Guru
Joined: 14/09/2005
Location: AustraliaPosts: 1548 |
| Posted: 09:31am 01 May 2007 |
Copy link to clipboard |
Print this post |
|
Thanks Dom,,, Yeah ,,, what's it's name???
Had to have a go ----
Cheers
Bruce
Bushboy |
| |
Feral
Newbie
Joined: 03/12/2006
Location: AustraliaPosts: 39 |
| Posted: 01:30pm 01 May 2007 |
Copy link to clipboard |
Print this post |
|
There is a specific cleaner or primer for ABS but you will find it very hard to find at any general hardware shop so I would suggest the normal plumber's PVC pipe cleaner or primer as they are very alike and both contain high percentage of Methol Ethol Ketone. It will take more then the hair off your blades if you are not careful. |
| |
brucedownunder2
Guru
Joined: 14/09/2005
Location: AustraliaPosts: 1548 |
| Posted: 09:56pm 16 Jun 2007 |
Copy link to clipboard |
Print this post |
|
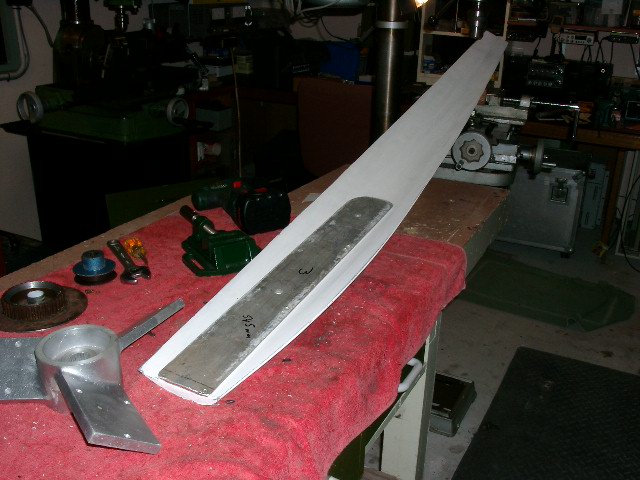
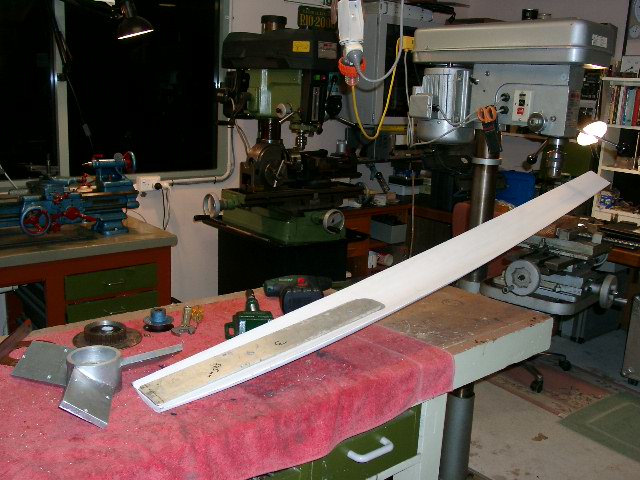
Well, I'm just about ready to align and attach these beauties to Trev's cast hub which slides onto the F&P shaft .
I've made up a profiled Aluminium 'stiffener" to rest along the front inside of the curve. Will ,maybe, fill this 'hollow' with foamfill and skim it with bog,
Thr blades are 1700mm and the stiffener is 500mm.
These are big blades and lots of hard work to get them perfect,have them within 20 gramms of each other,the raw abs blades,can get them perfect by shaving a little Aluminium off.
That carbide tipped 100mm angle grinder disc shaves Aluminium very easy. For those of you that don't have much experience with hand tools--these disc's are bloody dangerous,please be very careful. Wear all the protective clothing you can get.
Bruce
Bushboy |
| |
Bushman
Regular Member
Joined: 24/04/2007
Location: AustraliaPosts: 41 |
| Posted: 10:34pm 16 Jun 2007 |
Copy link to clipboard |
Print this post |
|
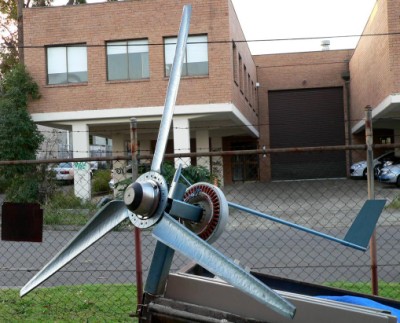
G'Day Bruce
Great looking blades! Love the idea of the aluminium stiffeners.
I finally finished the prototype - see attached - sorry about the confusing background. On this one, the blades are bolted to an old clutch plate that happens to have a splined centre that fits the FP shaft The second unit - also with UPVC blades is coming along nicely but it will have an alternative way of mounting the blades - details later.
I'm also making a third unit for my place south of Oberon - noted for being one of the coldest places in Australia - so instead of UPVC which becomes brittle at sub-zero temperatures, this one will have aluminium blades.
We are still experimenting with silicon controller/rectifiers. The objective is to run AC from the vane the 20 metres to where the batteries are located and put the rectifier/controller with the latter. This will largely eliminate the problem of voltage drop that would occur if the rectifier was at the vane end
Cheers
Alan
 |
| |
Bushman
Regular Member
Joined: 24/04/2007
Location: AustraliaPosts: 41 |
| Posted: 10:51pm 16 Jun 2007 |
Copy link to clipboard |
Print this post |
|
Comments about the prototype in the picture above would be welcome. For example:
Does the tailfin look large enough? It would be simple to add a second fin underneath
Having seen Bruce's blade stiffeners, how about adding some shaped stiffeners to mine? - pop-riveted to the blades and to the clutch plate.
How about longer blades? these are 750 mm. meaning a total diameter of about 1800 mm |
| |
FandPwithPVC
Regular Member
Joined: 09/09/2006
Location: Posts: 64 |
| Posted: 12:03am 17 Jun 2007 |
Copy link to clipboard |
Print this post |
|
Hi All
Three comments on the above blades.
First ,Is the total capture or working area in excess of .5 a square metre. If it is not it will not run a F @ P.
Second You have sharpened the front of the leading edge when it should be the back side.
Third If possible make your mounting so that the leading edge is aligned to the centre of the shaft. . This will make the blades run quieter smoother and more efficiently although it is harder to make.
Keep up the good work Regards Dennis L |
| |
Bushman
Regular Member
Joined: 24/04/2007
Location: AustraliaPosts: 41 |
| Posted: 03:10am 17 Jun 2007 |
Copy link to clipboard |
Print this post |
|
Thanks Dennis
Appreciate your comments but I'm not sure they are accurate. Actually, it IS the trailing edge that is "sharpened" - the leading edge has a pencil-round profile. Also, the leading edge IS the one aligned with the centre.
You may be saying that the blades are oriented the wrong way and you may be right. I could not find any useful information on this topic, but every illustration I saw had the leading edge the way mine is built, so looking from the front, the mill turns anticlockwise. Here are a couple of examples:
  |
| |
Gill

Senior Member

Joined: 11/11/2006
Location: AustraliaPosts: 669 |
| Posted: 09:12am 17 Jun 2007 |
Copy link to clipboard |
Print this post |
|
MMmmmm! Nice work Bushman.
Have to agree with the 3 points made by Dennis though. Sorry, yours and the 2 examples are clockwise rotation.
As for the Tail, I'm an advocate for a largish tail, I'd go at least 4 times your area.
My reasoning is that on a furling windmill the force on the blades must be counterbalanced by the force on the tail. This is expressed by anticlockwise moment (force * distance about the yaw bearing) equalling clockwise moment(ditto).
So in your case, to get a force on the tail large enough to counterbalance that on the prop, the tail will have to swing to at least 45deg (probably more) into the wind. That puts your prop at 45deg (or more) out of the wind, and this is not even furling yet.
Still after all that great work I'd increase the tail size and stuff the back-to-front blade shape, then give it a run anyway.
Let us know how it goes.

was working fine... til the smoke got out.
Cheers Gill _Cairns, FNQ |
| |
Highlander

Senior Member
Joined: 03/10/2006
Location: AustraliaPosts: 266 |
| Posted: 11:56am 17 Jun 2007 |
Copy link to clipboard |
Print this post |
|
Hey Bruce, nice blades.
Hey Bushman, nice rig.
I think the tail neeeds to be bigger, and the blades too unless it blows hard where you are going to install it.
It looks like you have or are going to speed test it on the trailor. Just make sure the blades are going to clear the trailor when it furls. 
By the way what model clutch plate fitted the spline?
Also is that a 3 or 7 phase?
Central Victorian highlands |
| |
| |
Page 1 of 2 |
