
|
|
Forum Index : Windmills : 200w yueniao windmill
| Page 1 of 2 |
|||||
| Author | Message | ||||
| slick Newbie Joined: 23/06/2007 Location: AustraliaPosts: 11 |
need help please cable is too short on windmill,needed 25mts bought some more at 4mm how do i go about hooking it up to alternator or getting blue plastic cowling off also the cable i got is the flat white stuff same as power cable used in houses  am hooking it up to charge batteries in conjunction with solar panels do i need to do anything to stop damage from lightening strikes from tower? am hooking it up to charge batteries in conjunction with solar panels do i need to do anything to stop damage from lightening strikes from tower? |
||||
| vasi Guru Joined: 23/03/2007 Location: RomaniaPosts: 1697 |
Good question! Hobbit name: Togo Toadfoot of Frogmorton Elvish name: Mablung Miriel Beyound Arduino Lang |
||||
| Dubyagee Newbie Joined: 15/06/2007 Location: United StatesPosts: 21 |
Testing a lightning rod grounded by cable versus grounding it via the tower. Here And one that is robust to say the least. Here Regards, Dubyagee |
||||
Gill Senior Member Joined: 11/11/2006 Location: AustraliaPosts: 669 |
G'day slick, Would like to help, but you don't give enough information. Like what make and model windmill are you trying to install? What is the existing solar setup that you will be connecting to? What voltage is your system? What is the windmill output (AC or DC)? Was a regulator provided with the windmill, if so, what type? I feel if you can give a bit more detail someone is bound to have helpful hits for you.  was working fine... til the smoke got out. Cheers Gill _Cairns, FNQ |
||||
| slick Newbie Joined: 23/06/2007 Location: AustraliaPosts: 11 |
the yueniao is a fd 200w 24v wind generator am hooking it up to a 24v solar set up am using a dr 1524e trace inverter/charger the yueniao came with a automatic wind generator charger controller is also dc am about to remodel the blades as shown on the site. does the power cable coming from the yueniao alternater have to be round? im very green. thank you. |
||||
| Gill Senior Member Joined: 11/11/2006 Location: AustraliaPosts: 669 |
G'day slick, Don't fret over the shape of the cable. What is important is the size. by size I mean the diameter and number of conductors. The general rule is "bigger is better" but I think if you have 2 cable @ 4mm for 25Meters or so, that will be fine. Entry points to enclosures (like solar panel junction box's)is mostly through Glands that are made to seal round cable. Use a little silicone to seal entry points if that is a concern. As for connection, follow the instructions with the wind gen. The Trace will not substitute for the supplied controller, though both are essentially protecting the batteries from overcharge, do not assume only one is needed. How does that sit with you so far? was working fine... til the smoke got out. Cheers Gill _Cairns, FNQ |
||||
| slick Newbie Joined: 23/06/2007 Location: AustraliaPosts: 11 |
thanks Gill thats good that the wire is ok its the same as in your house except its 4mm. I got no instructions,done some work for a bloke and he got me the generator.He kept any paperwork that would give me any idea on where itr came from as he charged me $650 worth of work and ive seen them advertised for $450. So ive got everything but dont know jack.I have to be able to pull cowling off to hook up new wires also would like to grease bearings cant trust new ones they dont seem to pack them like the ol days.Would there be a fuse set up in the controller box case the tower got hit by lightning so it doesnt go through to the batteries weve had a couple of strikes around the house over the years.Ive tried getting the bearings out but my little toy circlip pliers dont open up enough, can i get into where i have to hook up the wires through the shaft where the bearings are ?where the wire/cable goes through already.thanks again 4 the help , what a great site. |
||||
| Gill Senior Member Joined: 11/11/2006 Location: AustraliaPosts: 669 |
Sorry slick, don't know that wind gen, let alone how to get inside. Maybe someone else knows it's secrets. Seems like your in a lighting hot spot. Don't think I'd be relying on a fuse for static protection, that's not it's job. If you are not always around to disconnect(best), here's a device that may offer some static discharge for protection. Make out of heavy copper. Points don't actually touch but are very close. If 12V, set to car distriutor point gap or just a little less, never more, say 20thou' (0.020"). Rain & weather protection essential. 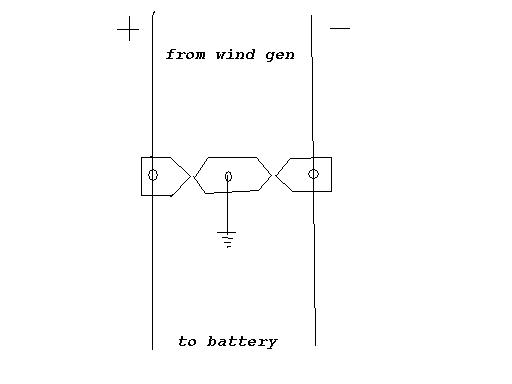
Alternatively, try a 'Gas Discharge Surge Arrester'. Altronics cat_RS-5424 . DSE once stocked them as cat R1804 but can't find them listed now. For the 3 lead type, the two outside leads go to Pos and neg, whilst the middle one goes to your tower earthing stake. The gas arrestors are not suited for 240v. Mostly used for protection of low voltage telephone and radio gear. Hope that's helped. was working fine... til the smoke got out. Cheers Gill _Cairns, FNQ |
||||
Highlander Senior Member Joined: 03/10/2006 Location: AustraliaPosts: 266 |
G'day Slick, that sounds like the ones that are on egay and jaycar. If that's the one your talking about ecoinnovation has a couple of pdf's you can download. http://www.ecoinnovation.co.nz/links.php?code=8 Scroll down to the wind section Good Luck  Central Victorian highlands |
||||
| slick Newbie Joined: 23/06/2007 Location: AustraliaPosts: 11 |
G,day all,well theres a lot in this wind generator game.Afterlooking at various sites i need more HELP.Ibecoming overwelmed(which doesnt take much.)How do i tell if i,ve got a mk 1 or mk2?I,ve seen on sites that u need to customize blades,no worries i can do that.2.The hub ass. and blades need balancing,ok.On the ecoinovations site they show a jig they use and that it should be attached to the wall i just cant seem to work out how they work it.Anyway i think i could knock one up using a couple of bearings and shaft and get it tapered on one end to fit the hub ass.,and just bolt it to my work bench(if i can find it).But then what do u doto balance it also what is a perfect static balance?.Then or before that drill an extra hole so as to have 5 bolts retaining the blade instead of 4,then some type of epoxy to help retain the blade?Then when thats done i have to build another tower as the one supplied is insufficient.On the ecoinovations site theyve also upgraded the insides as well.I,ve been trying to get the blue plastic casing off and now see how it,s done take to it with the little hand grinder and cut a slit in it.Theyve fitted a rectifier what type?they showed a close up piccy of it last week i went to check it out this week and its been updated and it doesnt show a close up now,also something about slip rings?WHAT DO I DO?Also the charger control box is no good so another site reckons so can it be fixed to work properly or WHAT DO I DO?At the moment i was setting it up app.10mts from bedroom window might be a bit noisy? i can shift it up hill a bit more but will have to get more cable can i join more on? its 3 strand 4mm ive got 25mts at moment if i shift ill have to add app.10-15mts.The 25mts cost me $95.Thanks everyone any help to get me up an running and the little windmill working properly will be greatly appreciated.What do i do with my old letters?do i leave them on?Ill be taking photoes of progress and would like to share but dont know how to get them on here. |
||||
| Highlander Senior Member Joined: 03/10/2006 Location: AustraliaPosts: 266 |
Hi Slick, if you want to put a photo on here, you'll need to resize it fairly small so it won't blow the page out, your camera software should have some editing feature which will allow you to save as "best for web" or "best for email" failing that save at 25%. The little boxes above the text area in post reply are for adding hyperlink email, etc the upload photo one is second last from the right. Put your mouse curser over it and it will tell you what each one does. As for the mill, I have only seen what is on the net. Does the mill have any wires coming from the unit? or were they supplied separately? How many wires 2 or three? What is written on the controller, ac in, dc in? Maybe take a few photo's and take it from there. I think the jaycar site has a manual too. ok found it, click here scroll to the bottom, there is a pdf to d/load. Central Victorian highlands |
||||
| Gill Senior Member Joined: 11/11/2006 Location: AustraliaPosts: 669 |
For pic resizing, I don't wait for photoshop to load, I right click the file[s], select send to mail recipient, the when prompted select 'resize'. This makes a email with the pics as small size attachments. Don't send email but view them, use 'save as' the post these to forum. Delete email. Perfect size for us country folk with no broadband access. Oh yes. Tree with the up arrow for posting pic. was working fine... til the smoke got out. Cheers Gill _Cairns, FNQ |
||||
| slick Newbie Joined: 23/06/2007 Location: AustraliaPosts: 11 |
Ok just spent the last 3hrs trying to work out camera etc and froze computor.Have given up putting a photo on 4 now.I down loaded the manuel from jaycar thanks Highlander.There is wires coming out of the mill a cord app. 13mts long with 3 wires just like an extension cord.But will be too small in gauge over length needed.Or can i use this cord and join on to my heavier cable to get the length needed?I took a photo of the back of control box and as you can see its still on the camera???But there is 8terminal points on back 4 across and 2 down.Ok 1st 2 up and down,top red + bottom black-,=DCoutput.Next 2 same colouring,=To Batteries.Next 4 go together, only 1st top one is black other 3 are red + and the lines going to the terminals only go to the red ones and are labeled To Turbine Generator.Manuel says its a 3 phase alternater, generating3phase AC, which is rectafied by the charge controler, which then feeds DCto batteries.Also it doesnt matter which way the 3 wires are hooked up as they bear ACcurrent.So going by the picture in the manuel wires from the control box come from DCoutput terminals and go straight to batteries, can i hook them onto same terminals that come from my inverter?Also what size wire needed only running app 1.5mts.And does the control box make a noise?as its bolted to bedroom wall on outside with inverter and battery bank.So any answers to my other questions? Dont even know how to get a face over onto here??Ive only just got past learning how to turn on an off with out getting stuck .Ive got to learn to type with more than 1 finger ill get a blister. |
||||
| Highlander Senior Member Joined: 03/10/2006 Location: AustraliaPosts: 266 |
Hi Slick, If possible use the heaviest wire you can afford, but in this case it seems like too hard basket to pull that mill head apart to change the wires. So I would use the wire that is there and where it comes out the bottom of the mast, connect up your heavier wire. You'll get a bit more voltage drop but better than nothing. Does your one have slip rings? If not, that heavy ribbon wire won't twist very well in the mast, so you may be better of with the one fitted already. Also leave plenty of slack with the cable coming down the mast. It sounds like the controller takes care of the rectifying so just connect the batteries up and the three phases up where it tells you to. Controller to battery cable can be a little bigger than the mill cable go 2 times as thick. Make sure the battery to inverter cable is plenty thick, that will depend on wattage capacity. How noisy is it ? buggered if I know 
Where are you, perhaps your close to someone who may help? Try and number your questions and start with a new line. It's a bit easier on the eyes.  Central Victorian highlands |
||||
| Gill Senior Member Joined: 11/11/2006 Location: AustraliaPosts: 669 |
Don't worry about computer skills. I've been using a computer for years and still type with one finger so don't worry you'll pick it up in time(or get to a stage where it doesn't really matter any-rate).
Just a hit on posting to the forum. break what you have to say up into little paragraphs. It makes it so much easier to read and understand. 
Yes, OK to hook DC to battery using same terminals as inverter. Rectifier/regulator (controller) should not make a noise so bedroom wall OK (provided doesn't shake too much). And use same size wire as your long run. For 1.5M you could use old jumper lead wire or starter motor wire or even old arc welder leads if you are caught short. It's never a problem to go bigger. Ensure all connections are sound. Don't just twitch wires together. Use clamping connectors and/or eye ends nipped up firmly. I've see 1/2" copper pipe used to good effect where the wire is soldered into one end with the other flattened and drilled. You farmers know all the tricks to avoid the journey to town. As for the regulator, It could be that the 2 red and 2 black leads are DC. The larger 2(if so) will be the DC charge to the battery. And the 2 smaller(if so) could be Voltage Sense from the battery. This Voltage Sense must come direct from the battery terminals and not via inverter or charger connections to be of any value. It can be a smaller wire, say like car & trailer wire. The 3 red AC would be the 3 phases, with no order of connection there. And for the black, I can only think it is a neutral/earth wire. I doubt that it is vital, a bit like the Voltage Sense wire, could be left disconnected without bringing the show to a grinding halt. Remember all this is guess work. I don't know the setup and haven't even seen a picture, but trying to help as best I can. was working fine... til the smoke got out. Cheers Gill _Cairns, FNQ |
||||
| Gill Senior Member Joined: 11/11/2006 Location: AustraliaPosts: 669 |
Just a thought, that may not be Voltage Sense, it may be a general purpose DC supply that has low voltage shutdown. In fact that is the more likely use. A multimeter will tell the difference. Connect with nothing in it. If multimeter reads battery volts then it is a general purpose output supply for lights/whatever. was working fine... til the smoke got out. Cheers Gill _Cairns, FNQ |
||||
| Highlander Senior Member Joined: 03/10/2006 Location: AustraliaPosts: 266 |
Hey Gill your probably right. I d/loaded that manual, here's a portion "Once running, the head unit delivers AC voltage to the control box, which then changes this to DC current for the batteries. At about 25 to 27 volt AC per phase for 24 volt systems, (13 to 14 for 12 volt), the control box will commence action and decide whether to charge the batteries or dump off power into the inbuilt load resistance" "The power generated will be absorbed by the internal heater and driven out by the fans." May make a bit of noise, don't think it will wake you up though. Found a pic of a 48v one 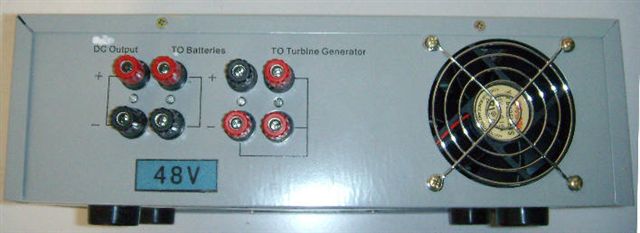
Is this what you have Slick? Central Victorian highlands |
||||
| slick Newbie Joined: 23/06/2007 Location: AustraliaPosts: 11 |
Yeah Highlander exactly the same they say theyre no good any idea? So the balancing of the hub and blades how? On the ecoinovations site they have one pulled apart and it shows sliprings so im hoping mine is the same mk1or mk2? If i have sliprings the wires will not twist is this right? so ecoinovations fitting a rectafier is this instead of using the charge controller box? Tried doing this in list form but no idea**&&## Thanks paragraphs didnt work either. Gill this is the ones jaycar are selling next to the cows idea |
||||
| Highlander Senior Member Joined: 03/10/2006 Location: AustraliaPosts: 266 |
Arranging text in paragraph form, just hit enter, easy
I have heard the controllers are a bit crappy, but no one has ever said why. I think I remember they overcharged batteries. But you should be able to adjust that, possibly there may be trimpots in there to play with. Anyway one step at a time, get it up and you can sort it out later. The rectifiers only change the alternating current to direct current. It doesn't replace the controller, you still need to feed the batteries with charge current untill they are full. Then the controller will switch the charge off the batteries, BUT the power from the mill still has to go somewhere or it will overspeed and self distruct. So it goes into a "dump" mode where it dumps the excess power into something like a heater element or a powerfull light etc. Don't try using a "solar only" controller as it won't have a dump feature. Just put it all up and see if it works before replacing it. OK balancing the blades. you can do it a few ways but this is how I did mine. 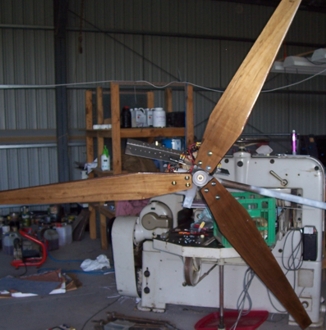
mount them so there is no resistence on the shaft, with a f&P you just take the magnet rotor off, but you may have to put a big bolt in the wall for the hub to spin in. Basically if one blade is heavier it will drop to the bottom, so you add weight to the one next to it, depending how far out they are, you may need to saw some length off even. Have you seen the page Glenn did on the chinese blades? Here Does it have slip rings? well we need a pic or you can try and see yourself. Is there any connections coming from the side of the pivot point? Or do the wires just come out of the centre of the pipe mount? Most of these don't have them, don't stress too much it's mainly a problem in turbulent areas where the mill spins around a lot with varying wind directions. Apparently if it's a fairly normal site it will be roughly the same clockwise and anticlockwise revolutions. But you may after time need to disconnect the wires and uncurl them. Having said that I did put rings on mine. 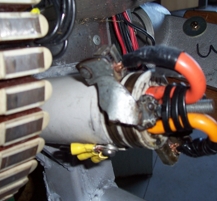
Got to go running late. PS you can use the search function many things you may want to know have already been covered, but maybe not, worth a look. Central Victorian highlands |
||||
| slick Newbie Joined: 23/06/2007 Location: AustraliaPosts: 11 |
Thanks again Highlander,i reckon i can sort the blades out,balancing and customizing. Trimpots to play with??i know jack about electronics and very very basic elactrics, so everything needs to be spelled out and said V E R Y E A S I L Y . Do i have to set up a heater element or powerful light to dump this extra power? The cable comes out of the centre of the mounting pipe, so does this mean it has slip rings? Im in a gully , part way up a hill, the winds turn around a bit. Hows that easier to read nice paragraphs,beautiful.TY. |
||||
| Page 1 of 2 |
|||||
| The Back Shed's forum code is written, and hosted, in Australia. | © JAQ Software 2026 |
