
|
|
Forum Index : Windmills : New PVC blades.
| Author | Message | ||||
| Gizmo Admin Group Joined: 05/06/2004 Location: AustraliaPosts: 5182 |
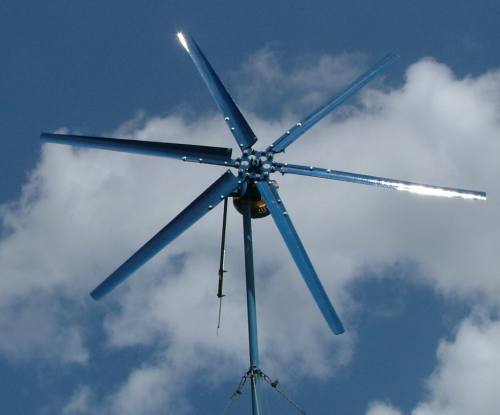
I made a set of PVC blades on the weekend, there's an entry in my diary here http://www.thebackshed.com/Windmill/FORUM1/forum_posts.asp?T ID=744&PN=1 where I start work on a dual stator windmill and needed a big turbine to drive it. The new blades have been up for a couple of days now and they are working very well, so I thought I would post the plans here in case anyone else wanted to make a set. 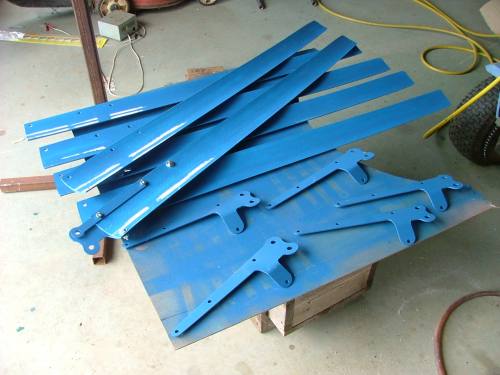
The 6 blades were cut from a 1100mm length of PVC pipe, 250mm diameter. To give some twist and keep a wide chord width at the tips, I offset the trailing edge by 30mm along the length of the blade. The wider chord means a stronger blade, hopefully, and more low speed torque. 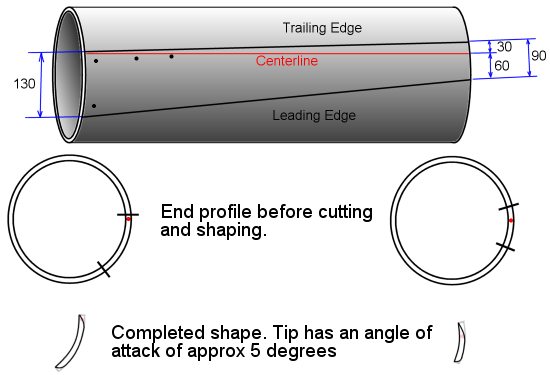
There is no real maths in this, I just drew up what I thought would work with the length of PVC I had. The result is a quiet set of blades ( even when free wheeling! ), with lots of low speed power. Glenn The best time to plant a tree was twenty years ago, the second best time is right now. JAQ |
||||
Bushman Regular Member Joined: 24/04/2007 Location: AustraliaPosts: 41 |
They look great Glen. What did you use for a centre hub and does this fit diretly onto the original FP spline? Cheers Alan |
||||
| Gizmo Admin Group Joined: 05/06/2004 Location: AustraliaPosts: 5182 |
Thanks Alan. The hub consists of several 3mm plates lasercut to suit the spline, all bolted together with nuts as spacers. Its my cheap way of making a hub, the laser cutter can cut a nice spline into 3mm plate and I stack them to get the strength. Glenn The best time to plant a tree was twenty years ago, the second best time is right now. JAQ |
||||
| nweeks Newbie Joined: 22/01/2007 Location: AustraliaPosts: 36 |
Yep - nothing wrong with plastic blades - work a treat. Plastic Chemical drums are also an excellent source, and most of them are UV stabilised. http://prism9.com/virtual/e/energy/images/ Nige. Nigel Weeks nweeks at karbonit dot com |
||||
philmountains Newbie Joined: 17/01/2006 Location: United KingdomPosts: 24 |
 I like this idea,they just throw these out at work,only downside I can see is the limited length of blade. I like this idea,they just throw these out at work,only downside I can see is the limited length of blade. 
Phil |
||||
| Bushman Regular Member Joined: 24/04/2007 Location: AustraliaPosts: 41 |
There is one other problem with UPVC and that is low-temperature. Most will not be concerned with this but my property south of Oberon can go to 10c below and at that temperature, the material gets brittle. A casual glance suggests the outer drums of the F&P washing machines might be nylon and if so, they could easily be cut into blades. Has anyone tried this? I'll check the temperature-stability characteristics. Cheers Alan |
||||
| dwyer Guru Joined: 19/09/2005 Location: AustraliaPosts: 575 |
Hi Bushman Will is not worth trying as l had number of washing drum left outside during the hot days some start to crack up very quickly ever in a week time they loose all their strenght as this is very poor quailty white nylon they use in any F&P product that endup at rubbish Dump 
Dwyer the bushman |
||||
| Bushman Regular Member Joined: 24/04/2007 Location: AustraliaPosts: 41 |
Thanks Dwyer Your advice saves a lot of heartache. If the drum is nylon, it Obviously lacks any UV stabilisers - not unreasonable due to where it is used. There certainly are other nylon formulations that would do the job - mostly those containing carbon-black to prevent UV degradation. Guess I'll persist with formed aluminium blades for my place. Hope to have the jig finished this week Cheers Alan |
||||
brett Newbie Joined: 08/02/2006 Location: AustraliaPosts: 39 |
Glen I think the drawing for the blade cutouts is wrong some how. I was looking closly and getting ready to cut some blades but from looking at your finished product compared to the cut out templete it seems wrong, or it could just be me. Your finished blades in the picture could be described as Root of the blade to the left, Tip to the right. 3 Bolt holes lined up on the trailing edge with the concave surface facing up, when lying on the ground. The result from your marking and cutting from the picture would have the Concave facing down. Is it me, just being dumb or is there a problem somewhere. Brett |
||||
| brett Newbie Joined: 08/02/2006 Location: AustraliaPosts: 39 |
Bushman The mill I have built was installed on my Father-inlaws Lifestyle property South Of Oberon. And hopefully will be reinstalled in a couple weeks. His Property is through the pine Forest East of Shooters hill, on the Tuglow river. Is that close to you. Brett |
||||
| nweeks Newbie Joined: 22/01/2007 Location: AustraliaPosts: 36 |
Now that's attention to detail! You are correct!! Not that it'll worry you - it'll just spin the other way, and you'd have to reverse the angled brace piece! The three bolt holes in a line are closest to the (almost) right angled corner of the blade. With concave face up, root towards you, and tip furthest away, the cutting diagram would have the three bolt holes on the right hand side of the blade, and cause rotation in an Anti-clockwise direction. Whereas, Glenn's actual blades have the three holes on the left (root close, tip away, concave up), and rotate clockwise! Here's a trick though! And it'll save Glenn re-drawing the diagram! It'll involve a little concentration, but imagine the front of the tube is transparent, and you're looking at the INSIDE WALL of the BACK OF THE TUBE!! It might take a bit of effort, but you can do it. Then, the three bolt holes ARE on the left(root close, tip away, concave up), and rotation once again is clockwise! Brett, you deserve a star for discovering the difference! Nige. Nigel Weeks nweeks at karbonit dot com |
||||
| brett Newbie Joined: 08/02/2006 Location: AustraliaPosts: 39 |
I thought that was the problem and the result, but did not want to start cutting till I had some back up. Thank you very much for the support. The transparent tube idea works for me but I think it works just as well if I follow all the measurements and work from Right to Left. Ie the Root of the blade will be on the right hand side of Glens drawing. Thanks again Nige |
||||
| Gizmo Admin Group Joined: 05/06/2004 Location: AustraliaPosts: 5182 |
Yes you are spot on, it is reversed. I remember I planed to cut them that way, but I had a moment and worked out the turbine would spin the opposite way to the near by southern cross windmill. Now anyone who has had two windmills near each other that spin in opposite directions will tell you how silly it looks, almost annoying to look at. So I changed mine to spin the same way as the 'cross. Glenn The best time to plant a tree was twenty years ago, the second best time is right now. JAQ |
||||
| Bushman Regular Member Joined: 24/04/2007 Location: AustraliaPosts: 41 |
Hi all Yes Brett - not far from us at all. We are off the back road running parallel to the Oberon-Talaga road on the Abercrombie river at Jerrong. Lets try to catch up when you are heading that way one weekend Re reversing blade direction - I made the same mistake on my first set of blades, but went one stage further by tapering the wrong edge, needless to say, they were scrapped and replaced. I hope we have a complete assembly with rectifier/controller etc within a couple of weeks. Then the mill plus a 100 W solar panel should be operational. Cheers Alan |
||||
| brett Newbie Joined: 08/02/2006 Location: AustraliaPosts: 39 |
Alan I am planning to get this mill back up this Friday and Saturday. I had a look at the Map and you are a bit far south for us to get to this trip, we have a bit of work on. With getting the mill up, all the general maintance (Nobody lives there) combined with controlling the local rabbit population a little. Next trip for certain I will alow more time to try and catch up, I have been looking for a windmill minded person to compare notes with and look at other ideas. If you need any help, our system is around 200w solar, 7phase F&P wind generator, Plasmatronics PL20 controler, running a 24v battery bank. My Email is brett.wilson@dpi.nsw.gov.au |
||||
| MiPl Newbie Joined: 12/01/2009 Location: SpainPosts: 1 |
@gizmo: Hi, yesterday I build the blades you described in your thread. I have some questions: - could it be, that the drawings on the tube are mirrored? - when I now see my blades I would say they will turn counterclockwise. If so, is it a problem? Should I build the blades new? Thank you for your attention. Best regards Michael |
||||
| The Back Shed's forum code is written, and hosted, in Australia. | © JAQ Software 2026 |
