
|
|
Forum Index : Windmills : My first windmill complete
| Page 1 of 2 |
|||||
| Author | Message | ||||
AMACK Senior Member Joined: 31/05/2009 Location: AustraliaPosts: 184 |
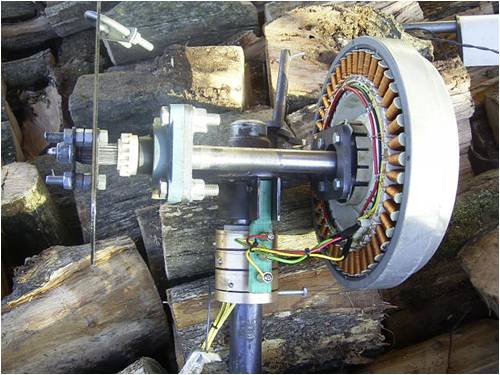
Just a photo of the first born. Using jaybars blades (1.6 mt X 3 ) and came up with a simple brush system that I made out of a bit of brass and nylon. Works well on test bench too. 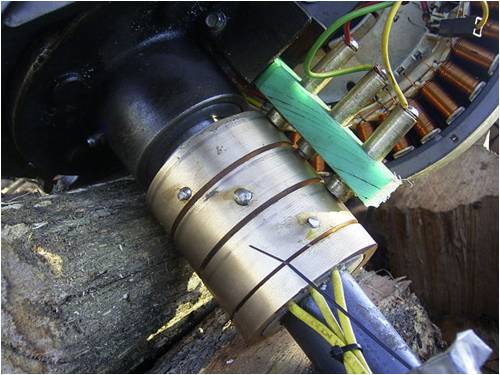
*Note to self 1. Make it thick 2.Make it heavy. 3.Make it stronger than it should be. 4. Don't rush the first job as the second job will cost more and take mor |
||||
Smart Drives Senior Member Joined: 06/07/2009 Location: AustraliaPosts: 115 |
I bet you had fun lining up the bolts ( to keep the rotor distance the same from the stator ) without the bearing housing or is there a cut down version hiding behind your steel plate ? Cameron. All smart drive parts sold Custom built turbine parts on Multicam flatbed CNC Router |
||||
| Gizmo Admin Group Joined: 05/06/2004 Location: AustraliaPosts: 5182 |
Thats a nice looking build AMACK, looks like its based on the laser cut parts from one of my earlier designs. Its good to see that design is still working, I have a couple of them I saved from when I used to sell them as a kit. The brush assembly you've added is very clever. Is the brush itself carbon? Glenn The best time to plant a tree was twenty years ago, the second best time is right now. JAQ |
||||
| GWatPE Senior Member Joined: 01/09/2006 Location: AustraliaPosts: 2127 |
You may need to add some weather protection to the assembly. The slip rings would probably only last a few months at my place. Steel rusts within a week and copper and bronze goes green after a few weeks. I would imagine that once current starts to flow, that this would speed the corrosion process. The slip-ring arrangement [brass rings, with carbon/copper brushes] in my mills is enclosed in the yaw box assemblies. At least you will be able to see when maintenance is due. LOL. Gordon. become more energy aware |
||||
| AMACK Senior Member Joined: 31/05/2009 Location: AustraliaPosts: 184 |
************Please Note... The photo has the blades on the wrong way, it was taken before the set was done********** Thanks.. The motor and slip rings will be inclosed in a fiber glass cover. I am going to make a mold out of styrofoam and then cover it with glad wrap and go from there so i can re-use the mold. And the brushes are carbon. I Got the biggest and longest from an auto-elect I could get and used them. They are 7.5 mm dia and about 20 mm long. They have a spring behind them and I am looing at another set that the auto elect told me about.. This project has got him looking too. The parts are from Gizmos disign and they work VERY VERY well. Grate to work with and easy to weld together, like a jigg saw puzzle. The blades are PVC from Jarbab and work Very well. They are easy to adjust and install. The hardest part was getting the tube in the blade. Be ready for a workout. It's tight but a good fit. I also used about 60 cm of solid steel at the hub end. I am running 3 phase down the pole to the battery bank them rec and reg there. That is why there are 3 slip rings.. I have got it up and working but I am going to put it up on a tower I have that is 12 mt high. At the moment it is just a test run to see how it goes. .. 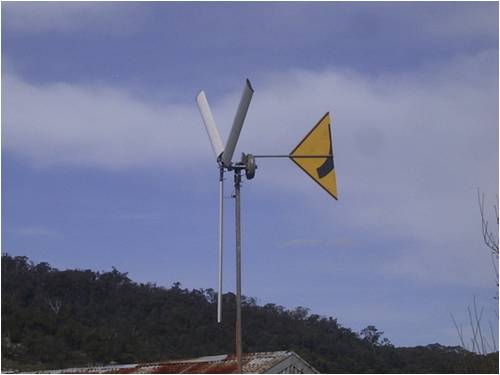
*Note to self 1. Make it thick 2.Make it heavy. 3.Make it stronger than it should be. 4. Don't rush the first job as the second job will cost more and take mor |
||||
| AMACK Senior Member Joined: 31/05/2009 Location: AustraliaPosts: 184 |
Cameron, (smart drives) I did not have any trouble lining up the bolt, you are right there is a cut down version in the back. It is one of Gizmo designs and works well. It's a little on the heavey side as I had to get a few mates to help me tip the mast up , and I am not weak. When you add up all the weight of the base ,blades,tube, solid rod,stub,hut,motor and all the tail weight it is getting up there. Andy *Note to self 1. Make it thick 2.Make it heavy. 3.Make it stronger than it should be. 4. Don't rush the first job as the second job will cost more and take mor |
||||
| AMACK Senior Member Joined: 31/05/2009 Location: AustraliaPosts: 184 |

Should have called this Topic MY FIRST WIND GENSRATOR COMPLETLY DISTROYED.. Just after I set the blades up and the wind gen was going well a strong wind kicked up and the wind gen speed increased as normal. Then a gust hit, the hub I was using was 3 mm mild steel and it flexed enough for the blade's to strike the mast.... This as you would expect caused one big mess. I should have known but in a rush to get it up and it is now on the way down.. So back in contact with Jaybar again
*Note to self 1. Make it thick 2.Make it heavey. 3.Make it stronger than it should be. 4. Don't rush the first job as the second job will cost more and take more time.. 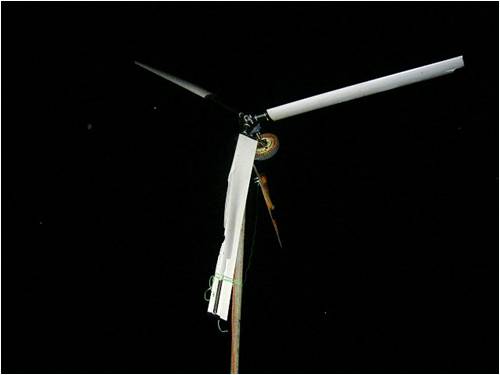
*Note to self 1. Make it thick 2.Make it heavy. 3.Make it stronger than it should be. 4. Don't rush the first job as the second job will cost more and take mor |
||||
| Gizmo Admin Group Joined: 05/06/2004 Location: AustraliaPosts: 5182 |
Oh no! I was thinking that plate looked a little thin, bugger. I've had a hub bend too, it had 6 PVC pipe blades and a small storm passed through, broke a couple of blades when the plates bent out of shape. I ended up re cutting the plates from thicker high tensile plate. Here's the story... http://www.thebackshed.com/windmill/FORUM1/forum_posts.asp?T ID=765 If your going to use 3 or 4mm plate, I would use two, spaced apart 20mm or more. The boxing give it strength. On my timber blades I had one plate at the front of the blades and another plate at the back, with bolts going through. Very strong. My hub for the extruded PVC blades like yours is cut from 6mm plate, though I think 8mm might be safer. It is heavier, but its also stronger. Glenn The best time to plant a tree was twenty years ago, the second best time is right now. JAQ |
||||
fillm Guru Joined: 10/02/2007 Location: AustraliaPosts: 730 |
Hi Andy , Sorrie to see your broken mill , but there is always a lesson learned as I found out when my Quad stator hit the deck last year . On another note ,from looking at the picture of your mill before the miss hap it looks like your blades are back to front or is it an optical illusion , which side was the convex side of the blade facing ? The tail also looks quite short for the amount of ofset , I have found that these PVC blades when up to speed they do not allow a lot of wind through to keep the blades into the wind with short tails ( my tails are 1.8m and have trouble keeping them square to the wind ) , did you see this failure happen ? But I would think the 3mm blade hub has a lot to do with the failure as you have said... PhillM ...Oz Wind Engineering..Wind Turbine Kits 500W - 5000W ~ F&P Dual Kits ~ GOE222Blades- Voltage Control Parts ------- Tower kits |
||||
| GWatPE Senior Member Joined: 01/09/2006 Location: AustraliaPosts: 2127 |
I looked at the photo and thought the 3mm disk was a brake disk. The 3 x 1.6m PVC blades will overpower a single stator F&P mill. My 1.2m wooden blades overpower my single stator F&P mill. This is the primary reason I designed the AxFx. Gordon. PS: did the highway sign offer much resistance. become more energy aware |
||||
| KiwiJohn Guru Joined: 01/12/2005 Location: New ZealandPosts: 691 |
Oh dear! Sorry to see what happened to those blades but dont be too hard on yourself. We put up a Dunlight in NZ, complete right out of the box, tower, generator etc etc. After about two days the blades looked like yours. I dont know whose fault it was but some of the bits in the box were the wrong ones. |
||||
| AMACK Senior Member Joined: 31/05/2009 Location: AustraliaPosts: 184 |
Thankyou all for the feed back, The next hub is going to be 8mm steel and I did notice the tail effect or lack of it. I was thinking about using a larger tail area, all the feed back just inforces that decision. I am going to pick up the mess today. The next set of blades are going to be 1.2 or 1.0 as I do think the 1.6 were over kill. And Gordon the sign did not fight at all.Next time I might use a road closed sign.( Joke.. My father deals in scrap iron and all sleet products so lots of goodies turn up here and there)  Gordon AxFx is next so any info would be grate. Gordon AxFx is next so any info would be grate. *Note to self 1. Make it thick 2.Make it heavy. 3.Make it stronger than it should be. 4. Don't rush the first job as the second job will cost more and take mor |
||||
liqud Newbie Joined: 11/08/2009 Location: United StatesPosts: 22 |
love the street sign! jk its a great re-purpose. Fantastic job on the coil. I am very intrigued. Keep up the great work. Shawn C Real power is not given its made... |
||||
| AMACK Senior Member Joined: 31/05/2009 Location: AustraliaPosts: 184 |
Hi All, Went at it again. I had some other blades that I used and cut down to 1 mt. Even at this length they run well. I think even 3 x 1 mt blades are on the border of over doing it in my location. Last night I ran the wind gen and put OATLEY'S K220A reg on it. I used a few 12volt Quarts down light as the load. They work well as they do get effected by dust and water. Most of the night, with the wind we had they were on. My wife asked me to cover them up as she was concerned that the next door neighbour might think we are trying to send messages with the flashing lights. I went out in the cold and rain and put the meter on it and it was still puting in 17.5 volt and 13-14 amp. I did see over 15 amp some of the time but I was not to keen on pushing a new wind gen to far incase somethink comes off. This is only on a Large truck battery and I am yet to conect in into the bank of Torjan's I have. All I can say from what I found is that bigger is not always best and a 3 x 1 mt blades work well on a single F&P motor wired 7 groups of 6(star). I would like to play around with difrent wiring setup's but I only have 3 F&P motors to play with. If anyone has a set up that works well I would like to give it a go. Andy.. *Note to self 1. Make it thick 2.Make it heavy. 3.Make it stronger than it should be. 4. Don't rush the first job as the second job will cost more and take mor |
||||
| Smart Drives Senior Member Joined: 06/07/2009 Location: AustraliaPosts: 115 |
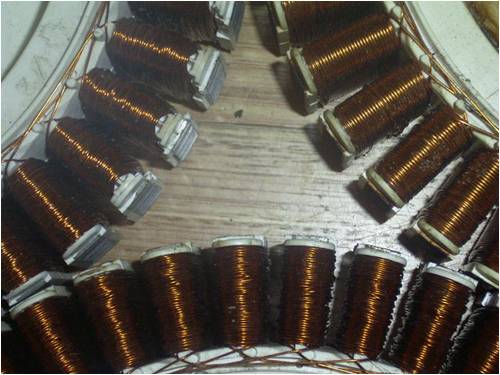
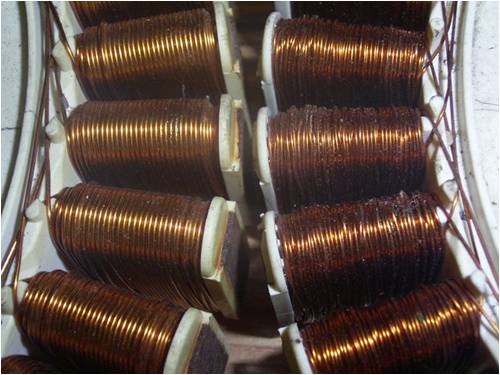
I might be able to help, but i need to know the thickness of the wire on your motor .6mm (messy looking) , .8mm (neatish approx 27 wire loops per pole), 1mm VERY neat ( 20 wire loops per pole). Cameron. All smart drive parts sold Custom built turbine parts on Multicam flatbed CNC Router |
||||
| AMACK Senior Member Joined: 31/05/2009 Location: AustraliaPosts: 184 |
I have a few motors here. I have a 1mm on the wind gen I built, wired 7 groups of 6 in a star. I have I think one 0.8 mm and two 0.6 mm. I have a few photos here. I would like to make a twin motor tri or a quad but I think that might be down the track. I have a 84 ft tower With a wind up wintch in it that lifts a 2" pipe up about another 30 ft. I got it from an Earth moving company real cheap, $750 and they even bought it up on there float for me. It is still on it's side at the moment but my plan it to put somthing good on top of it. There is a bloke over the road from me that is into Amateur radio in a big way he has asked me to sell him the tower but I dont think so. Every time he comes over he drools over it. Let me know what you think about the motors Thanks Andy 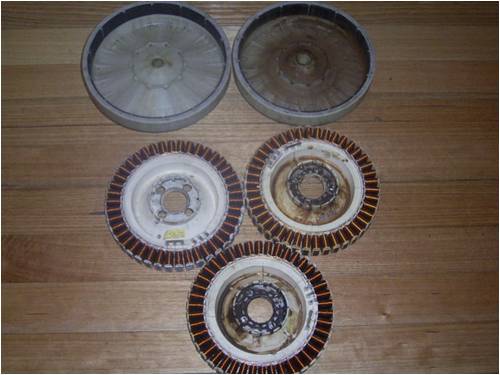
*Note to self 1. Make it thick 2.Make it heavy. 3.Make it stronger than it should be. 4. Don't rush the first job as the second job will cost more and take mor |
||||
| Smart Drives Senior Member Joined: 06/07/2009 Location: AustraliaPosts: 115 |
You will have to file the top of each pole (long edge)so the profile looks curved ( i can send a photo if you want)to get best low wind results but here are the BEST outputs for each thickness of wire: 1mm wire (100S) 48v Delta (startup 400rpm max output 600 watts at 750 rpm) 1mm wire (100S) 48v Star ( startup 200rpm max output 420 watts at 800rpm) Remove all 6 connectors , large plastic lug on left is No. 1 small plastic lug on right is 6. connect 1&5, 2&6, 3&4 for delta : connect 1,2 & 3 together then 4,5,6 become the phases for STAR. other wiring methods below are to detailed to mention now. .8mm wire (80S) 24v Star rewired half series half parallel(80-02S-07P-S) startup 300rpm max output 600 watts .6mm wire (60S) 12v Delta rewired all parallel (60-01-14P) startup 320rpm max output 540 watts 12v Star rewired all parallel startup 200rpm max output 350 watts DONT use .6mm on anything else as it is low output or high startup wind speed. Except 24v star if you can wait til 400rpm startup and max output 600 watts at 800rpm Hope this helps. Cameron. All smart drive parts sold Custom built turbine parts on Multicam flatbed CNC Router |
||||
| Smart Drives Senior Member Joined: 06/07/2009 Location: AustraliaPosts: 115 |
The best solution is to put in a stepper to switch from star to delta at certain rpm then the you get low startup and max amps when its windy. This is what i am doing on my 3 48v turbines. All smart drive parts sold Custom built turbine parts on Multicam flatbed CNC Router |
||||
| AMACK Senior Member Joined: 31/05/2009 Location: AustraliaPosts: 184 |
Thanks, Cameron Can you post or Email me the wiring diagrams for the .8 and .6 set up or are they posted on the site. Thanks Andy.. *Note to self 1. Make it thick 2.Make it heavy. 3.Make it stronger than it should be. 4. Don't rush the first job as the second job will cost more and take mor |
||||
| Gizmo Admin Group Joined: 05/06/2004 Location: AustraliaPosts: 5182 |
This link might help http://www.thebackshed.com/windmill/Contents.asp#3 Glenn The best time to plant a tree was twenty years ago, the second best time is right now. JAQ |
||||
| Page 1 of 2 |
|||||
| The Back Shed's forum code is written, and hosted, in Australia. | © JAQ Software 2026 |
