Martin H.

Guru

Joined: 04/06/2022
Location: GermanyPosts: 1572 |
| Posted: 03:53pm 18 May 2026 |
 Copy link to clipboard Copy link to clipboard |
 Print this post |
|
Hello Leo,
On Sunday, I took a look at Jake Gordon’s explanation and recreated it in MM-Basic (with help from Gemini).
I haven't done any speed tests on the Pico yet but it runs quite smoothly on MMB4W and should work just as well on the CMM2.
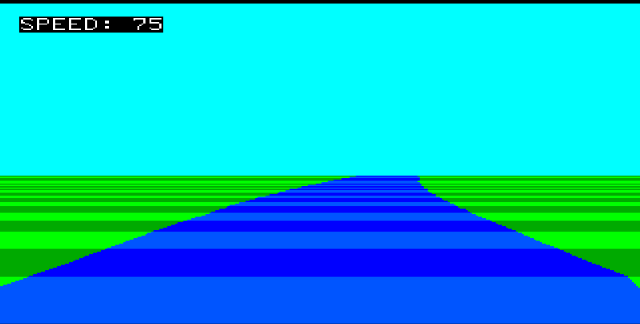
This could form the framework for the game.
' =========================================================================
' 2.5D Testloop Martin H. 2026
' MM-Basic Version based on the description by Jake Gordon
' https://jakesgordon.com/writing/javascript-racer-v3-hills/
' =========================================================================
Option Explicit
Option Default Integer
mode 7
' Bildschirm-Modus (z.B. 640x480)
Const SCREEN_WIDTH = mm.hres
Const SCREEN_HEIGHT = mm.vres
'
' Konstanten für die Straße und Kamera
Const ROAD_WIDTH = 2000
Const SEGMENT_LENGTH = 200
Const DRAW_DISTANCE = 100
' Globale Variablen mit DIM deklarieren
Dim Float fieldOfView = 100
Dim Float cameraHeight = 1500
Dim Float cameraDepth = 1 / Tan((fieldOfView / 2) * Pi / 180)
Dim Float playerZ = cameraHeight * cameraDepth
Dim Float resolution = SCREEN_HEIGHT / 480
Dim Float position = 0
Dim Float playerX = 0
Dim Float speed = 75
' Input values for the projection
Dim Float prj_wy, prj_wz
Dim Float prj_px, prj_py
Dim Float prj_camz, prj_xoff
Dim prj_looped
' Ausgabewerte der Projektion
Dim prj_sx, prj_sy, prj_sw
' Temporary auxiliary variables for the calculation (declared globally)
Dim Float prj_tx, prj_ty, prj_tz, prj_scale
' Two separate arrays of integers for the X and Y coordinates of the four corners
Dim xpoly%(3)
Dim ypoly%(3)
' =========================================================================
' The road network (global arrays)
' =========================================================================
Const MAX_SEGMENTS = 3000
Dim integer seg_count = 0
Page write 1
' The parallel arrays hold the route data
Dim Float seg_world_y(MAX_SEGMENTS)
Dim Float seg_world_z(MAX_SEGMENTS)
Dim Float seg_curve(MAX_SEGMENTS)
Dim seg_color(MAX_SEGMENTS)
' Subroutine to be added: Variables in the header are automatically local,
' no internal variables are redimensioned.
Sub Add_Segment(curve As Float, y As Float)
If seg_count >= (MAX_SEGMENTS-100) Then Exit Sub
seg_world_y(seg_count) = y
seg_world_z(seg_count) = seg_count * SEGMENT_LENGTH
seg_curve(seg_count) = curve
If Int(seg_count / 3) MOD 2 Then
seg_color(seg_count) = 1
Else
seg_color(seg_count) = 0
EndIf
inc seg_count
End Sub
Function EaseInOut(a As Float, b As Float, pct As Float) As Float
EaseInOut = a + (b - a) * ((-Cos(pct * Pi) / 2) + 0.5)
End Function
'Here we use LOCAL for the loop variable
Sub Build_Track
seg_count = 0 'Reset to restart'
' Parameter description for Add_Road:
' Inlet, Hold, Outlet, Curve strength (- for left, + for right), Hill height
' --- OUTRUN LEVEL 1: COCONUT BEACH ---
' Start & Erste Hügel
Add_Road 100, 100, 100, 0, 8
Add_Road 20, 20, 20, 0, 8
Add_Road 10, 10, 100, -5, 8
Add_Road 20, 50, 20, 30, 7
' First big left-hand bend & straight
Add_Road 100, 100, 100, -1.5, 0
Add_Road 26, 26, 26, 0, 7
' A right-hand bend that leads into a hill
Add_Road 100, 100, 5, 1.5, 0
Add_Road 0, 100, 0, 1.5, 20
Add_Road 0, 50, 100, 1.5, -10
' Hügelige Gerade
Add_Road 40, 40, 40, 0, 20
Add_Road 30, 60, 0, 0, -15
' Long left-hand bend, straight, sharper left-hand bend
Add_Road 20, 170, 85, -1.5, 0
Add_Road 50, 50, 50, 0, 0
Add_Road 60, 60, 60, -3.0, 0
Add_Road 70, 70, 70, 0, 0
' A combination of S-bends and hills
Add_Road 20, 20, 20, 3.0, 0
Add_Road 25, 25, 25, 0, -10
Add_Road 20, 40, 0, -3.0, 10
Add_Road 0, 80, 0, -3.0, -5
Add_Road 0, 70, 0, -3.0, 15
' Outward-sweeping left-hand bend & long straight
Add_Road 0, 50, 20, -3.0, 0
Add_Road 100, 100, 100, 0, 0
Add_Road 30, 30, 30, -3.0, 0
Add_Road 30, 30, 30, 0, 0
Add_Road 30, 30, 30, 0, 0
'The bumpy finish before the fork in the track'
Add_Road 20, 20, 20, -3.5, 0
Add_Road 10, 60, 10, 3.5, 20
Add_Road 10, 90, 10, -3.5, 25
Add_Road 10, 10, 10, 0, 0
Add_Road 50, 50, 50, 0, 0
Add_Road 10, 10, 10, 0, 5
Add_Road 10, 10, 10, 0, -5
Add_Road 10, 10, 10, 0, 5
Add_Downhill_To_End 150
End Sub
Build_Track
Dim Float trackLength = seg_count * SEGMENT_LENGTH
Sub Add_Downhill_To_End num_segments
Local startY, n
Local Float hillPerSegment
If seg_count = 0 Then Exit Sub
' Determine the current altitude at the end of the OutRun track
startY = seg_world_y(seg_count - 1)
' Calculate how much we need to decrease/increase per segment to end up at 0
' (Taper off as a negative slope)
hillPerSegment = -startY / (num_segments * SEGMENT_LENGTH)
' Add the run-out straight, which gently takes us to the finish line
' We use a slight left-hand bend (-1.0) to visually signal the finish line
Add_Road Int(num_segments/3), Int(num_segments/3), Int(num_segments/3), -1.0, hillPerSegment
End Sub
Sub Project
' 1. Transformieren
prj_tx = (prj_px * ROAD_WIDTH) - prj_xoff
prj_ty = prj_py + cameraHeight
prj_tz = prj_wz - prj_camz
' 2. Runden-Loop prüfen
If prj_looped Then
inc prj_tz , trackLength
EndIf
' 3. Division durch Null verhindern
If prj_tz <= 0 Then
prj_tz = 1
EndIf
' 4. Skalieren und Projizieren
prj_scale = cameraDepth / prj_tz
' 5. Ergebnis in die Ausgangsvariablen schreiben
prj_sx = (SCREEN_WIDTH / 2) + (prj_scale * prj_tx * SCREEN_WIDTH / 2)
prj_sy = (SCREEN_HEIGHT / 2) - (prj_scale * (prj_wy - prj_ty) * SCREEN_HEIGHT / 2)
prj_sw = prj_scale * ROAD_WIDTH * SCREEN_WIDTH / 2
End Sub
' =========================================================================
' Render-Engine
' =========================================================================
Sub Render_Road
Local baseSeg, s_idx, looped, n, maxy
Local Float basePct, playerY, p1_y, p2_y
Local Float r_x, r_dx
' Werte für das aktuelle Segment berechnen
baseSeg = Int(position / SEGMENT_LENGTH) MOD seg_count
basePct = (position MOD SEGMENT_LENGTH) / SEGMENT_LENGTH
p1_y = seg_world_y(baseSeg)
p2_y = seg_world_y((baseSeg + 1) MOD seg_count)
playerY = p1_y + (p2_y - p1_y) * basePct
maxy = SCREEN_HEIGHT
r_x = 0
r_dx = - (seg_curve(baseSeg) * basePct)
' Lokale Speicher für die projizierten Punkte
Local p1_sx, p1_sy, p1_sw
Local p2_sx, p2_sy, p2_sw
For n = 0 To DRAW_DISTANCE - 1
if n=Draw_DISTANCE - 1 then Box 0,0,SCREEN_WIDTH,p1_sy+1,,rgb(Cyan),rgb(Cyan)
s_idx = (baseSeg + n) MOD seg_count
looped = (s_idx < baseSeg)
' --- PROJEKTION PUNKT 1 (p1) ---
' Daten übergeben
prj_wy = seg_world_y(s_idx)
prj_wz = seg_world_z(s_idx)
prj_px = playerX
prj_py = playerY
prj_camz = position
prj_looped = looped
prj_xoff = r_x
Project ' Berechnen
' Ergebnisse sichern
p1_sx = prj_sx : p1_sy = prj_sy : p1_sw = prj_sw
' --- PROJEKTION PUNKT 2 (p2) ---
' Daten übergeben (Nächstes Segment)
prj_wy = seg_world_y((s_idx + 1) MOD seg_count)
prj_wz = seg_world_z((s_idx + 1) MOD seg_count)
prj_xoff = r_x + r_dx
Project ' Berechnen
' Ergebnisse sichern
p2_sx = prj_sx : p2_sy = prj_sy : p2_sw = prj_sw
' Kurven-Akkumulation
r_x = r_x + r_dx
r_dx = r_dx + seg_curve(s_idx)
' Clipping prüfen
If p2_sy >= p1_sy Or p2_sy >= maxy Then
Continue For
EndIf
' Zeichnen aufrufen (Variablenübergabe via Globals oder kurze Liste)
Draw_Segment_Trapezoid p1_sx, p1_sy, p1_sw, p2_sx, p2_sy, p2_sw, seg_color(s_idx)
maxy = p1_sy
Next n
End Sub
Sub Add_Road enter_seg, hold_seg, leave_seg, curve As Float, hillY As Float
Local startY, endY, total, n
Local Float c_val, y_val
startY = 0
If seg_count > 0 Then
startY = seg_world_y(seg_count - 1)
EndIf
' hill-Y wird hier als direkte Neigung pro Segment interpretiert,
' das verhindert mathematische Rundungsfehler bei schnellen Wechseln
total = enter_seg + hold_seg + leave_seg
endY = startY + (hillY * total)
' curve
' 1. Ease In
For n = 0 To enter_seg - 1
c_val = EaseInOut(0, curve, n / enter_seg)
y_val = EaseInOut(startY, endY, n / total)
Add_Segment c_val, y_val
Next n
' 2. Hold
For n = 0 To hold_seg - 1
c_val = curve
y_val = EaseInOut(startY, endY, (enter_seg + n) / total)
Add_Segment c_val, y_val
Next n
' 3. Ease Out
For n = 0 To leave_seg - 1
c_val = EaseInOut(curve, 0, n / leave_seg)
y_val = EaseInOut(startY, endY, (enter_seg + hold_seg + n) / total)
Add_Segment c_val, y_val
Next n
End Sub
Sub Draw_Segment_Trapezoid x1, y1, w1, x2, y2, w2, colorType
Local c_road, c_grass,n
If colorType = 0 Then
c_road = RGB(0, 0, 255)
c_grass = RGB(0, 170, 0)
Else
c_road = RGB(0, 85,255)
c_grass = RGB(0, 255, 0)
EndIf
if y2>SCREEN_HEIGHT then y2=SCREEN_HEIGHT
' Fill in X-coordinates (integer assignment)
xpoly%(0) = Int(x1 - w1)
xpoly%(1) = Int(x2 - w2)
xpoly%(2) = Int(x2 + w2)
xpoly%(3) = Int(x1 + w1)
For n = 0 To 3
if xpoly%(n)> SCREEN_WIDTH then xpoly%(n)= SCREEN_WIDTH
next
' Fill in Y-coordinates (integer assignment)
ypoly%(0) = Int(y1)
ypoly%(1) = Int(y2)
ypoly%(2) = Int(y2)
ypoly%(3) = Int(y1)
'Grass baseline
box 0, y1, SCREEN_WIDTH, y2-y1,, c_grass,c_grass
'Road segment
POLYGON 4, xpoly%(), ypoly%(), c_road, c_road
End Sub
' =========================================================================
' (Game Loop)
' =========================================================================
CLS 0
Dim k$
DO
inc position,speed
If position >= trackLength Then inc position, - trackLength
' Keypress?
k$ = INKEY$
If k$ = "a" Or k$ = "A" Then playerX = playerX - 0.05
If k$ = "d" Or k$ = "D" Then playerX = playerX + 0.05
If k$ = chr$(27) then end
'start Render-Engine
Render_Road
TEXT 10, 10, "SPEED: " + Str$(speed)
page copy 1,0
' PAUSE 30
LOOP
Cheers
Martin
Edited 2026-05-19 20:14 by Martin H.
'no comment |
Martin H.
Guru
Joined: 04/06/2022
Location: GermanyPosts: 1572 |
| Posted: 03:40pm 03 Jul 2026 |
Copy link to clipboard |
Print this post |
|
Background graphics for Outrun all 15 stages
Hello,
in case anyone’s interested: I’ve revamped the background graphics for all 15 levels of the game.
To do this, I ripped the graphics from the Sega Mega Drive/Genesis version. These are originally 640 pixels wide. To save on resources, I’ve compressed them horizontally (C64-style, It doesn’t look as bad as it sounds, and it’s just the background on the horizon, where you can’t make out much anyway  ) )
PNG for CMM2 Windows, BMP for Pico RGB 121
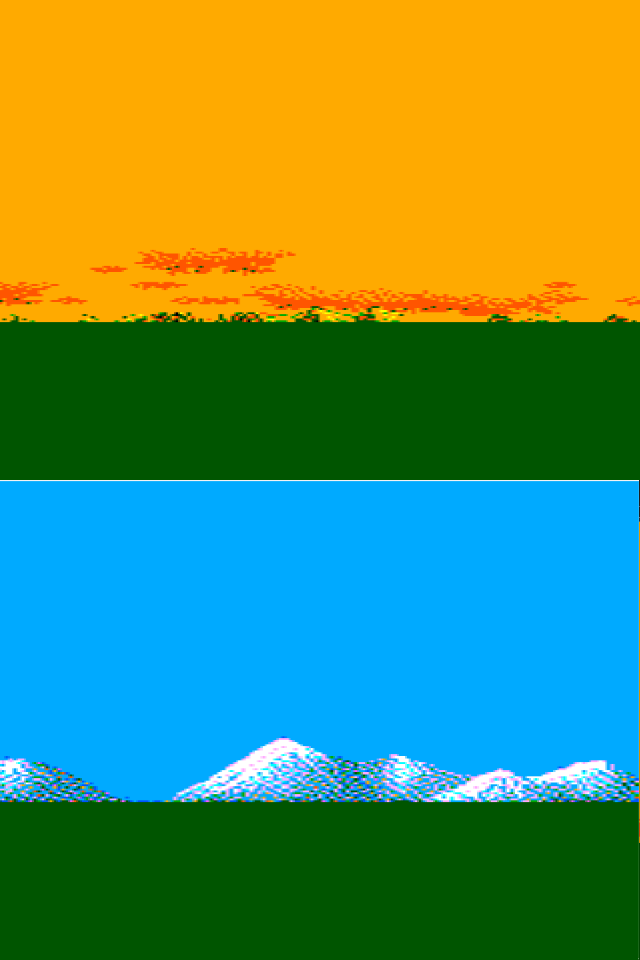
MegaBG.zip
I’ve also included a small sample programme so you can take a look at the backgrounds on Windows or on the Pico.
'Test / Demo for Outrun backgrounds
Pico=1
If Pico Then
MODE 2
FRAMEBUFFER create f
Else
MODE 7
End If
CLS
If Pico Then FRAMEBUFFER write f :Else :page write 1:EndIf
Dim FN$(14)LENGTH 2 =("01","2A","2B","3A","3B","3C","4A","4B","4C","4D","5A","5B","5C","5D","5E")
grass%=RGB(0,85,0)
Dim Integer s=1 'Scrollspeed 1-8
Do
For N=0 To 14
If Pico Then FRAMEBUFFER write f :Else :page write 1:EndIf
LN$=FN$(N)
If Pico Then
Load image LN$+".BMP"
'Save compressed image LN$+".BMP",0,0,312,80
Else
Load png LN$+".png"
End If
sky%=Pixel(0,0)
If Pico Then FRAMEBUFFER write n :Else :page write 0:EndIf
Box 0,0,320,80,,Sky%,sky%
Box 0,80,320,160,,grass%,grass%
If Pico Then FRAMEBUFFER write f :Else :page write 1:EndIf
For f=0 To 320
'Scroll Left
Blit 0,0,312,0,s,80:Blit s,0,0,0,312,80
If Pico Then
Blit Resize f,n,0,0,160,80,0,80,320,80
Else
page write 0
image resize 0,0,160,80,0,80,320,80,1
page write 1
End If
Pause 20
Next
For f=0 To 320
'Scroll Right
Blit 0,0,s,0,312,80:Blit 312,0,0,0,s,80
If Pico Then
Blit Resize f,n,0,0,160,80,0,80,320,80
Else
page write 0
image resize 0,0,160,80,0,80,320,80,1
page write 1
End If
Pause 20
Next
Next
Loop
Perhaps someone will find the time to give it a go.
Edited 2026-07-04 01:42 by Martin H.
'no comment |

 Notice. New forum software under development. It's going to miss a few functions and look a bit ugly for a while, but I'm working on it full time now as the old forum was too unstable. Couple days, all good. If you notice any issues, please contact me.