
|
|
Forum Index : Solar : Deciding if I should build this solar heater
| Author | Message | ||||
| rogerdw Guru Joined: 22/10/2019 Location: AustraliaPosts: 955 |
Well it's finally up there. Rescheduled for 8am this morning ... and took about 45mins from when the crane got here till it was in place. Went very smoothly and I'm hugely relieved to say everything lined up perfectly. Only thing that could have gone better was if the bottom edge was in place first. Because the top edge was lowered onto the supports first ... they sagged a few mm and so we had to put pressure on the lower ones for the bottom bar to sit inside the brackets. Very minor issue though. The rain was a bit of a worry for a while but it held off during the lift and bolting down time. Got my shoes and socks in front of the fire drying out now. The wet grass was the killer.  Oh, and he only charged me $300 cash. 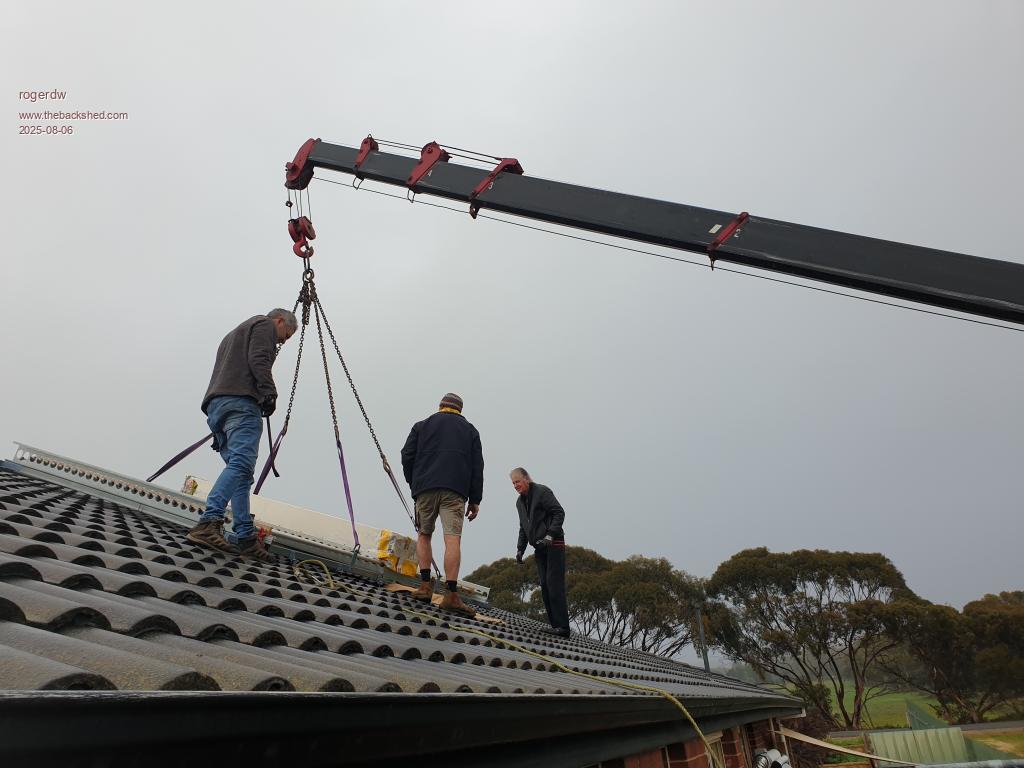 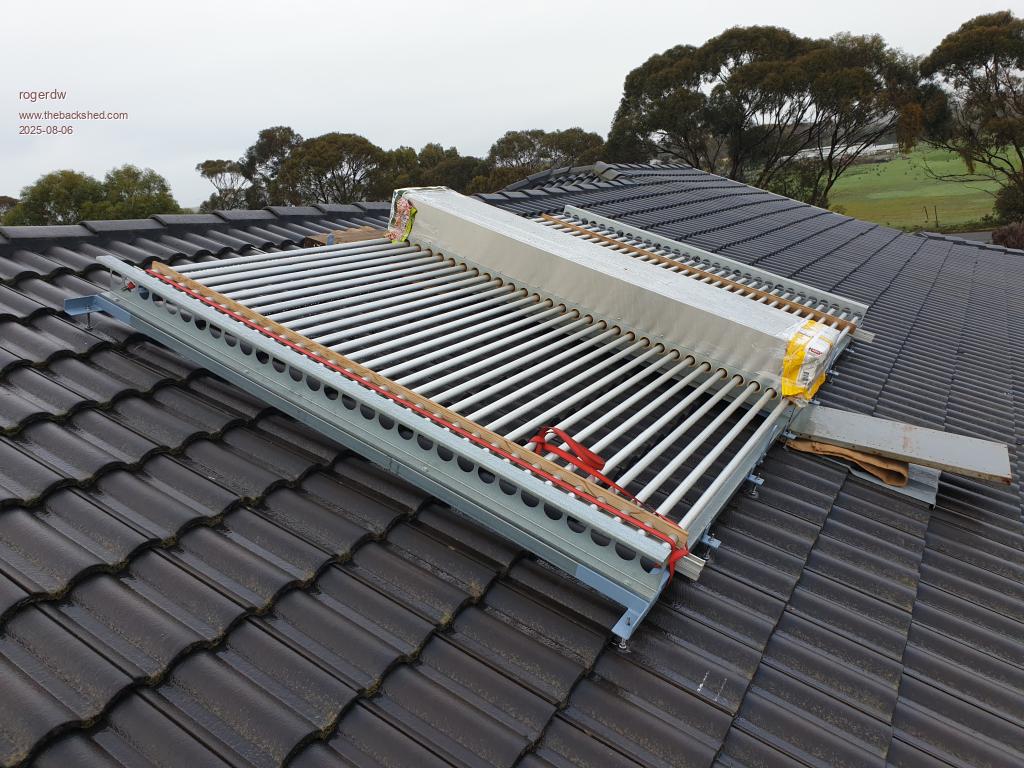 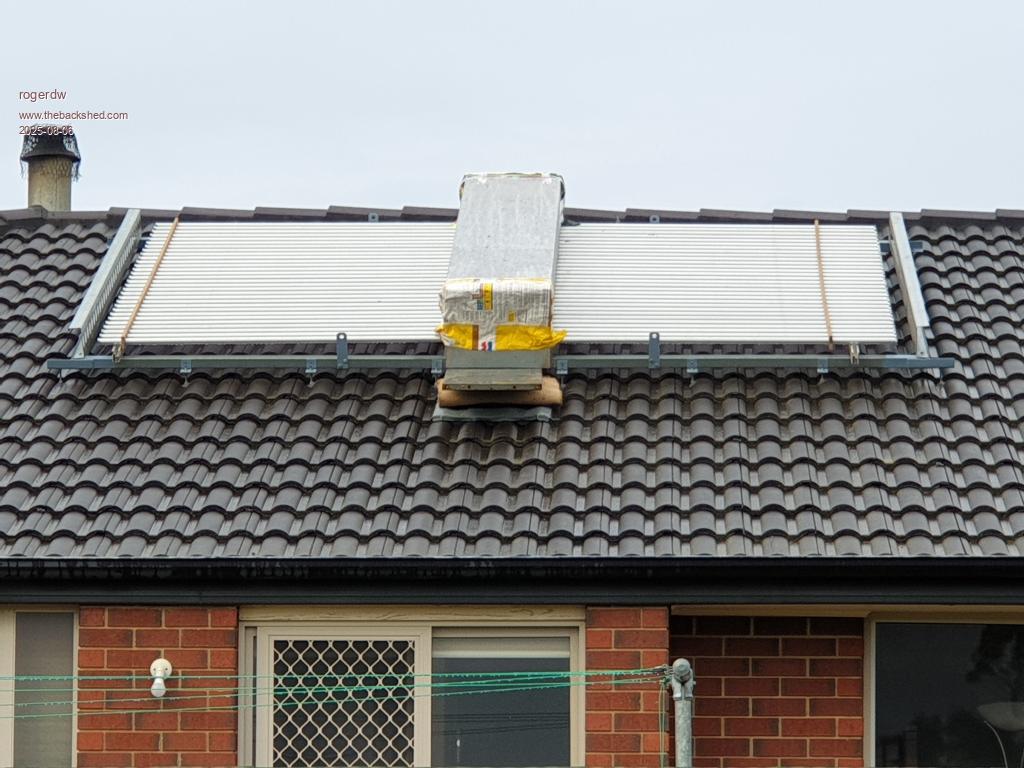 You can just see the top of the original prototype over on the rhs. 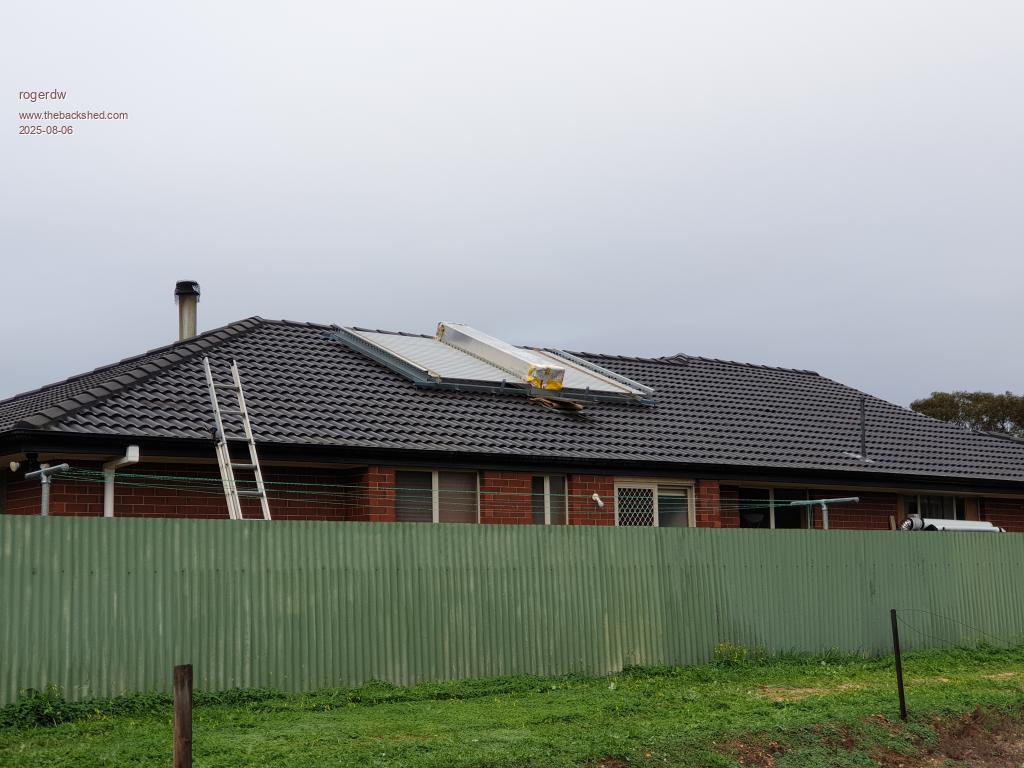 Edited 2025-08-06 10:26 by rogerdw Cheers, Roger |
||||
| Godoh Guru Joined: 26/09/2020 Location: AustraliaPosts: 667 |
Fantastic, looks great. We wait for the reports of how it works. Glad it all fitted perfectly Pete |
||||
| KeepIS Guru Joined: 13/10/2014 Location: AustraliaPosts: 2177 |
Awesome build from start to finish   NANO:Inverter V 8.2ks - Linux AvrDude GUI script V4.1 |
||||
| wiseguy Guru Joined: 21/06/2018 Location: AustraliaPosts: 1296 |
Well done Roger congratulations! You seem to be an all round artist, whether it's an inverter or solar heating structure, full marks for presentation & appearance. Now waiting impatiently for the clouds to vanish for the ultimate test results... If at first you dont succeed, I suggest you avoid sky diving.... Cheers Mike |
||||
| rogerdw Guru Joined: 22/10/2019 Location: AustraliaPosts: 955 |
Thanks for the interest and the encouragement Pete. And yeah, it was a big relief to see it all slot together. Nothing ever happens fast around here ... but I feel like I'm finally making progress. Now just need to hook up the fan and some ducts ... and transfer the control system over from the other one. Thanks for the kind words Mike (KeepIS) though don't look too closely at the welds. And thanks to the other Mike too (wiseguy). I think I've surprised myself with some of the building tasks and I'm sure I could make improvements in any future projects ... but still very happy with how it's turning out. Of course the sun is already out, it only had to rain while we were out there ... though what's the saying ... if that's the worst thing that happens today ... I'm a blessed man.Cheers, Roger |
||||
Bryan1 Guru Joined: 22/02/2006 Location: AustraliaPosts: 2100 |
Roger great to see it went into place nice and easy and when your ready to install the glass tubes hopefully I won't be busy again and I would love to come and give you a hand  As 2 people would make it much much easier to get them up on the roof as doing it by yourself one slip and ............ ouch |
||||
| rogerdw Guru Joined: 22/10/2019 Location: AustraliaPosts: 955 |
Thanks Bryan, and yeah a real pity he changed the time on us ... I was looking forward to catching up again. Hopefully your appointment went well. I hope to fit the tubes on Saturday as the sooner I can fit them, the less rain can get into the insulation and cause issues perhaps. If you were available sometime during the day would be very helpful ... but no real drama. It's something my lad could help with and get him off his computer for a few hours. Each box of 10 is 20kg if I recall correctly ... 120kg total of glass. They are well packed, so just need to slide the boxes up on the roof and open them up there. I pulled a clanger in that I hadn't actually checked to see if I had enough fittings ... the cups that locate and protect the ends of the tubes ... and the rubber seals that go at the other end. I started this so long ago, I forgot that was something I needed to do. After I went through the other boxes I found I was still a few short ... even if I pinched the ones off the old heater ... so I ordered more from aliexpress. I hope they'll be here tomorrow or Friday. If not, I can fit the remaining ones when they do arrive. Cheers, Roger |
||||
| Bryan1 Guru Joined: 22/02/2006 Location: AustraliaPosts: 2100 |
Well lets make it a date Roger Saturday morning and I'll get all the stuff done from what the doctor said this morning over the next 2 days. |
||||
| rogerdw Guru Joined: 22/10/2019 Location: AustraliaPosts: 955 |
That sounds great thanks Bryan, it'll make a lot of difference with some help. I ususally do the parkrun on Sat mornings but get home around 9am ... so no screaming rush time wise. Thanks again. Cheers, Roger |
||||
| mab1 Senior Member Joined: 10/02/2015 Location: United KingdomPosts: 282 |
That really is impressive! Must've been a huge relief when it went in ok.Looking forward to seeing it with the tubes! Marcus |
||||
| rogerdw Guru Joined: 22/10/2019 Location: AustraliaPosts: 955 |
Thanks Marcus and yes it was. I must have measured it all twenty times and gone backwards and forwards between the roof and the shed double checking everything. I happened to have a 5mtr length of timber ... so I took that up on the roof and hammered it onto the lugs sticking out. Then I drilled through the dents and transferred it directly onto the heater frame ... and drilled that. I continued going back and forth doing all the spacings and then the diagonals ... so in the end it just had to be right. Well that's how I convinced myself so I could sleep at night. If only I had been awake to what Pete suggested ... and not had to feed the corner bolts through holes. If I had fitted right angle "cups" to the corner mounts like I did for the sides, it would have been far simpler. I'll know for next time. With a bit of luck the tubes will go up on the weekend with some help from Bryan ... and fitting the right angle elbows on the input and output should be relatively straightforward too. Those have already been on and off at least twenty times too. The young lad who folded them up and welded the corners suggested rivnuts for holding them on. I'd never had any experience with them ... but they turned out to be an excellent choice. Cost me a hundred bucks for a kit ... and I'm sure I'll use them in the future too. I used 8mm rivnuts and there are 10 x 8mm bolts for each one holding them on. A bit overdone, but they'll never fall off. The tubes need plastic cups to hold them and protect the fragile nipple and I knew I had 36 of them and was sure there were more somewhere ... but I panicked a couple weeks ago when I couldn't find them ... and ordered a heap more off aliexpress. Then this morning I found them ... though there was one short ... and then the postie turned up with another 40 ... so will have lots of spares. No excuses now. Cheers, Roger |
||||
| Bryan1 Guru Joined: 22/02/2006 Location: AustraliaPosts: 2100 |
Hi Roger take your time on your parkrun mate as I do have to head out to eastside bearings and get a new oxy hose as the oxy connection finally perished on my old hose and a new hose won't go astray. I will also bring up that toroid from that old variac and get your opinion on it to see if it worth a rewind for my madboard inverter project. Cheers Bryan |
||||
| rogerdw Guru Joined: 22/10/2019 Location: AustraliaPosts: 955 |
Sounds good thanks Bryan, I'll see you when you get here. Cheers, Roger |
||||
| rogerdw Guru Joined: 22/10/2019 Location: AustraliaPosts: 955 |
Well Bryan and I had a very productive day today. We lifted all 60 tubes on the roof at 22kg per box of 10 ... then fitted them in place. Not sure how I would have done it without help ... would have been a very long winded job. I also managed to fit the outlet manifold in place and feed through the Dektite fitting on the tiles before the rain set in and had to get off the roof. Next job is to fit the inlet manifold, then connect up the fan and ducting ... and cut holes in the ceilings for the inlet and outlet vents. Getting closer now. Thanks very much for your help today Bryan, I couldn't have done it without you. 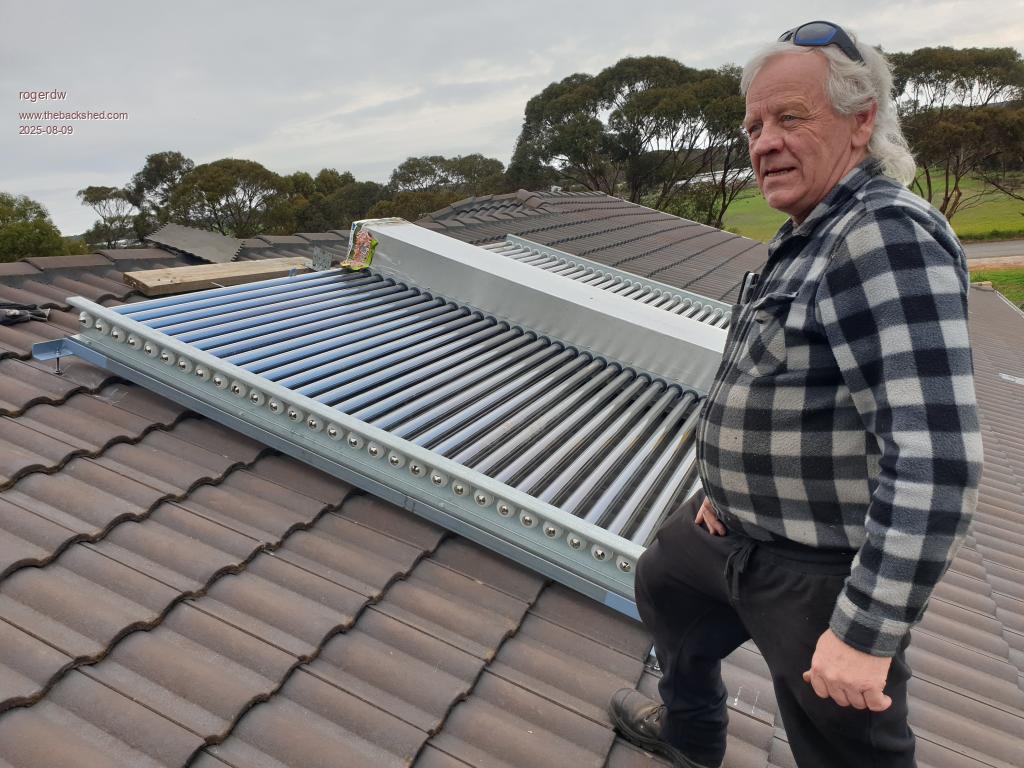 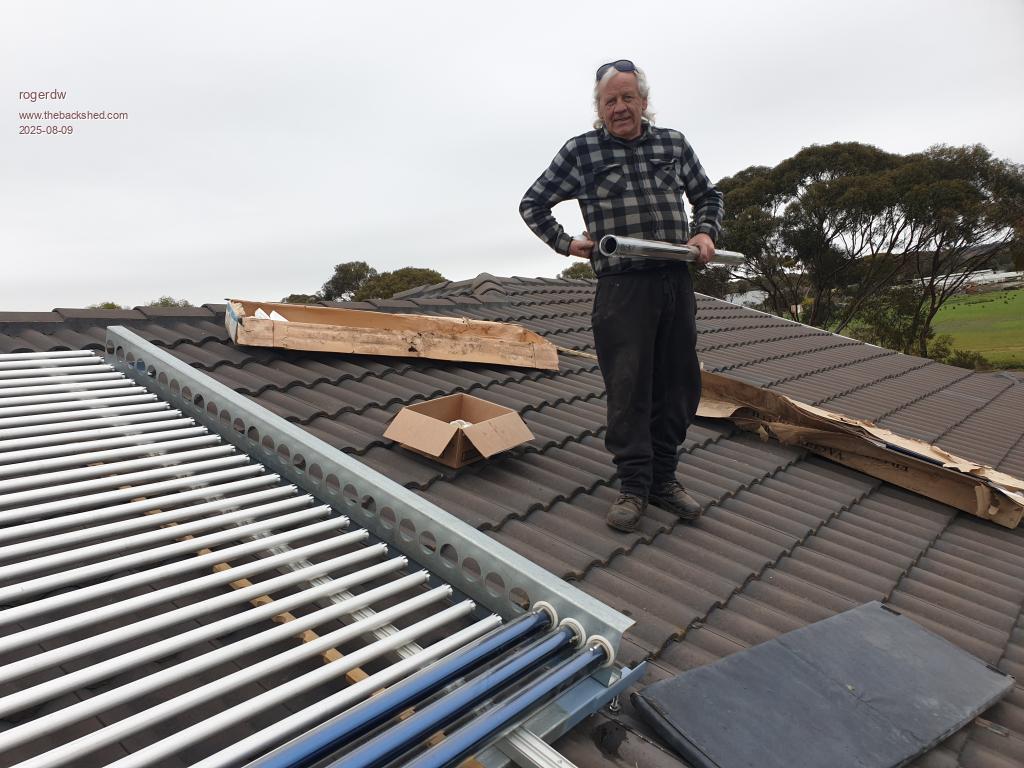 Edited 2025-08-09 22:41 by rogerdw Cheers, Roger |
||||
| rogerdw Guru Joined: 22/10/2019 Location: AustraliaPosts: 955 |
Okay, well had a very busy day yesterday. Cut holes in the ceiling for the inlet duct and outlet duct ... fitted the inlet manifold on the heater and fed through the Dektite fitting. Connected a 3mtr length of R2.0 duct from heater outlet to ceiling vent. Cut up some timber and rubber mounts to support the fan assembly and fitted them in the ceiling ... and hung the fan centrally, ready for the short lengths of ducting to complete the connection. There's an exhaust fan in the laundry, so I plugged the fan into its socket temporarily so I could power it easily ... until I work out some controls. First thing this morning I closed those gaps in the inlet track and finally switched it on about midday. The day here was probably 95% cloud, but the stored up heat came out at around 70C ... and took perhaps half an hour to get down to around 35C ... where it stayed until I turned it off around 4pm. 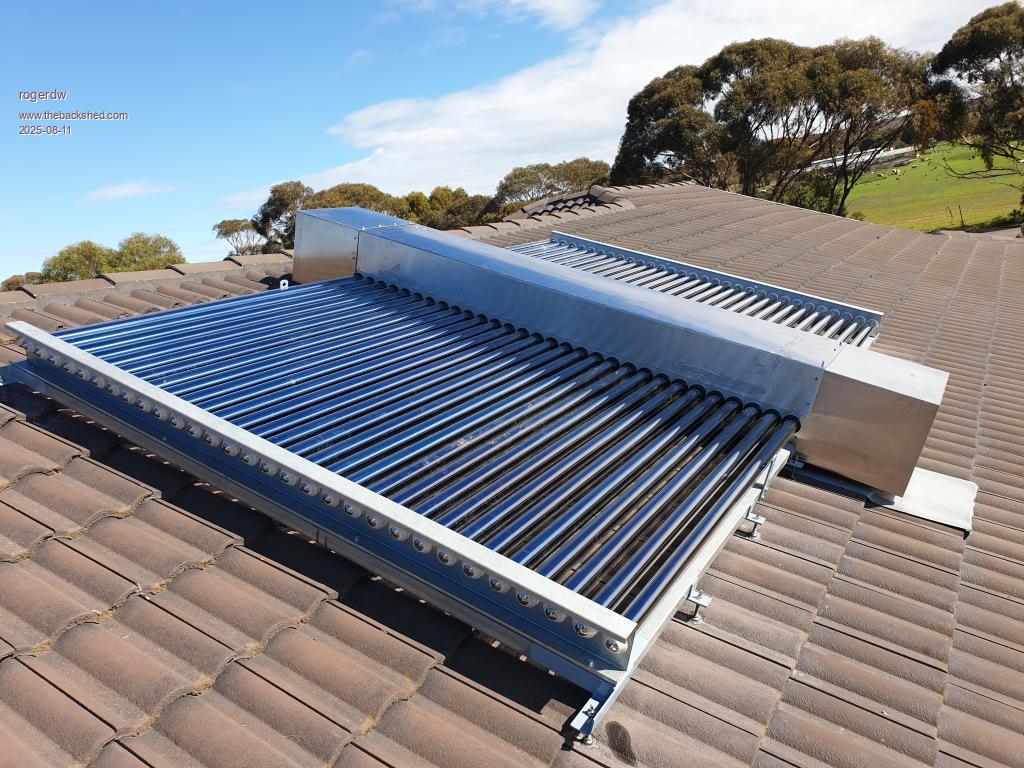  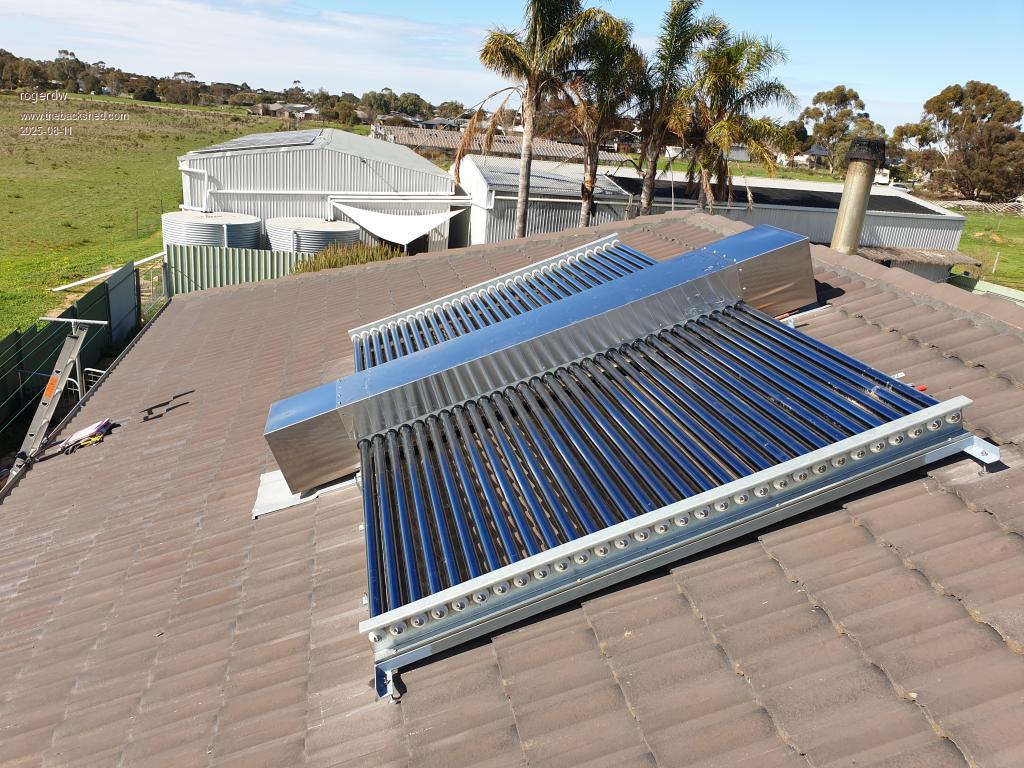 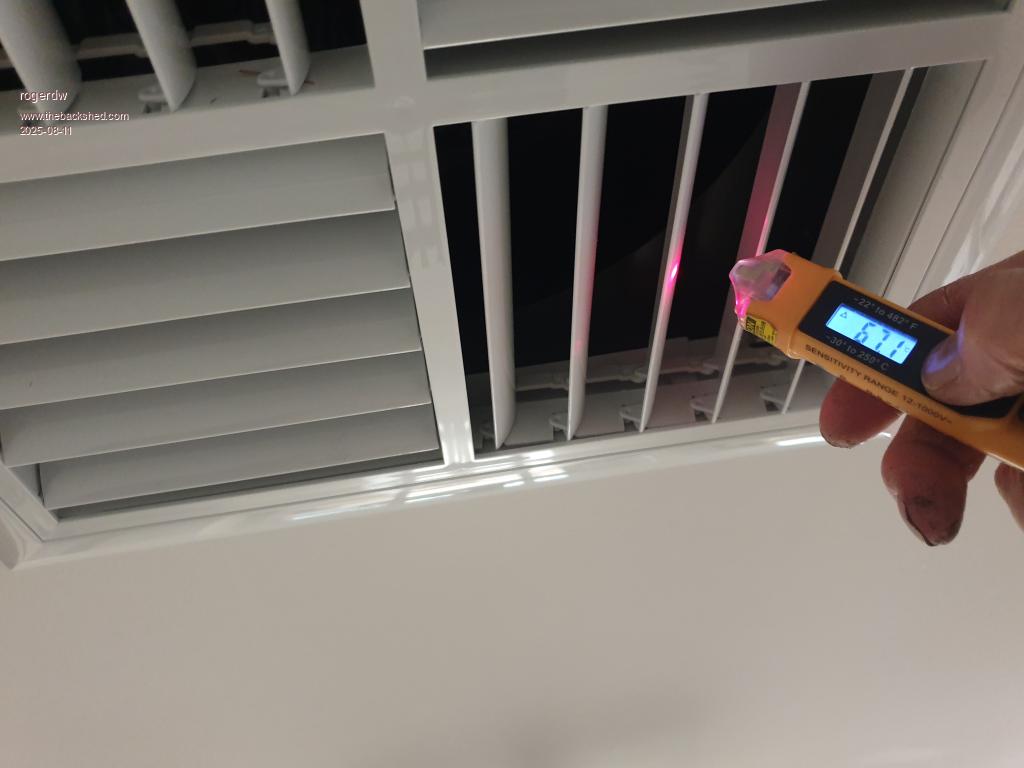  Cheers, Roger |
||||
| rogerdw Guru Joined: 22/10/2019 Location: AustraliaPosts: 955 |
A couple photos from in the ceiling ... The inlet end drawing air from the laundry which is probably the warmest room in the house ... with a fan pushing the air through the heater. The fan has straps bolted to a couple strips of rubber to avoid transmitting vibration through the timberwork. The intake noise level is reasonably high due to the closeness of the fan to the ceiling inlet duct ... but with the door shut it quietens it down a fair bit. I have a door grill to fit yet, to allow circulation when the door is shut ... and that will fit right at the bottom to draw colder air from floor level. More duct tape than anything else ... but it won't leak in a hurry. 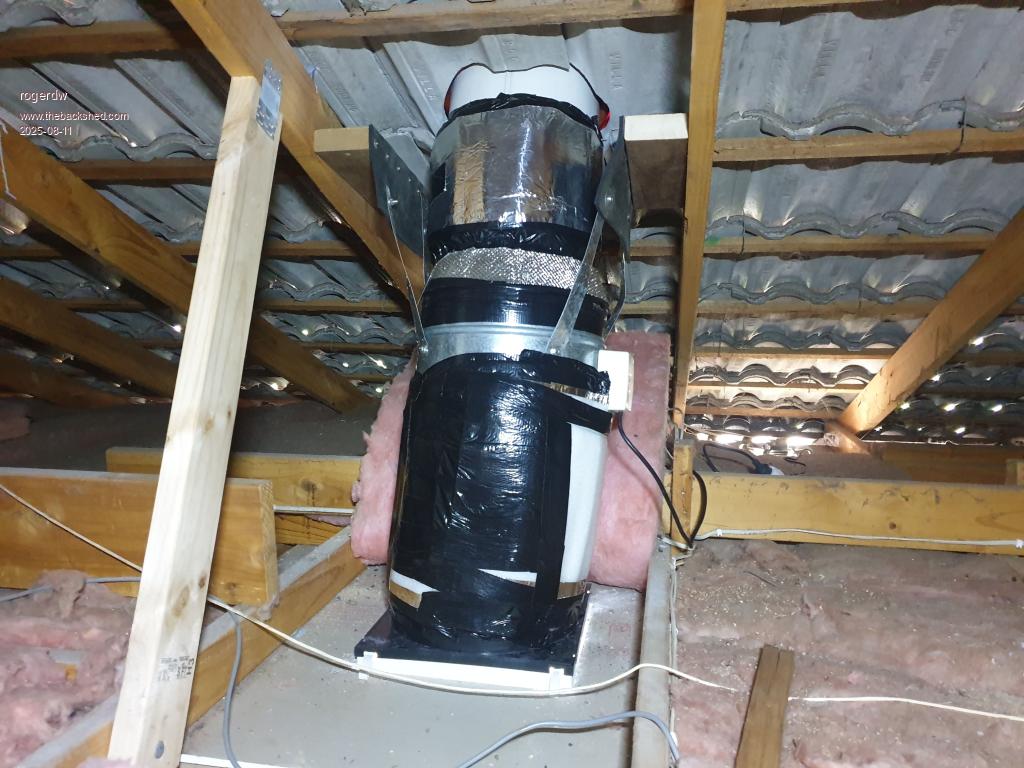 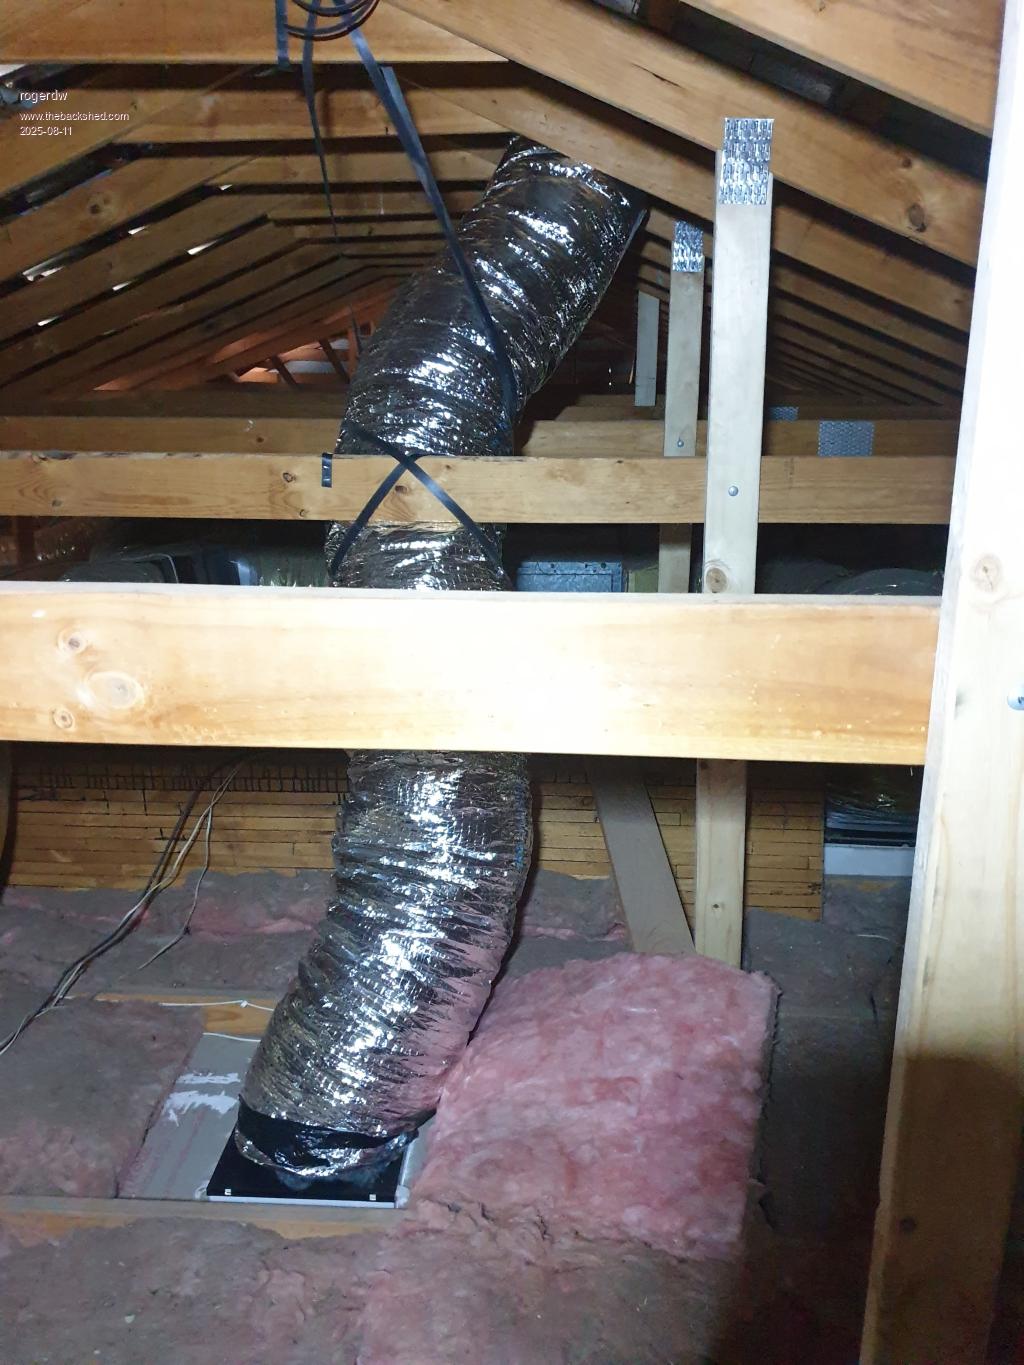 Cheers, Roger |
||||
| Godoh Guru Joined: 26/09/2020 Location: AustraliaPosts: 667 |
I would be thinking you are feeling pretty chuffed about getting near the end of such a big project. That is one impressive project, well done on getting it all happening. Is there a way of reversing it so it can suck hot air out of the house in summer? thanks for sharing the project Roger Pete |
||||
| KeepIS Guru Joined: 13/10/2014 Location: AustraliaPosts: 2177 |
Seriously bloody impressive NANO:Inverter V 8.2ks - Linux AvrDude GUI script V4.1 |
||||
Revlac Guru Joined: 31/12/2016 Location: AustraliaPosts: 1277 |
Looks good, You should have no problems with wind or light rain (when sunny) affecting heat output. I still collect the heat from under the tin roof on the house using a pipe and fan, the roof has a lot of surface area, the air gets very hot, but output is drastically cut down with wind and rain.  Cheers Aaron Off The Grid |
||||
| rogerdw Guru Joined: 22/10/2019 Location: AustraliaPosts: 955 |
Thanks Pete, yeah it's a bit of a relief to finally see it up there and sort of working. I'm just running it manually at present and need to set up a differential controller. I'm still not sure what I was thinking back then to tackle such a huge project. Was far more complex and convoluted than I was expecting. Just glad I stuck it out and didn't give up. I'll be a little gun shy in future I think. Would be nice if it would work in reverse, but somehow I don't think so. Though having said that ... I have noticed with the other one ... that the temperature inside the tubes can get very cold overnight ... far colder than the normal outside temperature.I've seen -18 and even lower if I recall correctly ... which is far lower than we ever get around here, so I don't know why that shows ... doesn't make sense. I have turned it on to see what temperature comes out at that time ... but it wasn't super cold or anything. But I plan on investigating further with this new one ... especially if I see those low temps again. Having said all that ... today was cloudy again until lunch time ... so only mid 30's output ... but after that it ran at around 45 until about 3.30 and then slowly petered out. The temp in the kitchen area reached 24C while I was having lunch ... but didn't get any higher after that. Of course I had the underfloor heating running then as well ... so all combined the house was nice and cozy. Cheers, Roger |
||||
| The Back Shed's forum code is written, and hosted, in Australia. | © JAQ Software 2026 |
